
You know what's awesome? You own a Nexus. That means, with Google's blessing, you have easier access and control over your device than other manufacturers allow. You can really dig in and do some interesting things if you root.
The big 'R' word can be intimidating for the new and uninitiated, but it doesn't have to be. The process is a breeze once you get down to it, and it's not as daunting as it seems.
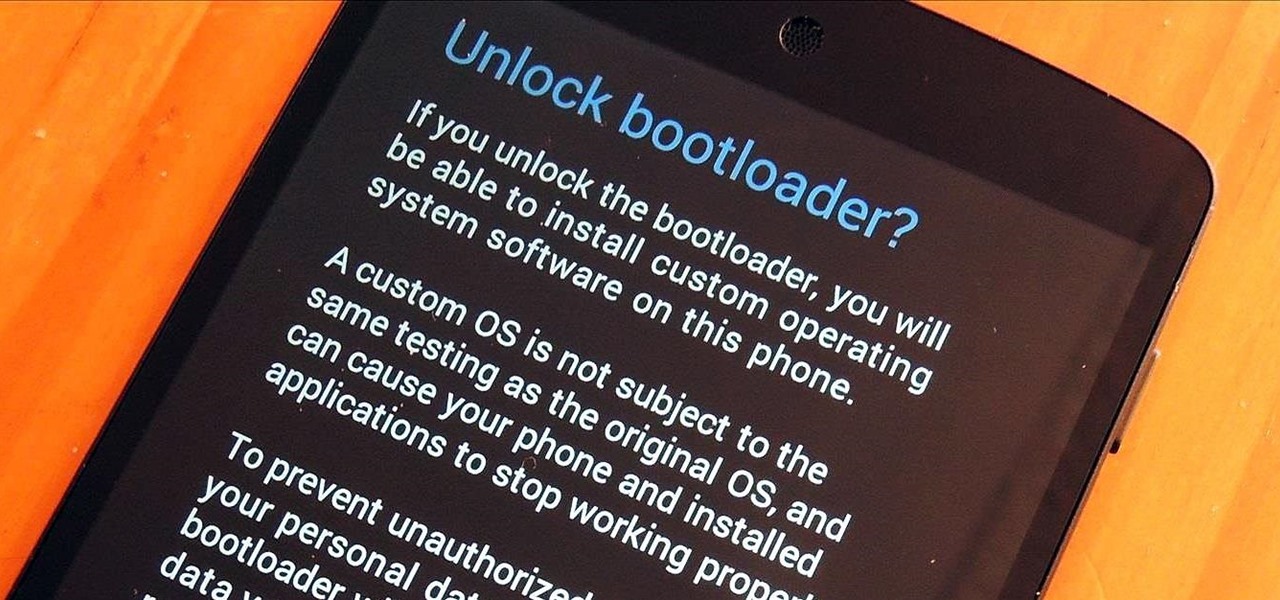
In order to root and get into that fun stuff, though, the first thing you're going to have to do is unlock your bootloader. An unlocked bootloader is the first step on a journey toward full Android customization, and lucky for us, on a Nexus it's cake-slice simple. Time to get your feet wet.
Step 1: Back Up What You Care About
Before you touch your bootloader, know this—unlocking the bootloader will erase all user data on your phone. It's the equivalent of a factory reset. It's a security thing. Since an unlocked bootloader allows for deep-level modification, erasing all of your data is the most surefire way to keep your stuff safe if someone gets their hands on your device and tries to break in.
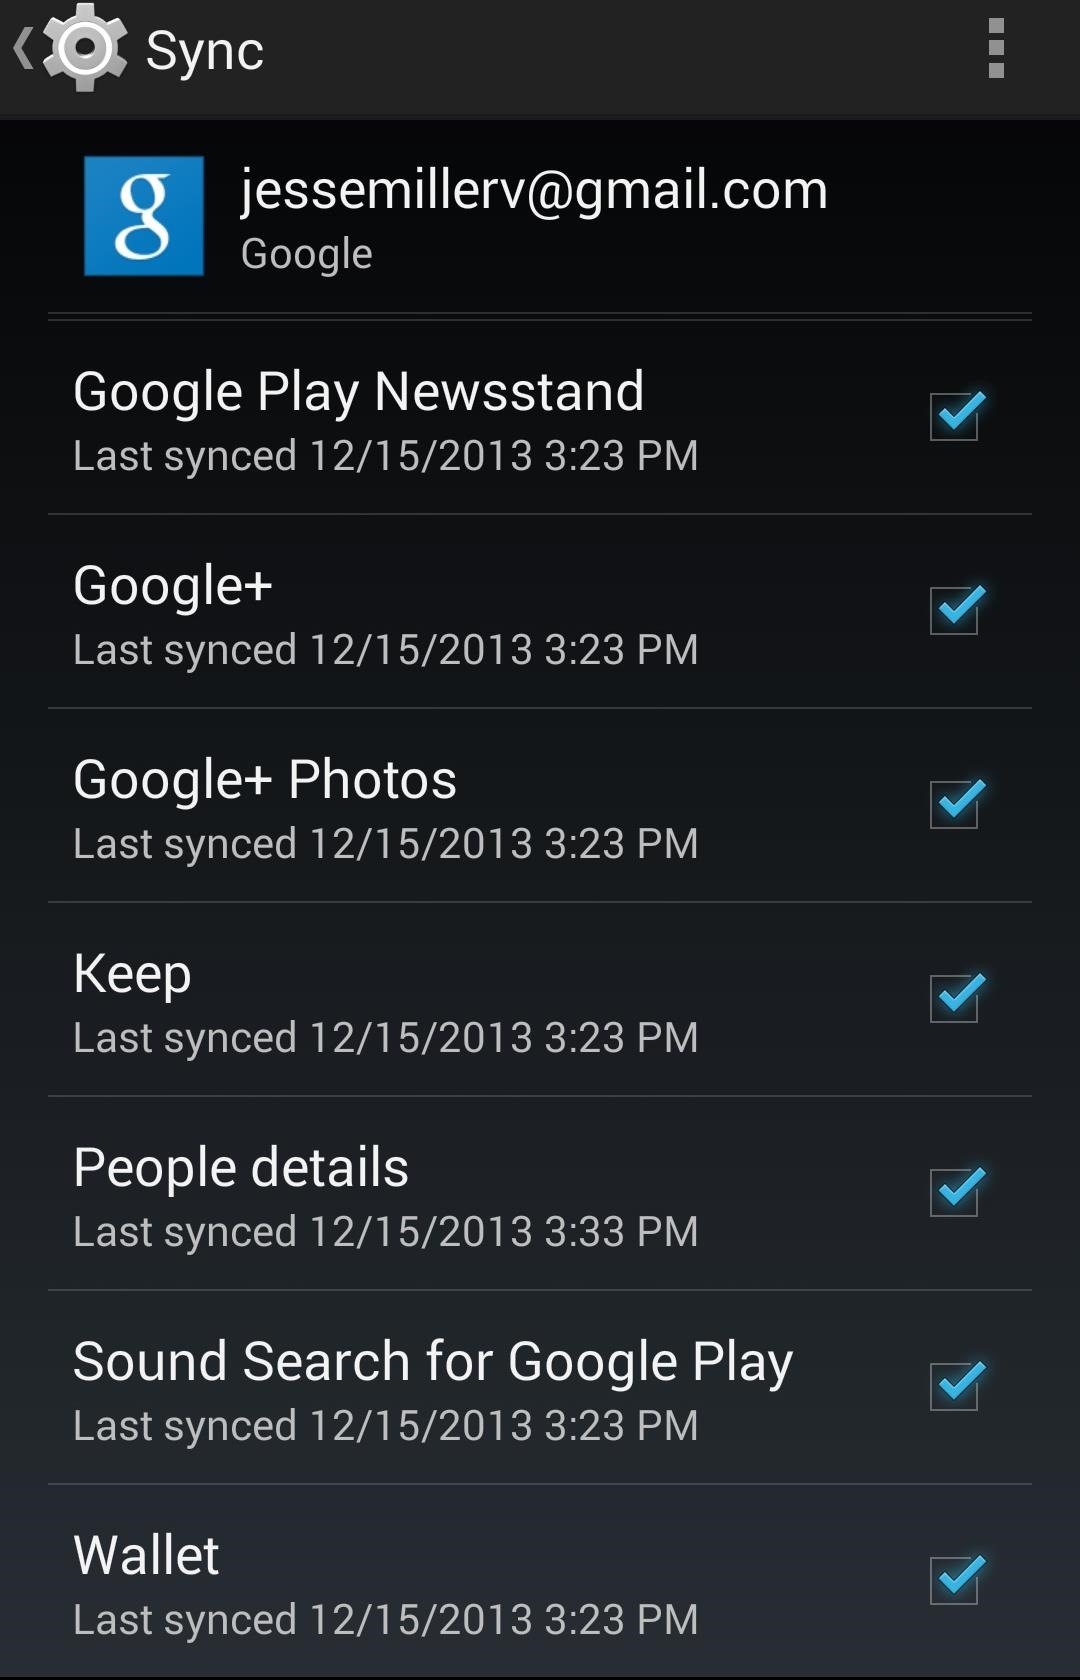
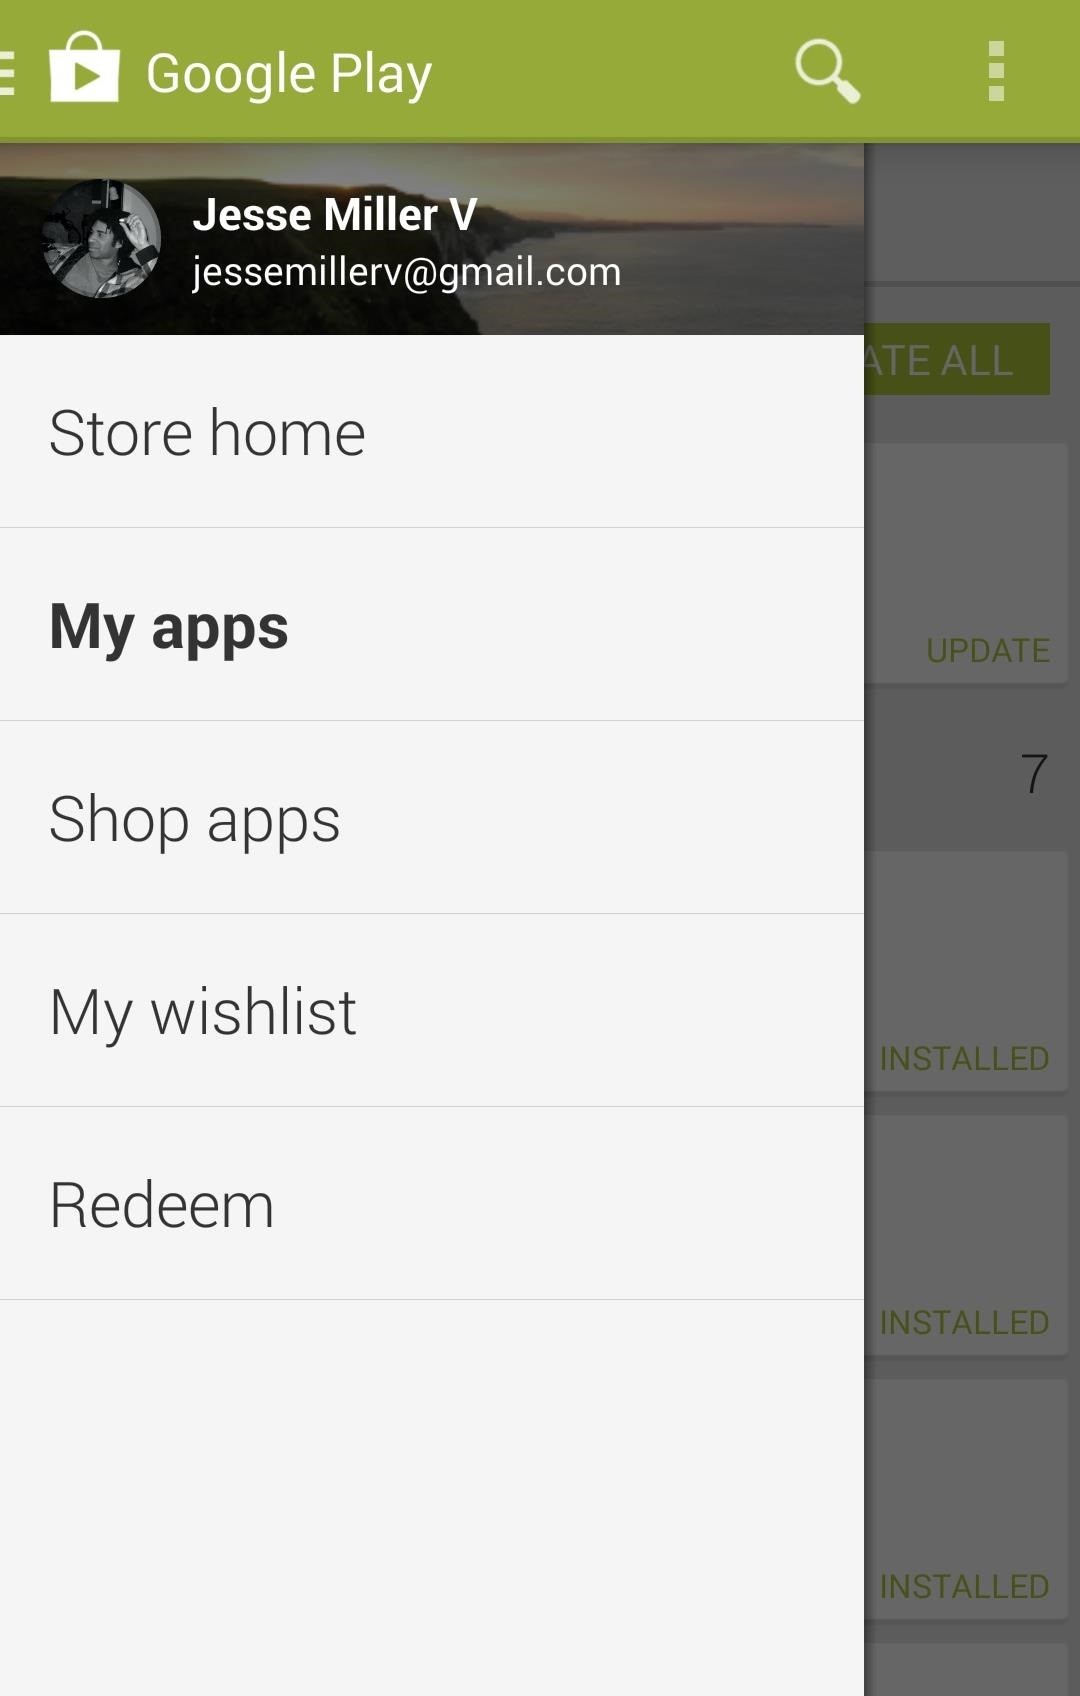
So before you proceed further, make sure you've backed up anything you need to keep around. If you're synched with your Google account, stuff like your contacts and emails will be safe. Any apps you've downloaded or purchased will be available to re-download in the Play Store afterward, as well. You can check what's synced under the Accounts section of the Settings menu.
If you want to keep your photos, make sure you bring them over to your computer or upload them to Google Photos before continuing.
There are also apps in the Google Play Store that will back up your SMS messages if you want to hold onto them. I recommend SMS Backup & Restore.
Step 2: Download Android SDK to Your Windows PC
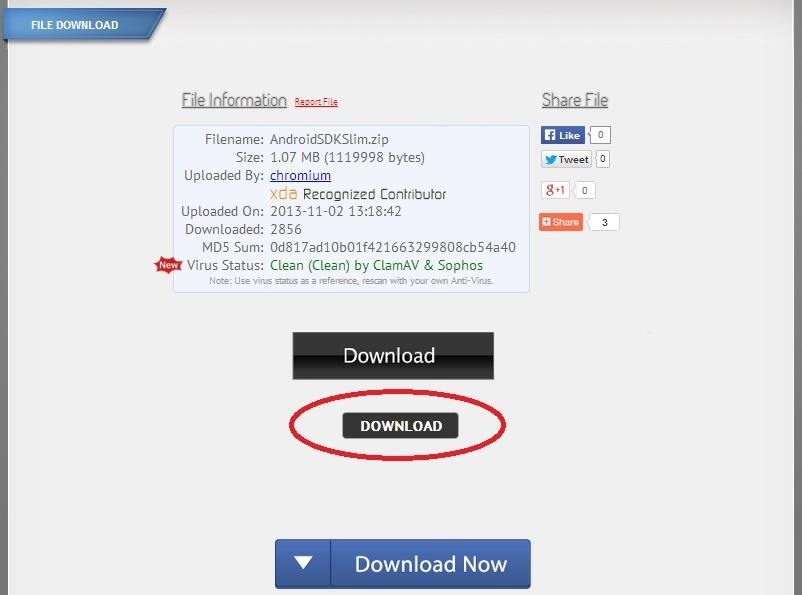
The Android SDK allows your PC to communicate with your device. Downloading this toolkit allows you to issue the command to unlock the bootloader. You can download the full version from Google, or try out the slimmed down version of the essential tools, which I'll be using.
If you chose the slimmed down version, too, be weary of ads on the download page. There might be multiple "download" icons on the page. Just make sure AndroidSDKSlim.zip is the only file being downloaded.
You're going to need a program to unzip the file after it's been downloaded. There are a ton of programs that do this. WinZip works. So does WinRAR.
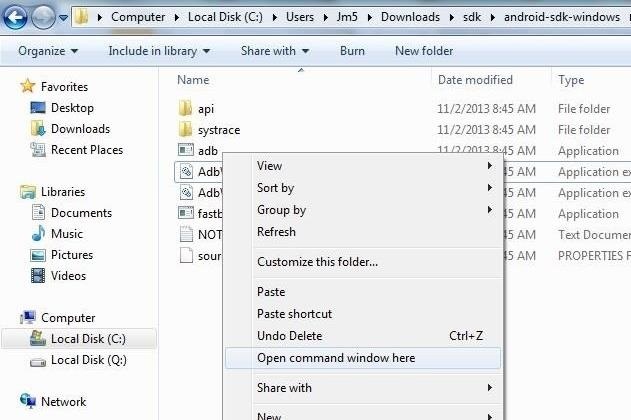
Step 3: Unzip Zip File
Now that you've downloaded AndroidSDKSLIM.zip, navigate your PC to the file. For convenience, it's best to create a new folder to unzip the file to. For example, for me, the file lives in my Download folder, and I created a new folder there called SDK to find it more easily, then dragged the .zip file and unzipped from within that folder.

Step 4: Confirm with Command Prompt
Unzipping the file will reveal a folder that reads android-sdk-windows. Enter the folder, then platform tools. You'll now see files and folders that read:
- api
- systrace
- adb
- AdbWinApi.dll
- AdbWinUsbApi.dill
- fastboot
- NOTICE
- source.properties
While on this screen, hold down the Shift key and right-click, then click on "Open command window here."
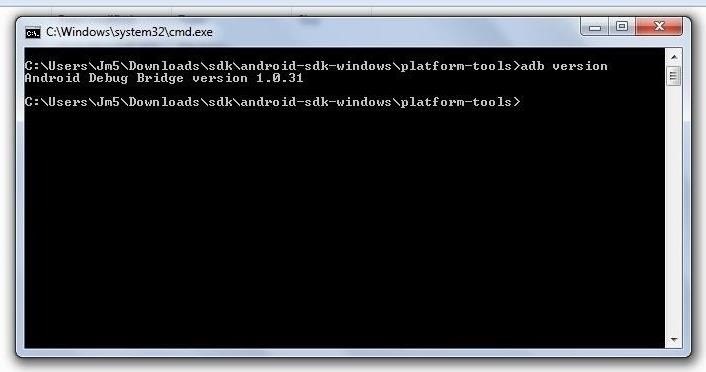
In the terminal that opens, enter the following command:
- adb version
You should now a response that says Android Debug Bridge version 1.0.31.
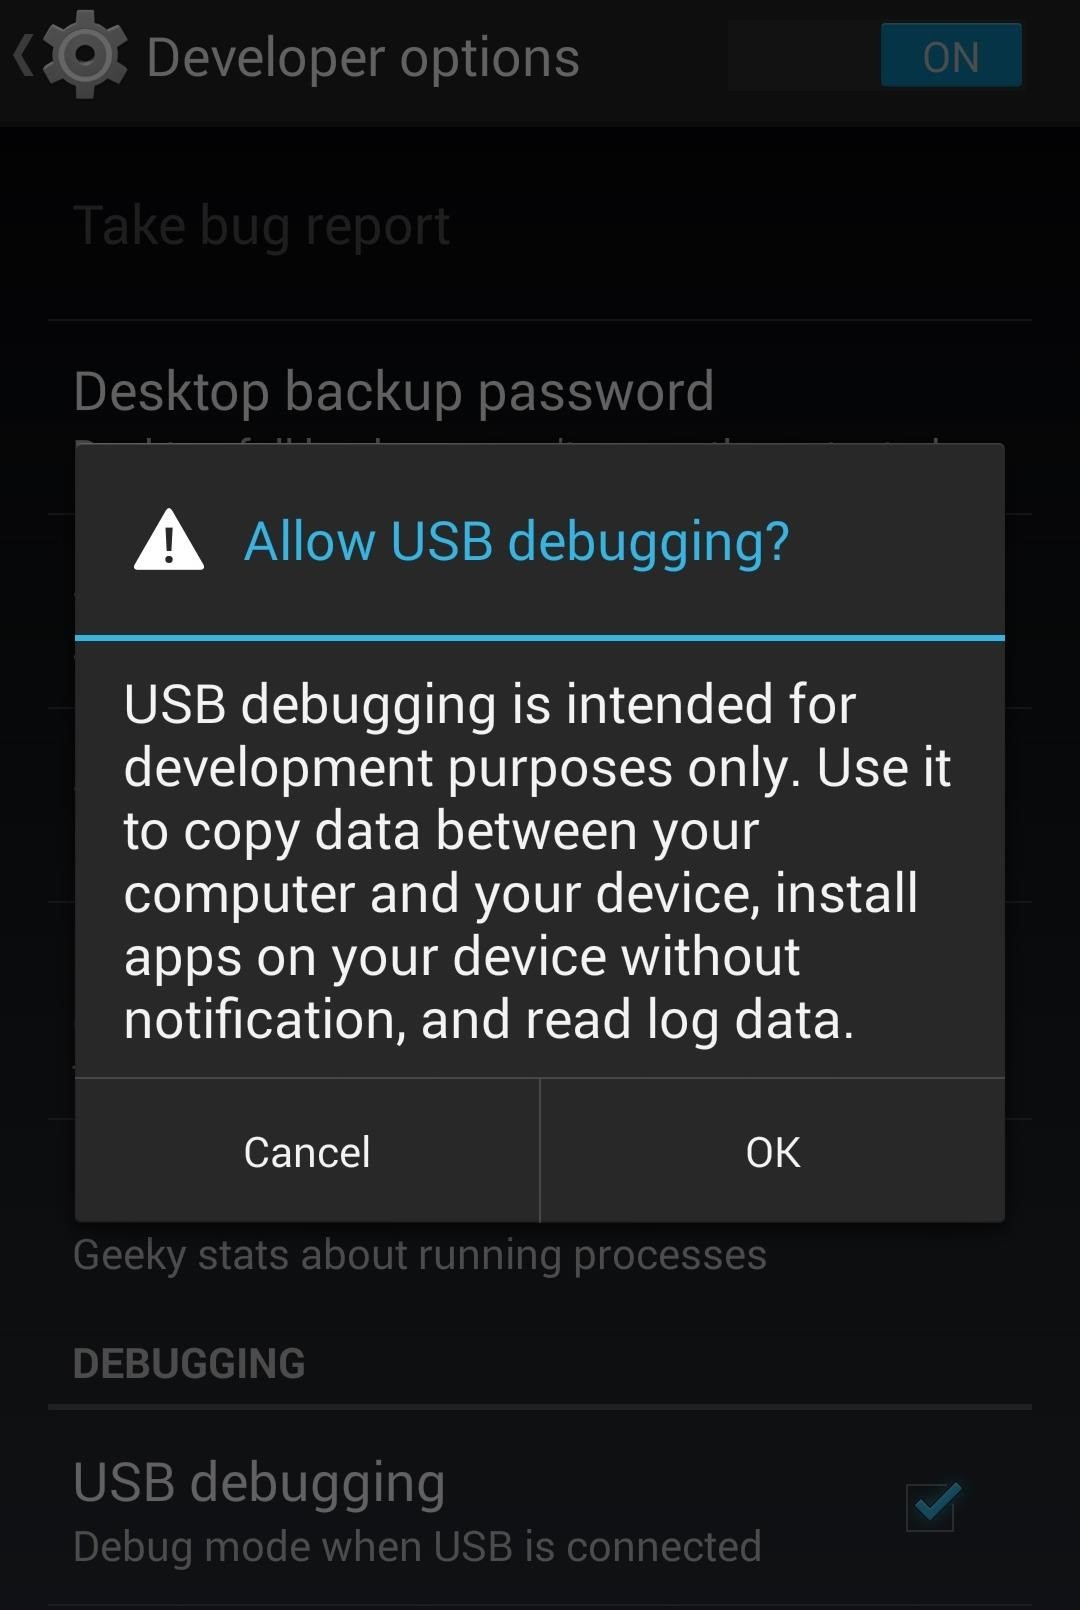
Step 5: Enable USB Debugging on Your Nexus
To allow our Nexus to communicate with our PC, we'll need to enabled USB Debugging on the phone, which can be found in Settings -> Developer Options.
If you don't see any Developer Options on your Nexus, go to Settings -> About phone. Scroll to the bottom to Build number and tap it several times. Keep tapping until a popup message reads, "You are now a developer!"

Step 6: Boot Phone into Fastboot Mode
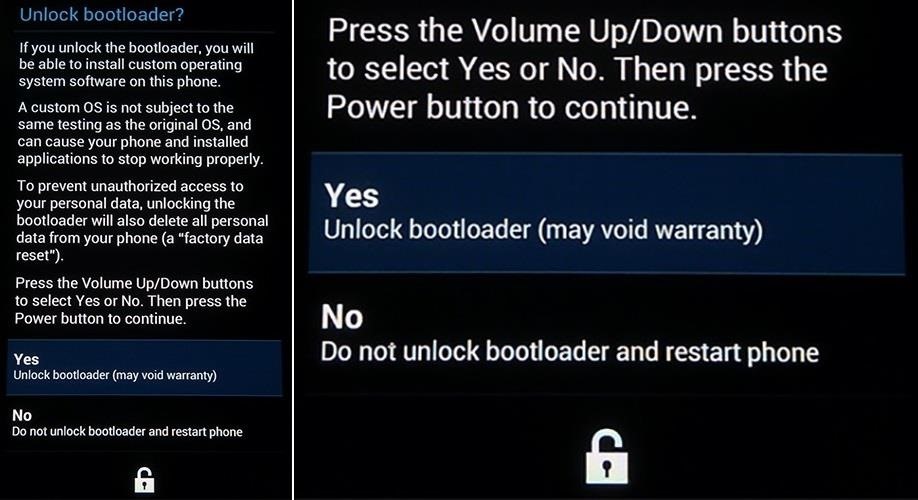
Power down your device, then hold in the Volume down key and press the Power button simultaneously. You'll see an image of the beloved Android mascot opened up on his back. You should also see a string of text.
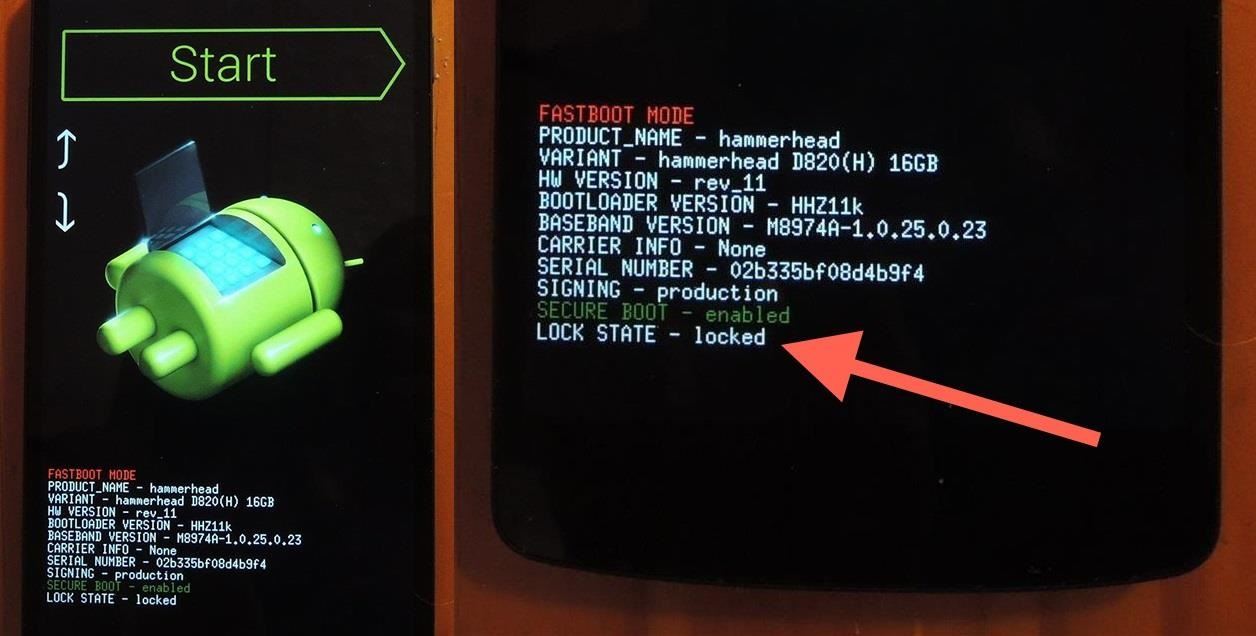
Do you see at the bottom it reads, Lock State - locked? That's what we're going to be changing.
Step 7: Unlock Bootloader
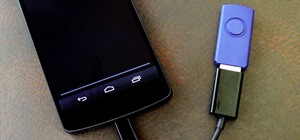
Connect your Nexus to your PC with your Micro-USB cord. On your PC, navigate back to platform tools in the android-sdk-windows folder. Remember, you should be looking at this:
- api
- systrace
- adb
- AdbWinApi.dll
- AdbWinUsbApi.dill
- fastboot
- NOTICE
- source.properties
Open up the terminal again, if you've closed it, by holding in the Shift key, right-clicking, and selecting, "Open command window here." In the terminal, type in the following command:
- fastboot devices
The command should list connected devices. If you see your phone's serial number, you're ready to rock. If you don't, check out the troubleshooting section at the end of this guide.

Now to unlock the bootloader, type in the following command (and remember—unlocking your bootloader will wipe all the data on your phone!).
- fastboot oem unlock
You'll get a message on your phone asking to confirm the command. Use the Volume keys to highlight Yes, then use the Power button to confirm.
Step 8: Reboot with Fastboot Command
After you've confirmed the fastboot command on your phone, enter this command into the terminal:
- fastboot reboot
This will reboot your phone and finish the process. You'll get a progress bar on your Nexus while this is happening. It could take about ten minutes. Don't touch or unplug your phone from your PC while this is happening!
You're done! Your bootloader is now unlocked and you're free to install a custom recovery and root to your heart's content. Remember, an unlocked bootloader is the first step on an exciting mod journey. Things will only get more interesting from here.
Troubleshooting
If your device is not listed when you run the fastboot devices command you most likely do not have the proper drivers installed on your PC. You can remedy the situation by installing the Universal Naked Driver (the latest version is Universal_Naked_Driver_0.73.zip).
If you need any further help, comment below and I'll try and help you out.
Just updated your iPhone? You'll find new emoji, enhanced security, podcast transcripts, Apple Cash virtual numbers, and other useful features. There are even new additions hidden within Safari. Find out what's new and changed on your iPhone with the iOS 17.4 update.


24 Comments
I know that this process voids the warranty on other phones but does it also void the warranty on a T-Mobile nexus 5?
It does. But they would only know that if you brought in your phone for repairs and they saw it was rooted. You can easily unroot your Nexus, re-lock your boot loader, and return to stock and it would be like you never did anything at all.
THANX... ur tutorial reallyy helped me a lot in rooting my nexus...AND IM EXTREMELY GRATEFUL... :)
Thanks!
I'm pretty certain that upgrading your Android version won't re-lock your bootloader. I upgraded my N4 from 4.3 to 4.4 and the bootloader remained unlocked.
At the same time, unlocking your bootloader will definitely not downgrade your Android version. So there's no way you're going to go from 4.4.2 back to 4.4.
The only thing that can downgrade your Android version is you if you do a lot of work to flash an older version!
I downloaded the drivers and allowed usb debugging and it doesn't tell me the phones serial number when i type in fastboot devices. WHY!? (It makes a like 2 low tone sound when i plug it in if that helps)
having the same problem, followed each step and tried it a few times and serial numbers still not coming up
I have the same issue :-(
For me it was a driver issue try following the troubleshooting section. If that doesn't work then follow the guide http://www.teamandroid.com/2012/07/30/how-to-set-up-adb-fastboot-with-android-sdk/ worked for me :-)
I did the following steps but my device is not starting, it always try to boot but it only show startup window (after google image). if i press volume and power button it is not going bootloader mode.
Please help
great thanks :)
hey guys the laptop im using cant seem to "see" my device
and ive tried using the naked driver but wont wok
Try changing the USB connection mode from "PTP" to "MTP" or "Camera".
Hi, I could not get phone's (nexus 5) serial number after typing fastboot devices. I tried universal naked driver 0.73 zip but it could not be installed in my pc (windows 7). When i tried to install androidwinusb , another window opens saying " the INF file you selected does not supprt this method of installation. I upgraded to lollipop but now want to downgrade to kitkat 4.4.4, for that i need to unlock. Please help me in this regard.
When I commanded fastboot devices my device didn't show up. I looked for the troubleshooting driver, installed it but my device is still not getting recognized. Please help. Is it because I have the lollipop version?
I am not able to view my phone when i command fastboot devices... Pls help...
I can see my serial number when i command fastboot devices, but after that when i command fastboot oem unlock, my phone doesn't receive any confirmation, how to fix that ?
It works!!! You rock man.
Awesome. Thanks so much :)
nexus 5 bootloader unlock after restart bootloader locked
plzzz help me
Awesome.work perfectly. Thanks so much :)
how can i install the driver when i had the files of the driver ?
The SDK slim version cannot be downloaded, Google Chrome blocks it as malware
Major problem with unlocking. I cannot prevent my Nexus5 usb from returning to 'charge' mode whenever I attempt to access it thus preventing the whole bag of tricks. How do I lock it in MTP mode?
Thanks
Share Your Thoughts