

Update: June 19, 2014
Android 4.4.4 has been released, fixing a small security bug in 4.4.3. The factory images have already been made available to all current-generation Nexus devices, and I've linked them out below. This does not affect the process depicted, you can still use these same steps to bring your device up to date with this latest release.
The security risk that this version patches apparently has nothing to do with the recent Towelroot exploit, as I've tested and this method still works to root Android 4.4.4.
June 26, 2014
With the release of the developer build of Android L today, you may be ready to jump right in to the latest and greatest that Google has to offer. Best of all, you can do it using the same toolkit as shown below, or with fastboot commands if you don't have access to a Windows PC.
Note that this build is only for the Nexus 5 and the 2013 Wi-Fi edition of the Nexus 7. All other Nexus devices can continue with Android 4.4.4 as shown below.
Additionally, installing Android L will not only erase your data, but it will remove root.
End Update
With the recent release of Android 4.4.3, all of you Nexus 5 owners running fully stock software will be getting a notification to apply the patch soon, but what about those of us with rooted phones?
The over-the-air update that comes directly from Google will not install on a rooted phone. The script that it uses to patch your OS to the newer version performs a check that will abort installation if any changes to the system partition are detected. And since the Superuser binaries are installed on the system partition, rooted phones cannot pass this checkpoint.
But there's no need to fret, we've got you covered here in a step-by-step guide that will let you install Android 4.4.3 KitKat on your rooted Nexus, and you don't even have to worry about losing any data. The steps will be essentially the same for all Nexus variants, including the Nexus 4, Nexus 7 (both the original and 2013 models), and Nexus 10—simply grab the appropriate image files in Step 3.
Prerequisites
- Rooted Nexus 5 with stock Android 4.4.2+ (or any other rooted Nexus device)
- Windows PC
- USB cable in good condition
Step 1: Prepare Your Phone
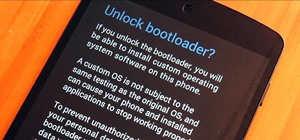
Since this method will utilize Android Debug Bridge, you'll need to enable USB Debugging on your device, which is in the Developer Options menu. If you don't see that menu in your Settings, let's unlock it now.
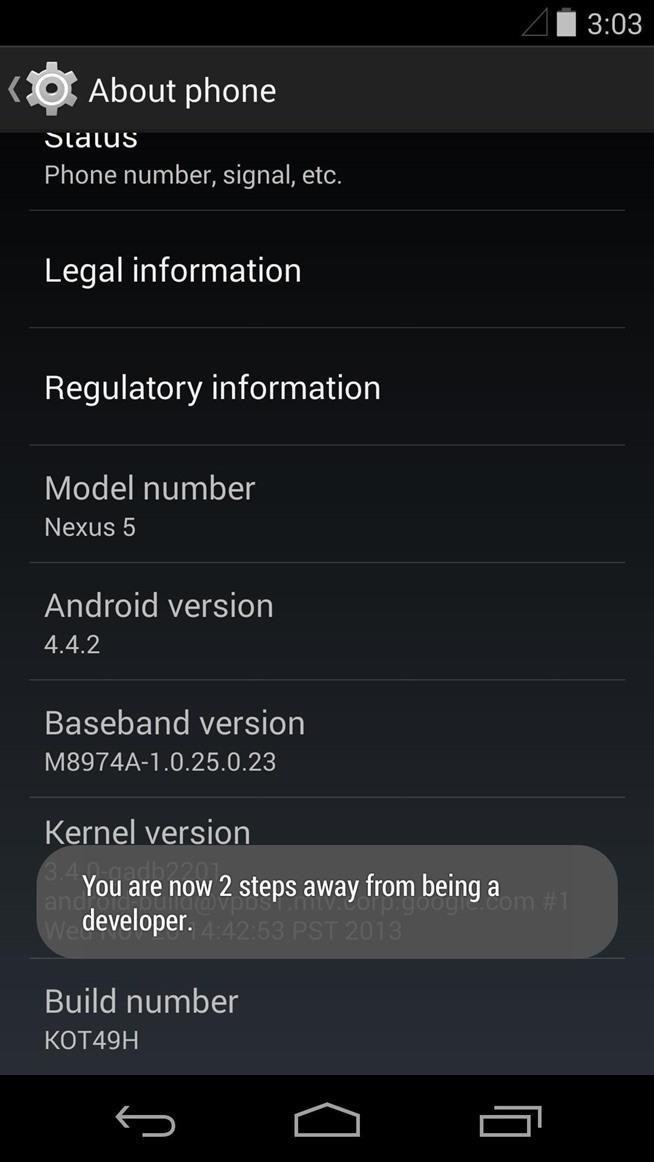
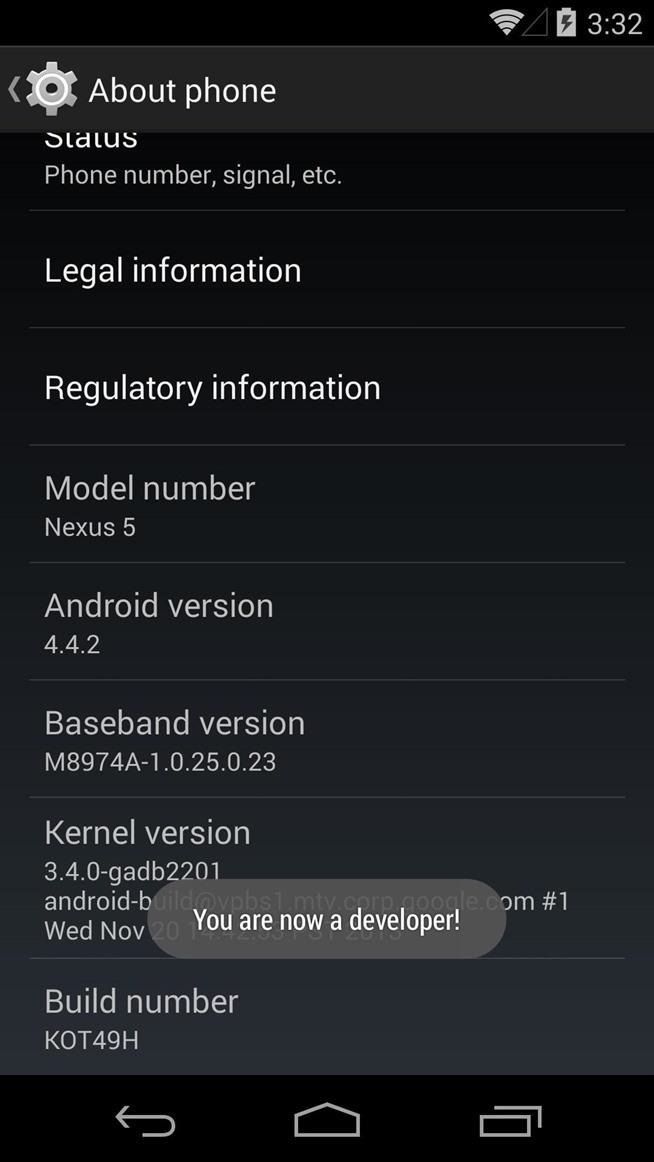
Head into Settings, then scroll all the way down to the bottom and hit About Phone. In here, scroll down to the bottom again and tap Build Number seven times in rapid succession.
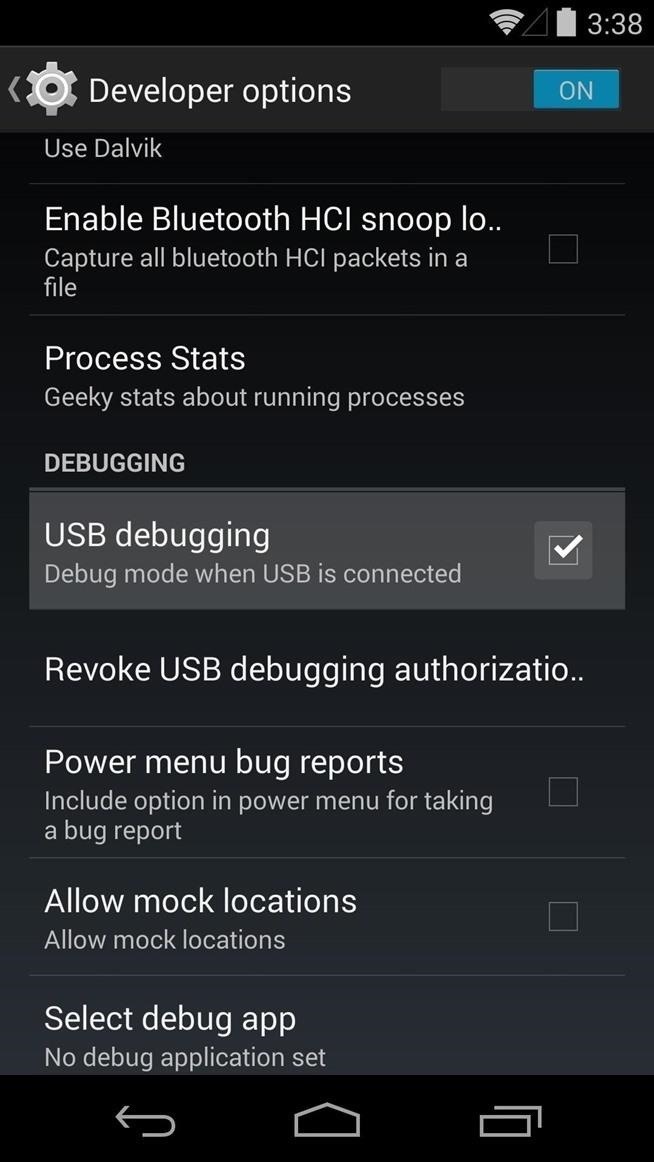
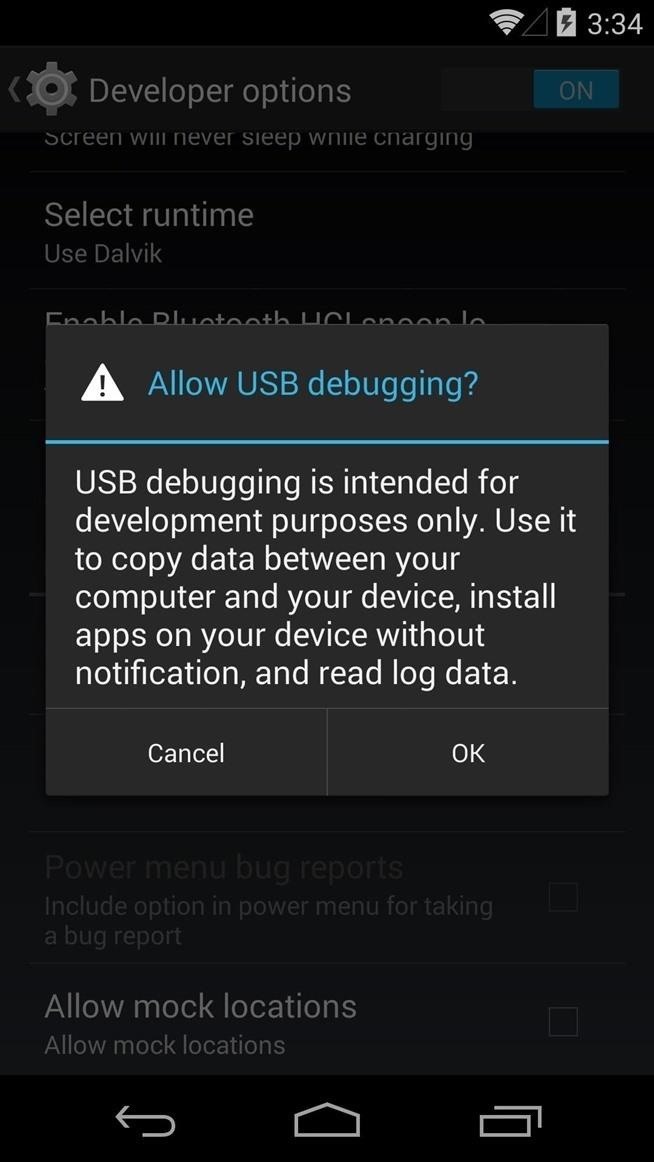
Next, back out one level and you'll see a new Settings menu titled Developer Options. Open this menu, then tick the box next to Enable USB Debugging and press OK on the subsequent popup.
Step 2: Connect Your Phone to Your Computer
This is a simple step, but it's an important one. You'll need to connect your phone to your PC to apply the update, but the USB cable you're using to do that is important. Make sure there is no visible damage to the cable and the connection it makes at both ends is firm.
Step 3: Download the Factory Images from Google
Google's been kind enough to make the factory image files for the Nexus line of devices available to the public. The files you can download from their official site are the exact firmware that came shipped with your device, so there's no difference between this and an OTA update.
From your Windows PC, click this link to start the download. Make sure to note the save location as you'll need to access this file later.
Download links for other Nexus devices:
Step 4: Install Nexus Root Toolkit
I've covered Wugfresh's Nexus Root Toolkit in the past, and it's a wonderful tool. To simplify things today, we'll be using it to install the update. To download NRT, just click this link from your Windows PC.
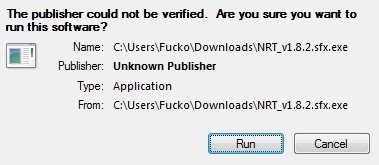
When the download has finished, double-click the file and hit Run.
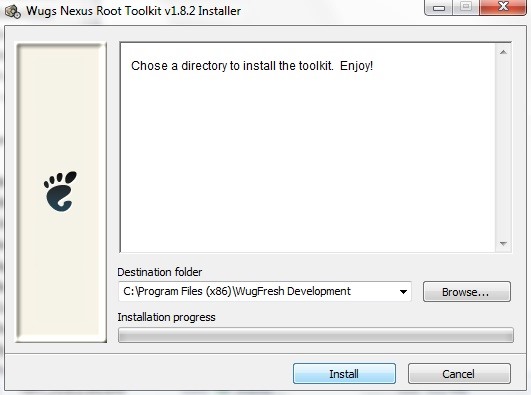
From the next window, click Install.
When the installer is finished, you'll be asked to enter your device name and Android build number. For Device Name, select Nexus 5, and in the Android Build Number field choose Build KOT49H (or Build KTU84M if you've already updated to 4.4.3 and are now updating to 4.4.4).
This will vary if you are using a different Nexus device.

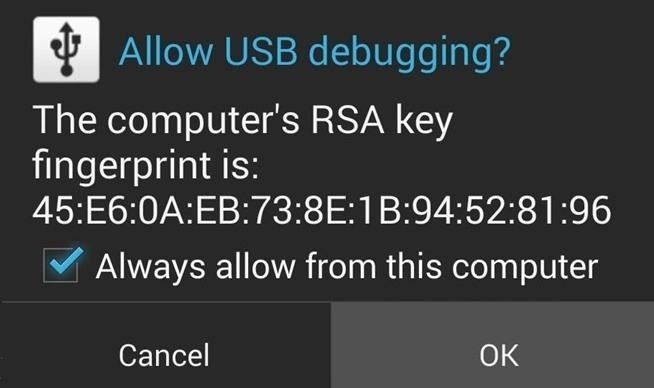
At this point, you'll see a dialog box instructing you to enable USB Debugging on your device. We've already covered that part in Step 1, but you'll also need to allow your computer to connect to your device at this point.
Unlock your device and you should see a dialog box asking you to Allow USB Debugging. Tick the box next to Always Allow From This Computer and tap OK.
Next, NRT will ask you to download a couple of files. Click OK on these two windows to allow it to download all of the necessary files.
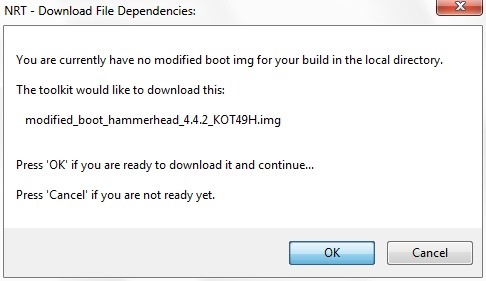
Again, your prompts will look slightly different if you're using a different Nexus device.
Step 5: Configure Nexus Root Toolkit
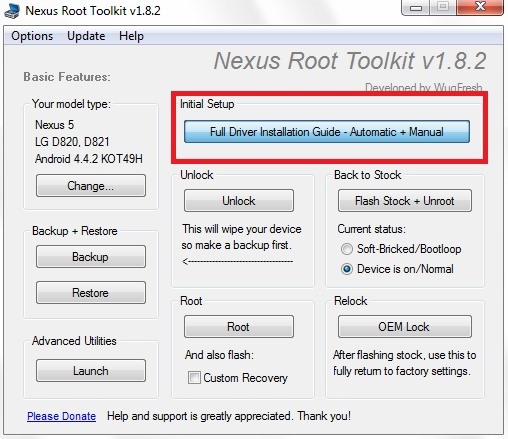
At this point, you should be looking at the main screen of the Nexus Root Toolkit. First, you'll need to install the ADB drivers if you haven't already done so. Right up top, tap the button that says Full Driver Installation Guide to get things started.
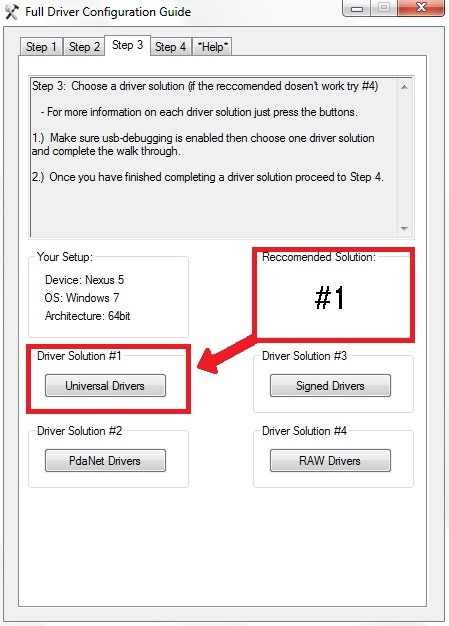
On the next screen, click the Step 3 tab and take note of the Recommended Driver Solution. Click the corresponding driver solution below it, then follow the prompts for driver installation.
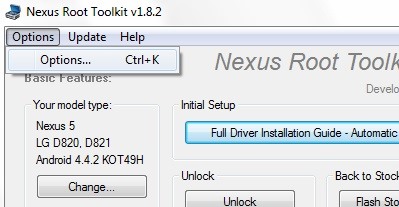
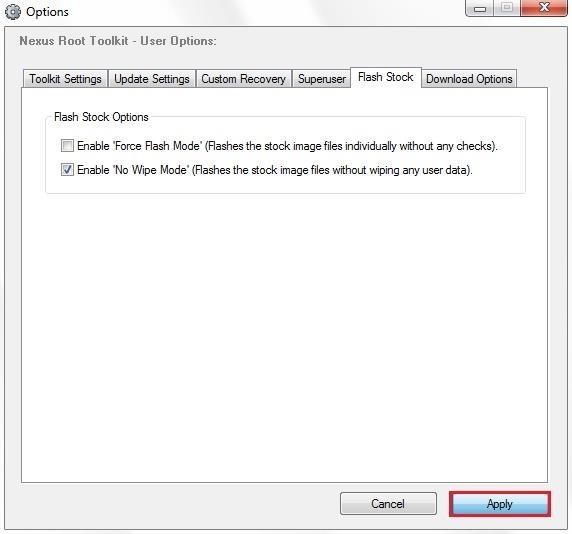
When finished, head back to the Nexus Root Toolkit's main page. From here, click the Options menu, then select Options.
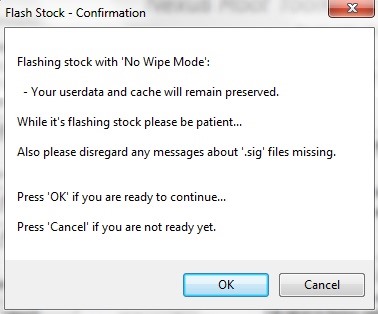
Head to the Flash Stock tab on this screen, then tick the box next to Enable No Wipe Mode.
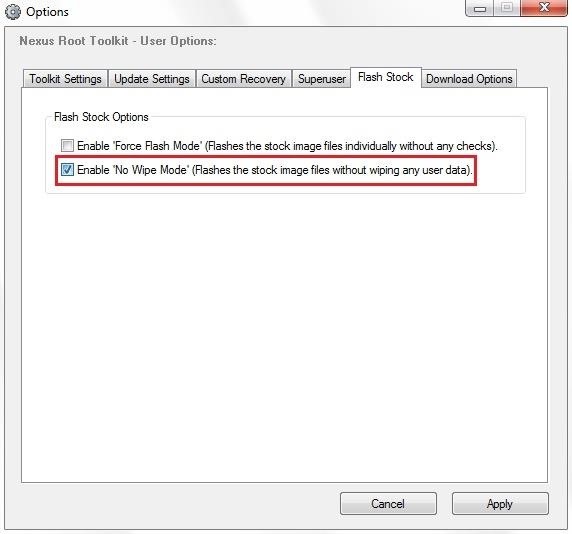
Press OK on the dialog box that shows up, then hit Apply to make your changes take effect.
Step 6: Flash the Update
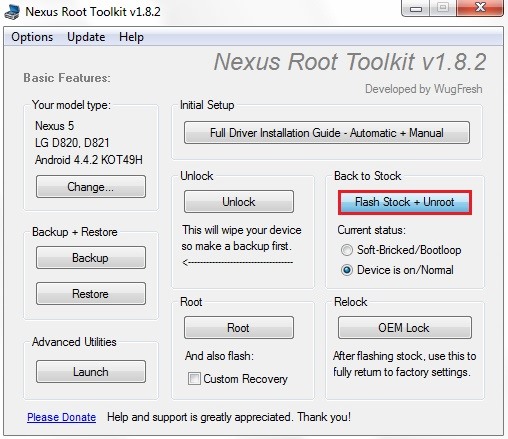
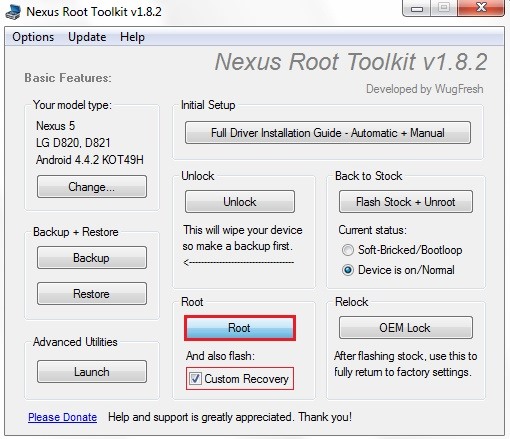
Back on the main screen of NRT, click the button labeled Flash Stock + Unroot. Don't worry about the "Unroot" part of that title, as we'll fix that later.
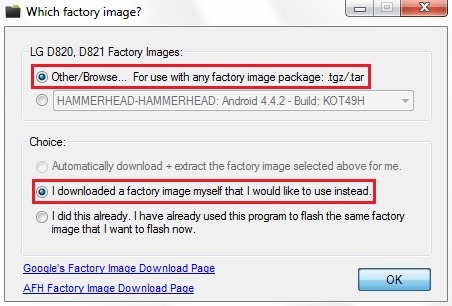
On the next screen, be sure to tick the boxes next to Other/Browse and I downloaded a factory image myself..., then click OK.
Use the next window to browse to the hammerhead-ktu84p file that you downloaded in Step 3 (or the one for a different Nexus device), then click Open.

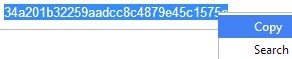
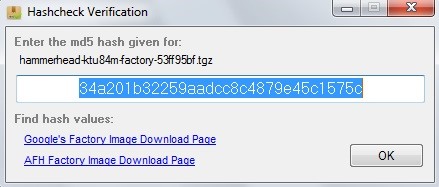
Next, you'll be asked to enter an MD5 number to verify the file's integrity. Copy the following text, then paste it into the field in that window and click OK:
- d450411b40a6e60884c8e419bd50db2b
If you are using another Nexus, your MD5 will be available from the same page you downloaded the factory image from in Step 3.
After a bit of processing, a window will appear that summarizes the install options you've selected. Click OK here to begin flashing the update, making sure that your phone doesn't get disconnected from your PC during this process.
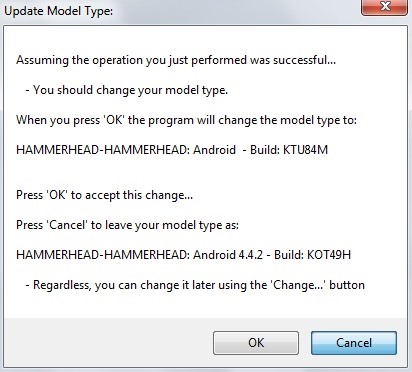
When it's done, you may see a window asking you to change your build number. This is for NRT's own sake, and it's not necessary here, so just click Cancel.
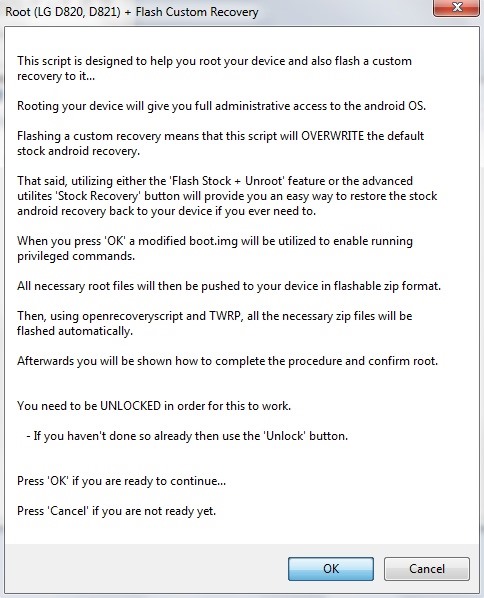
Step 7: Re-Root & Flash Custom Recovery (Optional)
Since the Superuser binaries reside in the system partition that the new version of Android just overwrote, you'll have to install them again if you still want to have root privileges. You can also reinstall your Custom Recovery at this point if you had one before.
From NRT's main screen, under the Root subsection, tick the box next to And Also Flash: Custom Recovery. Then, just hit the Root button to begin the process.
On the next screen, click OK to begin rooting and installing a custom recovery on your phone.
When it's all finished, a confirmation box will let you know that the process was successful.
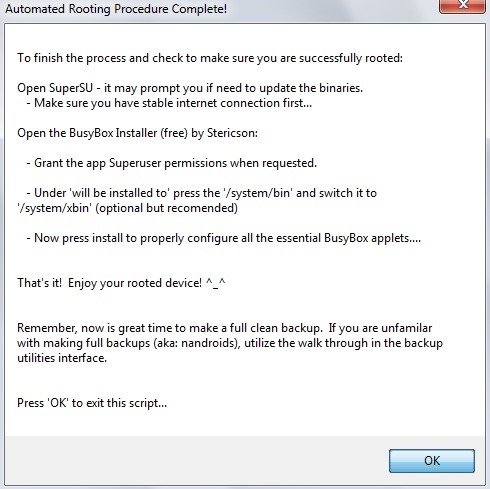
You should now be up to date, with root and custom recovery restored and all of your data intact. If you use Xposed, you'll have to install the framework again for your modules to become active.
Most of the changes in Android 4.4.3 are under the hood, fixing various bugs and improving security. The only front-facing change that I've noticed so far is the dialer app, which got a bit of a makeover.


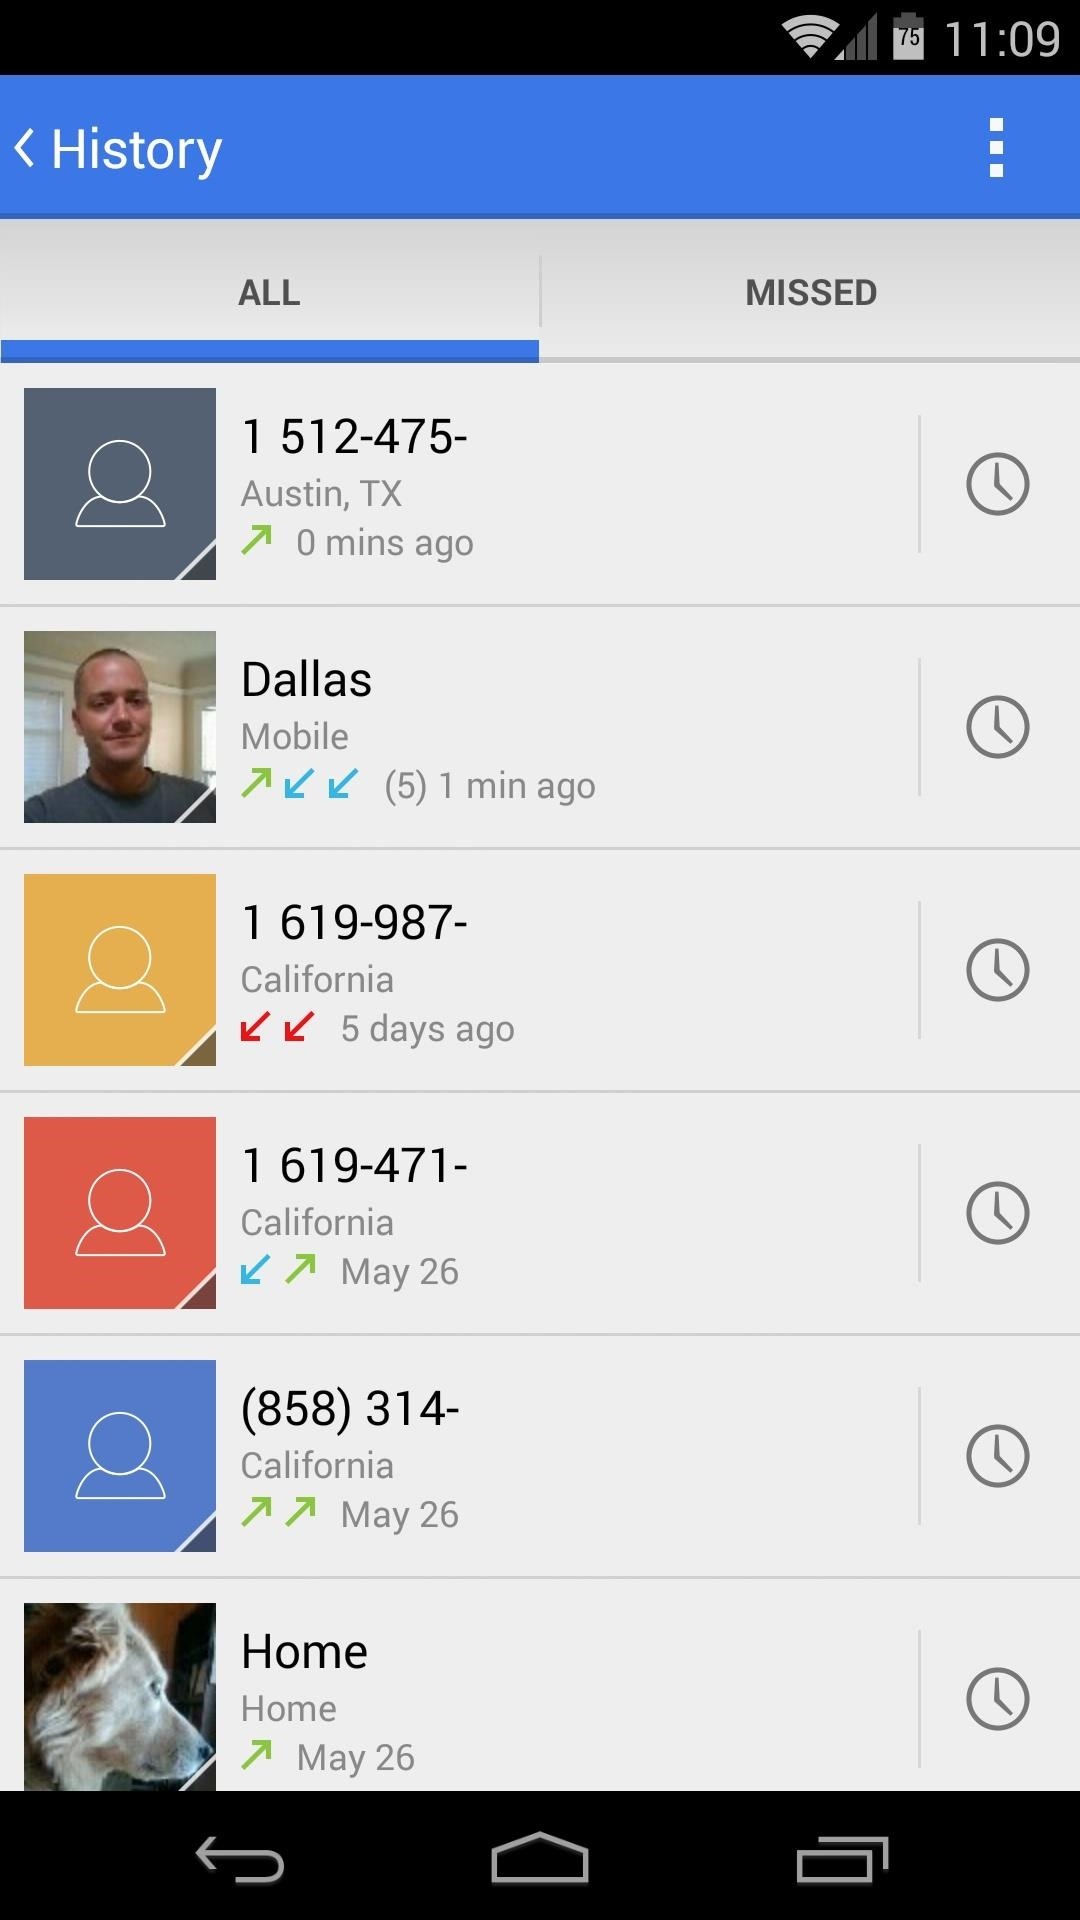
Now that wasn't so bad, was it? How are you liking the new dialer app? Have you noticed any interface changes other than the dialer? Let us know in the comments section below.
Just updated your iPhone? You'll find new emoji, enhanced security, podcast transcripts, Apple Cash virtual numbers, and other useful features. There are even new additions hidden within Safari. Find out what's new and changed on your iPhone with the iOS 17.4 update.


130 Comments
Great article. It worked well. Post another article about how to unroot and relock Nexus 5 4.4.3 if possible. Keep up the good work!
You can use this guide, simply change the stock firmware in Step 7 to the one you downloaded for this tutorial.
Man, I know its gonna sound crazy but for the first time I wish I had a PC man !!! I only have Macs and most of this stuff don't work on the Mac and all I wanted was Immersive mode full time on my device !!!
If you want to relock and unroot your nexus you can use:
https://play.google.com/store/apps/details?id=net.segv11.bootunlocker&hl=pl
This application lock bootloader without computer or fastboot (you have to have root) and then you can just uninstall supersu or just remove all from phone. I used this application because my Nexus 7 have broken USB and I cannot connect to PC. I just relock bootloader and then wipe nexus 7 and sent to service ;)
Care to mention the fact that you will lose ALL of your apps and their data? Nasty scum.
No need for the nastiness. Did you Enable No Wipe Mode, as indicated in Step 5 and in the guiding video?
Someone didn't follow directions...
No. you won't lose ALL of your apps. At least I didn't - and I followed this guide.
Brilliant! Thank you very much.
Excellent. Very thorough and works just fine with no data loss.
Thanks!
I have a Nexus 7 2013 Mobile model and on the google factory images site there is no 4.4.3 version firmware for my model "razorg" for Nexus 7 2013 (Mobile). Is it safe to use the Nexus 7 (Wi-Fi) or the Nexus 10 4.4.3 firmware on my Nexus 7 2013 (Mobile)? Would I loose any "mobile" functionality if i did? Or should I just wait for an official version?
Is this through Verizon? Also, when you are in "About device", what does it say for Build?
T-Mobile. Build KOT49H.
I read somewhere that the 4.4.3 build for this device will be released later than all of the other releases.
You probably shouldn't. Just wait a couple days and see if it pops up.
How do I do this with a mac
RAW adb did the trick, but the universal drivers, no good.
I am currently on 4.4.2 and flashed CM 11 on my nexus 5.. now I want to go back to the stock i.e 4.4.2 or 4.4.3 because of some shitty things in CM.. and I am trying for a week but it isn't working.. whenever I download the factory images for 4.4.2 or 4.4.3, I get a zipped file.. I extract it.. and just find ONE FUCKING FILE NAMED "HAMMERHEAD ETC" AND THERE ARE NO OTHER SUBFOLDERS OR FILES LIKE "FLASH.BAT" ETC ETC.. SOMEONE HELP ME, PLEASE!?
If you are using this method, there is no need to unzip the stock image file. That's the actual file that the toolkit extracts and flashes to your device.
Awesome guide and tools! Helped me solve the no led notifications by reflashing 4.4.3! Thanks!
Didn't work for me. I've got the following error during flashing in Step 6
Any suggestions of what can I do?
Thanks!!
My first thought is that it may be a bad download, or a bad USB cable. Try to download again and use a different USB cable, then let us know how it goes.
IT'S A BAD DOWNLOAD. I had the same error. downloaded the factory image from the official google developers site (link provided below) and it worked like breeze... All the best
https://developers.google.com/android/nexus/images?csw=1#hammerheadktu84m
Both links (ours in the article and the one linked above) lead to the same place.
Thank you very much! I've changed the USB cable and re-download from the link provided here too, and it just worked. One of these two thing made the difference, don't know which one :)
All the way in Ghana, West Africa. Just used this tutorial and tool to update my Nexus 4. Very cool and easy steps!!
Hi, I am not able to do this process successfully. During Step 6 when the software checks for ADB status it shows ADB device not found, even though ADB drivers are installed. My fone is rooted but no custom recovery is there. Yesterday I got OTA, it was successfully dwnloaded but when device booted again it showed error, and my firmware was nt updated it still shows 4.2.2. If a check System updates option in About phone it shows up to date.
struck in booting ..the whole process is completed though ..waitied 15 min ..struck at booting
During the update process to 4.4.3, Nexus Root Toolkit says that my baseband is not recognized, and refuses to install. Any suggestions to this particular problem? (Tried "Force Flash" in Settings to no avail)
what should i do if i'm on a custom rom with a different build number?
Thank you! Excellent tutorial, worked without a hitch!
This worked flawless! Thank you for an excellent guide. However, when downloading the NRT from the link in the post, Google Chrome browser insisted that it contained some sort of malware. False positive probably, but it worked after I downloaded it again from one of the mirrors on the developers site.
On step #5 when I click the Options menu, then select Options.. The window never pops up? Any ideas???
Did you ever get this to work? I'm having the same issue. Nothing I do will make the Options dialog pop up.
*Update*
I did figure this out. I downloaded the Microsoft .NET Framework 4.5.1 Setup. Performed a Repair on my installed version. Now the Options menu opens like it is suppose to.
Great tutorial! Hats off to the author and to Wugfresh of course for the toolkit. Thanks!!!!!!!
My device's (Nexus 10) bootloader is locked. It says that i need to unlock it in order to proceed
i was using nova launcher before i update my device using the steps above. i successfully updated my nexus 4 to 4.4.3 but the Google Now Launcher always crashes. please help
Very GREAT article! Simple, clear and efficient. I had problem installing OTA and this thread saved me! Weel done ;)
Very nice work my man, now i have a question to ask you before i proceed. I have a nexus 5 with a custom kernel and xposed, now i know that i have to uninstall xposed but what about the custom kernal? i read around the net that you have to revert to stock android in order to apply the update? thank you very much for everything!
No need, this process will overwrite the custom kernel with a stock one. You actually don't need to uninstall Xposed either, as that will also be removed through this process (but your modules will remain intact).
Then, after you're updated and re-rooted through this guide, simply reinstall Xposed and re-activate your modules. As for the kernel, just make sure the dev who supports your kernel has updated it to work for 4.4.3, then flash that.
sorry to bother you again faisal, but my nexus wont get passed the google logo. Should i go into recovery and flash 4.4.3?
Very good thank you faisal! :)
I just flashed cm11 will it over right that too or do I have to go back to stock
Great post! Worked perfectly.
I was wondering, can I use this method to install cyanogenmod (or any other rom for that matter)without wiping my nexus 7 grouper?
I didn't know about this and let the OTA update from rooted 4.4.2 to 4.4.3 update install. It did install just fine. I just lost root. So apparently you don't have to do anything special to prepare for it. Google doesn't care if you're rooted.
that was super slick. thanks so much
Thanks, worked well. But I'm having a problem with my Home button; it shows the tough, but doesn't take me back to the homescreen. The "Swipe up for Google Now" doesn't seems to be working either. Any suggestions? Thanks in advance!
My device: Rooted nexus 5. While rooting I got "fastboot.exe failed" error. Any advice ?
I'm having the same problem, although my system files haven't been deleted. I updated to 4.4.3 using this guide but now having a lot of issues trying to update to 4.4.4. Downloaded the files multiple times, reinstalled the Root Toolkit, reinstalled ADB drivers, rebooted phone, rebooted PC...
Got around this error by unpacking the hammerhead...tar file, the image-hammerhead.zip file, copying the boot, recovery and system.img files and copying fastboot.exe from \Programfiles(x86)\Wugfresh\Data to the same directory, opening command prompt and running the commands in the screenshot. Update successful + data intact.
I had the same problem. I tried what was listed in this thread (http://forum.xda-developers.com/galaxy-nexus/help/fastboot-load-img-t1452031) and I got the flashing process to complete successfully.
In short, "In windows, I used task manager to find the ADB process and killed it, and then it worked fine."
I tried one more time and it looks like it deleted some system files. Phone is not booting now :( What to do now ?
Are you sure you downloaded the correct system image file for your device?
Woah wait a minute; if it saids I am now a developer, won't I be charged?
Nope. That just allows access to some hidden settings.
GREAT JOB guys, thank you! Everything is now working perfectly with Android 4.4.3 And WugFresh NRT is an awesome box!
Thank you for this guide. Worked flawlessly for my nexus 7 (2013)
Faisal, I just want to clear somethings up before I try it: will it overwright my twrp recovery for me or do I have to uninstall it myself? Please answer. Thanks
It will overwrite the recovery, but then when you re-root in Step 7, it will re-install TWRP.
I had the elementalx kernal installed so I could have the knock on feature (which I learned from another one of your awesome articles!). After updating, it seems to have disappeared.
Would you mind assisting me in how to reinstall that kernal? I'd greatly appreciate your help! Thank you for this (and all the other) nexus articles, they really helped me out.
Follow the same steps you did to install the kernel the first time, but this time make sure to use the 4.4.3 kernel found here.
hi thank you for the tutorial.
after successful installation of update, when i start the google now launcher, it says"UNFORTUNATELY GOOGLE NOW LAUNCHER HAS STOPPED WORKING". The same message pops for google search too.
I also cannot use the smart settings button on taskbar.
All I did was uninstall the Xposed framework then use SuperSU to unroot. Downloaded the OTA and it installed fine. Rooted again and reinstalled Xposed and I am back to normal.
Any idea how long this proces takes??
I'm waiting : writing 'system'....
At least 30 min.... Any ideas??
In my taskmanager Fatboot.exe is using a lot of memory but no cpu...
Is this normal?
Disregard last 2 messages
Glad to hear you got it up and running...what was the culprit?
Thank you very much for this crystal clear tuto.
Now, my Nexus 4 running 4.4.2 with root and Xposed framework was successfully upgraded to 4.4.3.
Thanks a lot for the brilliant guide! Works like a charm! Just a word of caution to guys running xposed framework. If you have changed ur pattern lock using one of the xposed modules, make sure u revert back to stock before upgrading to 4.4.3!!!!
Very useful, thank you. Flawless for me.
Thank you very much! Please keep up with the excellent work!
Please help... after step 6 my nexus is not going past the google boot up sign
Sorry for the late response. What's the situation now?
Please get back to me i need my phone
Thank you!!
Awesome tutorial, dude! I so wish I'd come across this page before trying to flash the OTA update of my rooted Nexus... Had to wipe... :(
I'll make sure to remember the procedure when 5.0 is released!!
Love it! If a n00b like me (never rooted nor did ANYTHING like this with android) can do this and update all the way from 4.4.2 to 4.4.4 with full root access and without any data loss, then anyone can do it! Great job with the article, much thanks!!
That's great to hear! Let us know what else you'd like to see...
Good tutorial. But unfortunately I only have Mac and I do not want to install windows in it. Do you have any way that I can update my Nexus 5 rooted device by Mac?
Works perfectly. I used in my Nexus 4 to update to 4.4.3 and to 4.4.4 after. All data are safe. Thanks. Congratulations!!!
Thanks! I've rooted before and this was the most effortless it has been. Three cheers for wugfresh. Worked perfectly on Nexus 4 with 4.4.4.
i update my nexus 5 4.4.4 with ota but nexus root toolkit show the previous version
I followed your instruction to update my rooted nexus 7 wifi to 4.4.3. Now my device stuck on the start screen. Nothing happened when I press the power button to select Start, Restart bootloader or Recover mode. The only option that works is Power off. Please help.
Hi, this may have been answered before, but I just wanted to be certain.
Can I use your tutorial if I have Custom Recovery(Cwm) and Xposed Framework+Xprivacy installed?
If I can, should I uninstall/disable Xposed and Xprivacy?
Thanks in advance!
Yes. No need to uninstall anything. You will however need to reinstall Xposed after this process, but all your modules will remain intact.
That is awesome, thanks :-)
Hay man thank you I used my nexus 5 to update 4.4.3, and 4.4.4 the same time and then I rooted back good jop thank you
Dear Dallas Thomas,
I intentionally created an account to say THANK YOU for what this post! I have been trying to update from 4.4.2 to 4.4.3 and in vain... until I found this website. I'm so happy that I successfully did it, because of your post! Thanks again!
Im not sure anyone else had this problem... But i feel it wasn't clear enough that you had to get the updated file. I know that seems pretty stupid, but I was under the impression you had to get your current version factory image. It wasn't until i finished the tutorial that i realized I did absolutely nothing but unroot my device.
Sorry to hear that! Our links in the tutorial will guide you to the latest version, which is currently Android 4.4.4.
You can simply to the process again with the updated image file and you'll be good to go.
Hi, is it also possible to use this method with NRT if my Nexus 7 is not rooted at all? Or will it cause some other problem? I've got 4.4.3 now and I've downloaded the 4.4.4 image file from Google, but like I said my Nexus 7 is not rooted.
You can use this method just the same with an unrooted device. Just ignore Step 7, but everything else should be the same.
If I were you, though, I'd stick it out and wait for the update. It was a staged rollout, but it's nearing its cycle and most all devices should get the regular "System Update" notifications within the next few days.
Thanks Dallas for your answer, as by miracle the official update was downloaded last night and I performed the install this morning, everything's fine. Thanks again, also for the quick reply!
Perfect to update 4.4.3 to 4.4.4 ....Thanks :)
Hi!
Thanks for the great tutorial! Unfortunatelly, I'm stuck at the 5th step: when clicking on the options button, the options menu window never pops up and nothing seems to happen... Reinstalling the toolkit or trying to launch the app with admin rights doesn't solve the problem. Could you help me with troubleshooting the bag?
Thanks
Hi, the Allow USB debugging "ok" screen never pops up and so the update doesn't work. have any idea as to why?
I've successfully updated my Nexus 5 to Android 4.4.4 using this great tutorial a few days ago. However, I am thinking about unrooting my phone because I think it is a little laggy and not running as smooth as my girlfriend's unrooted Nexus 5. Can I follow the same steps again and skip number 7 to accomplish that (it would be like installing Android 4.4.4 on top of Android 4.4.4). Will it work?
Absolutely!
Thanks!
greate tutorial.. my nexus finaly become 4.4.4. thanks alot
can i use this method to update my nexus 5 from 4.4.2 to 4.4.4 directly skipping 4.4.3?
Or do i need to update to 4.4.3 first and then 4.4.4?
You can go directly to 4.4.4.
The updates seem to be working but for some reason, my app notifications (which appear on top left screen) do not show up anymore and neither does my Quick Settings (which I access by "pulling" down from the top of the screen to the bottom). And my Home button doesn't work either. Could it be due to the Cataclysm Rom that I had installed with 4.4.2?
I think you're right about Cataclysm causing the issues. There are underlying bits of data and settings that Cataclysm stores on your phone that are probably incompatible with stock Android.
I'd recommend backing up all of your installed apps with Titanium, then running through this tutorial again without no-wipe mode enabled. This will give you a clean install, so everything should work as intended. Then you can root your Nexus in under a minute and use Titanium Backup to restore your missing apps and their data.
Great article. Thanks a lot :)
You're welcome!
if i dont tick the box against install custom recovery and just press root tab then my device will be rooted but i can still recieve ota update or also my bootloader needs to be locked currently it is unlocked
As always...fantastic article and very well illustrated and easy to follow. I have two Nexus 7 (Wifi), that I previously rooted, that were running KitKat 4.4.2. I was able to successfully update directly to 4.4.4 (no need to go through 4.4.3). Since I was using the same computer that I had previously used to root (with NRT), all the ADB configurations and other preferences were already installed on my computer. Having the ADB configurations already on my computer allowed me to bypass Steps 4 & 5....a huge time saver. When I ran NRT, I made sure to select "Update" from the menu bar options. NRT did its update to 1.8.4 and in the process it updated SuperSU. I did not have the latest and greatest version of SuperSU (I believe it is now 2.1) but once I downloaded the SuperSU 2.1, NRT 1.8.4 was able to include that update into its program. Next, I proceeded with Step 6 and flashed the 4.4.4 upgrade that I previously downloaded. Again, everything went without a hitch. I think the thing everyone needs to remember is to be patient. Some of the upgrading process takes time...your Nexus will power off/on as needed without any assistance...but patience is crucial!
In the end, I was able to successfully update both my Nexus 7 tablets without a single problem. Your illustrations and step-by-step instructions are painstakingly thorough and complete. My suggestions to anyone rooting a device or upgrading to the lastest OS on any rooted device is this....be sure to thoroughly read and completely understand each step of the process....and of course, be patient. I commend Dallas Thomas on a great post and thank Faisal Hussain for all his time and help with answering others' questions. Without the two of you, many of us "newbies" would be totally lost. Thanks to you both, I am less apprehensive and more confident about tinkering with my Nexus 7. KUDOS-KUDOS-KUDOS!!!!
I had the "Xposed" program installed before updating and had to reinstall. I also needed to reinstall BusyBox as it was not activated after the "Recover" step. Both were just minor inconveniences :)
Followed instructions, upto step 6, phone is stuck at recovery stage, tried " start,restart bootloader,recovery mode " but nexus 7 (2012.mobile+wifi) still will not boot.
Under step 4....are you sure you selected the right "device" and "build" for your tablet? I had a similar issue when I first attempted to root my 2012 Nexus 7. I wasn't for sure on the year of make (whether mine was a 2012 or 2013) until one member here informed me that the 2012 Nexus 7 only has a camera on the front....the 2013 has both front and rear cameras. Once I had that issue resolved, I was able to correctly choose the 2012 Nexus 7 (Wifi) option and everything worked just fine. I hope this helped you out.
I have nexus 7, and it had the old 4.3 build. It's rooted, uses supersu and twrp as the custom recovery. That's all that I know about it, my boyfriend rooted it for me! I decided (brilliantly, I might add) to just update ota - my tablet was doing this weird twitch with the wallpaper intermittently, and I just decided to not do any research and hit the button that's been sitting on my screen for the update for uh, probably a year. ;) Brilliant!
Anyway. It started the update, ran through the stuff, and went to restart. TWRP booted, ran some scripts and programs. (I noticed it did not use the md5 checksum, and it also took the entire cache from my old build.)
Well, that finished, and I hit reboot - system. It said "you've lost root, want to get it back?" or whatever. I hit yes. It went to reboot. Then, it wouldn't reboot the system. Now it only reboots in TWRP.
Do I need to do something with Supersu now, to finish the update? (There IS a supersu zip file in the android folder that I could use to install, but I'm afraid it's going to brick my device to use it, cause it's old version, 1.47 or something.)
What do I do from here to avoid losing my data? I know if I flash the image, I'm going to lose everything. Which, eh. It's just a bunch of games I've spent too much time playing, and my custom wallpapers/icons, and a few images downloaded off the internet. But, I'd like to save all of that stuff if possible.
Update: Tried to install supersu zip. The install failed on both the old version and the new version. I'm now lost as to what to do next. I just want my tablet back! :( Is the fact that it couldn't find the checksum what's messing it up, since it was an ota update?
Be sure to have BusyBox installed and running. That might be the problem.
I would advise you to download the latest version of NRT (Nexus Root Toolkit) and follow the instructions that Dallas Thomas has at the top of this page. Be sure to read through each step from beginning to end before attempting. The NRT program will "re-root" your device for you...provided you had backed up your Nexus through TWRP. If you still have trouble rooting your device, you can always use Towelroot. It is the simplest way to root a device (that I have seen to date)...but beware, it will completely erase any and all saved data on your tablet...so you may want to back up any important pictures, files, programs, contacts, etc. before attempting. I hope this helps.
No, there wasn't a backup. I just jumped the gun on the ota. We just flashed a clean install of 4.4.4, and I'm just going to go from there with a re-root and lesson learned for next time.
i have a nexus 5. tried this method but got an error at the end of step six. moreover do i need to update nrt to 1.8.6
Yes, I'd update NRT and try that part again.
The 1st part has been done sucessdully but the 7th step, i.e. Re-Root & Flash Custom Recovery is showing the error of "Mismatch twrp".
Should I root my device manually or ...?
Sometimes, the servers that NRT uses to download the various files to your PC can be a bit finicky. You can try re-launching NRT to force it to attempt to download the files again.
But if that doesn't work, rooting with Towelroot is incredibly easy. Once you've done that, you can install a custom recovery with an app like Flashify.
Here's a tutorial on Towelroot, and here's a guide on getting TWRP installed using Flashify.
Ive got one question.
If i update my Nexus 5 in the way you describe, you said that you will not lose any data.
Whats up with the settings, apps and qidgets? Do i have to rearange everything?
You won't have to rearrange anything or alter any settings. Everything remains the same throughout the update.
hey DALLAS i have aproblem on my nexus7 2012 32 GBwhich was running on 4.4.2 and i updated to 4.4.4 actually while i was updating something went wrong and my os was deleted but i installed with force flash enabled and no wipe mode disabled and it was successfull.but on other day i noticed that my internal memory decrease from 32 GB to 6.02GB plz i need some suggestion please reply soon
I checked my intenal memory using es file explorer and with apps2sd and also with settings ->storage
i even tride factory reset plz reply
thanking you in anticipation
Done but recovery lost. Just this dude is showing in recovery mode. I'm busted
Power off, Volume down + Power on
Run cmd as Admin >cd C:\UnifiedAndroidToolKit
>fastboot-toolkit.exe devices
09049482 fastboot
>fastboot-toolkit.exe flash recovery openrecovery-twrp-2.8.0.1-deb.img
Do not reboot.
Volume down + Power - Recovery mode > Install SuperSU & Reboot
That's all (for Nexus 7 2013 LTE)
Can I update my rooted Nexus 7 2012 from 4.2 to 4.4.4 directly without going to 4.3 jellybean?
Will this procedure work with the new Android 5 (Lollipop) OTA images that Google recently released?
Yes. You can actually skip Step 3 altogether now, too. When you get to Step 6, choose Android 5.0 from the pop-up, then make sure Automatically Download + Extract the Factory Images Selected Above For Me is selected.
Can I use this to go from 5.0 to 5.0.1 nexus 5
Share Your Thoughts