
For many people, the two main advantages of buying a Nexus device are prompt updates and the ability to root without much hassle. But in a cruel twist of fate, these two features are almost mutually exclusive, since OTA updates will refuse to run on rooted devices.
In the past, this has always meant that updating your rooted Nexus required hooking the device up to a computer and running complicated fastboot commands. But now, thanks to a recent update to a popular root app, we can finally apply firmware updates entirely from within Android.
Note About Major Android Version Updates
This method should not be used to update across major Android version bumps—for instance, from 6.0 Marshmallow to 7.0 Nougat. It's perfectly fine for minor updates like monthly security patches and "x.0.1" releases, but when Android gets a new codename, you'll still have to take the time to flash the factory images in order to make sure you don't experience any bugs.
If you're trying to update your Nexus to a new milestone release like Nougat, the best method is still either Nexus Root Toolkit or ADB. I've previously covered both of these methods in detail, so use the following guide for help on that front.
Requirements
Step 1: Install the Latest FlashFire Beta
The app that allows you to update your rooted Nexus from within Android is called FlashFire, and it was created by legendary developer Chainfire. So to start, simply install FlashFire from the Google Play Store.

Step 2: Download the Factory Images Package from Google
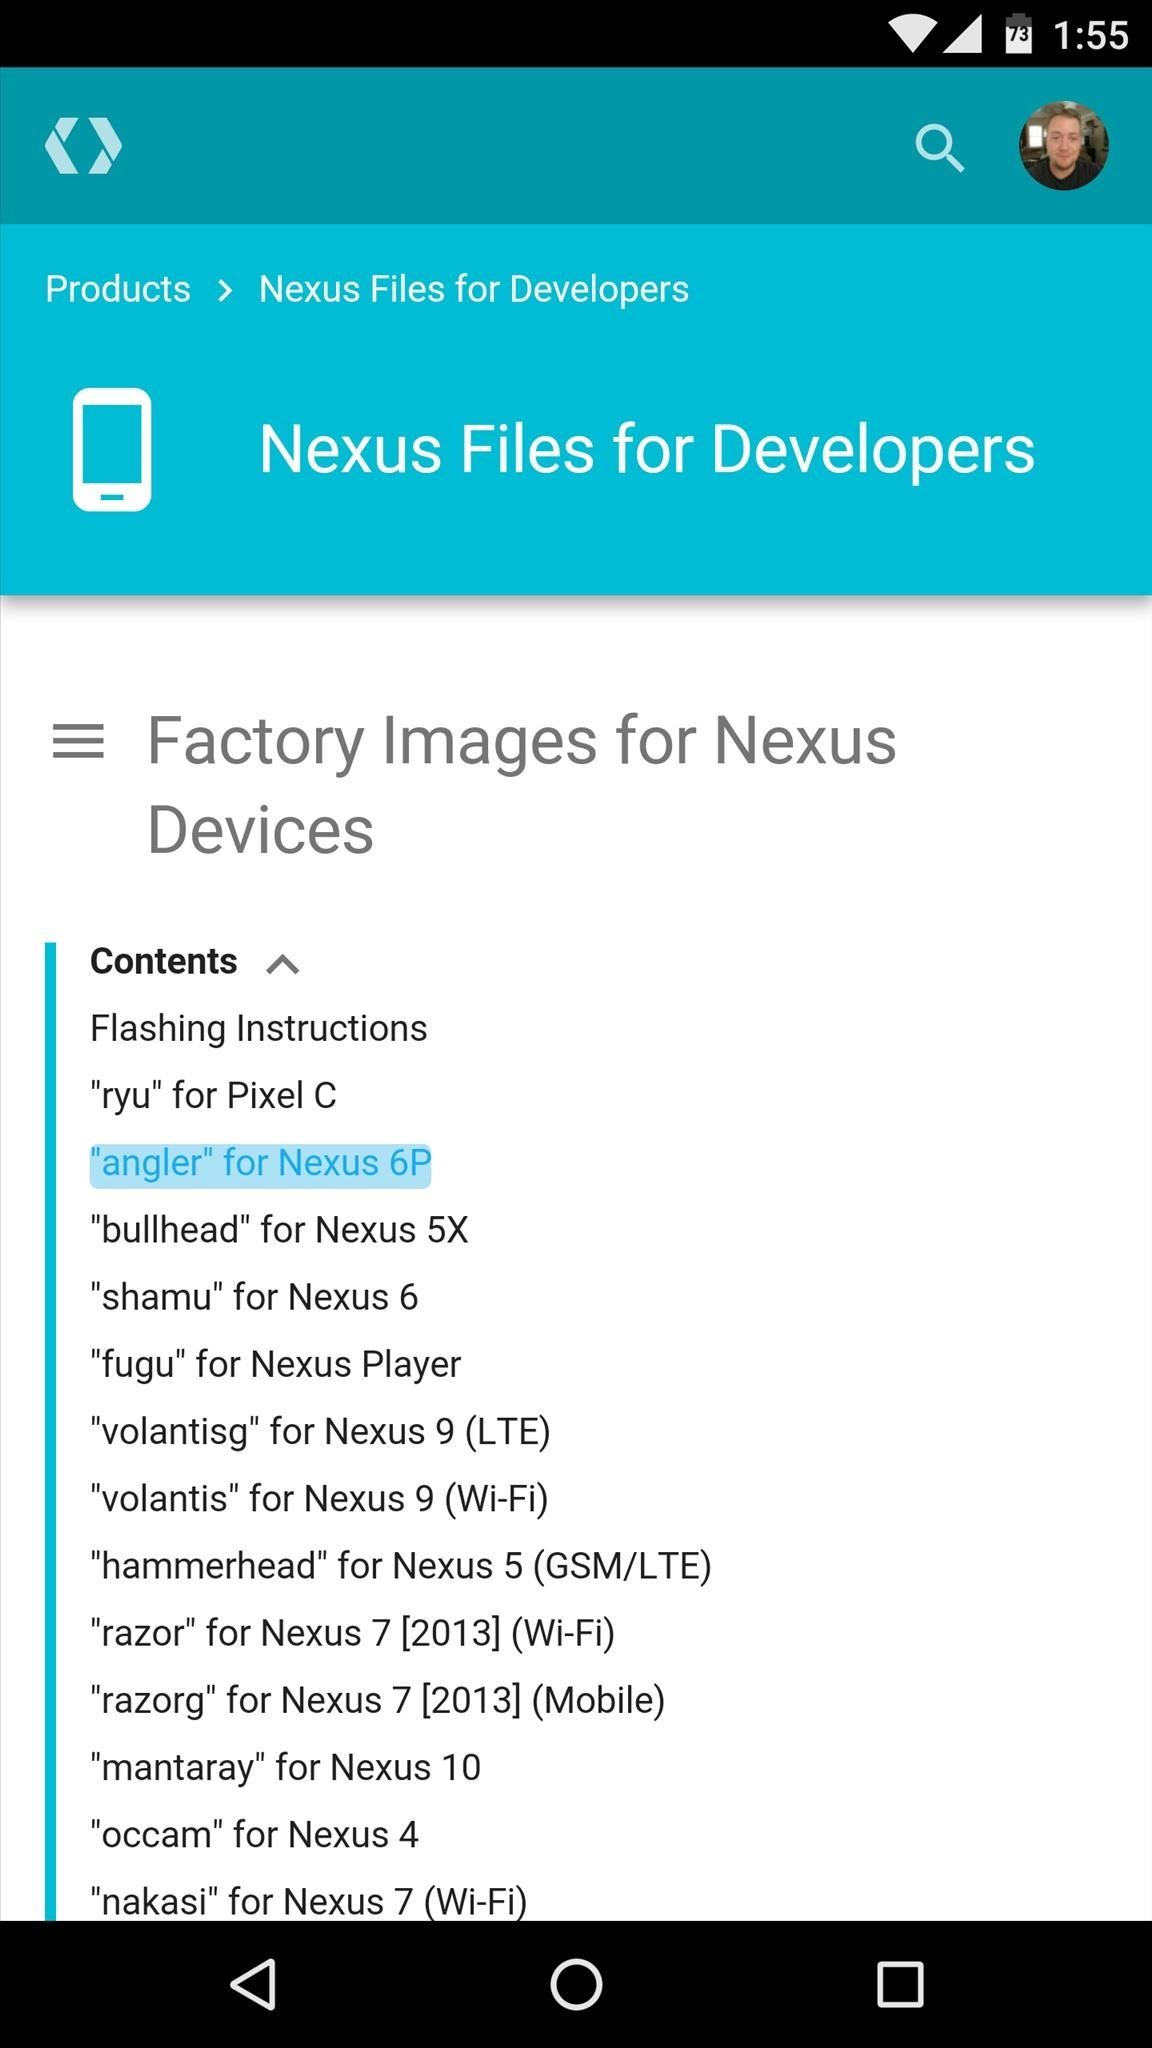
Next up, you'll need to download the latest factory images package for your device, as this is the Android update itself. So to start, head to the following link from your Nexus.
From here, tap the "Contents" link at the top of the page, then select your device from the list. Next, scroll down to the bottom of the following table, then click the download link next to the most recent Android version available for your device.
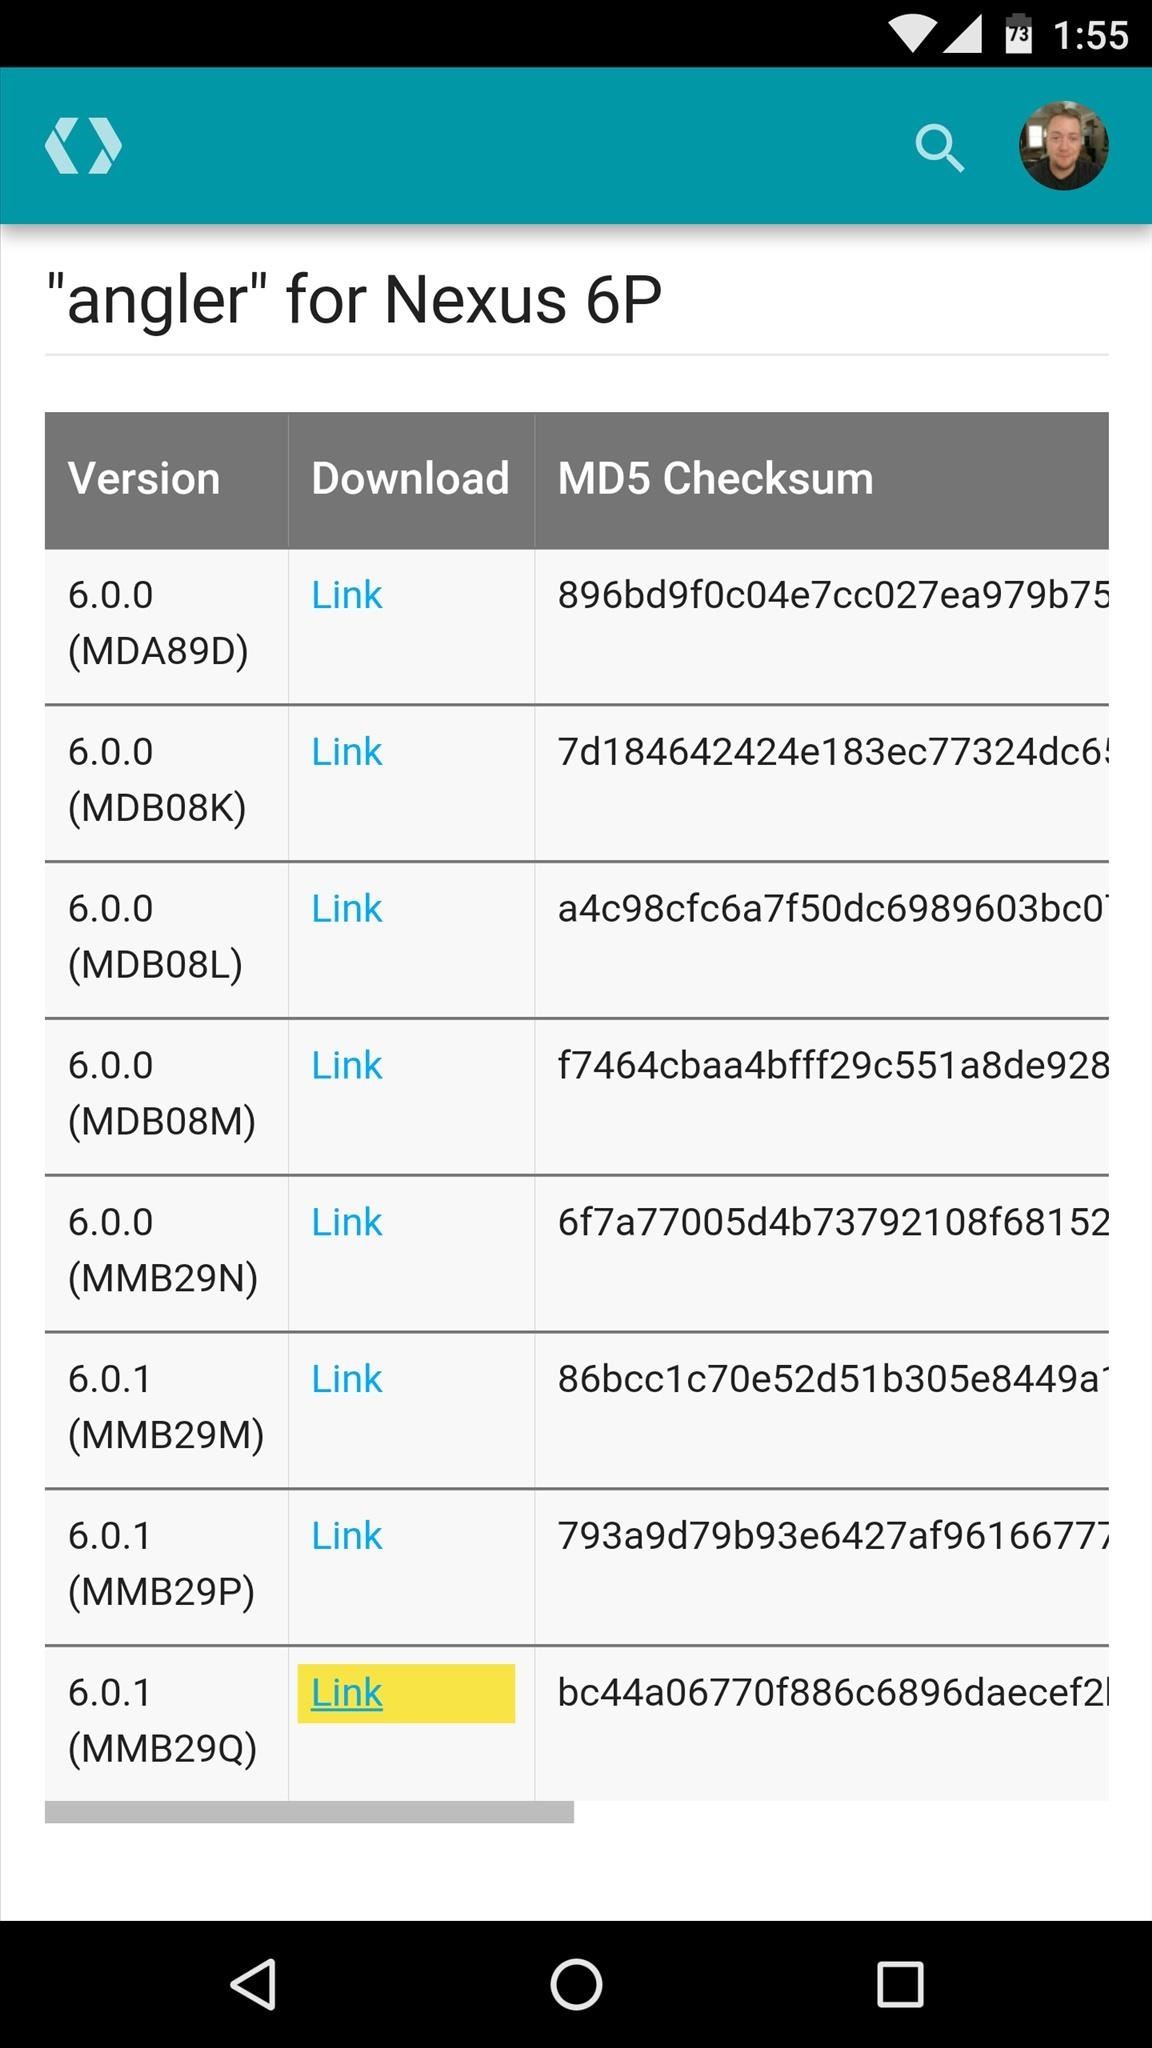
The factory images package is a rather large file, so you'll need at least 1 gigabyte of free space to save it to your device, and the download itself may take as long as 20 minutes.
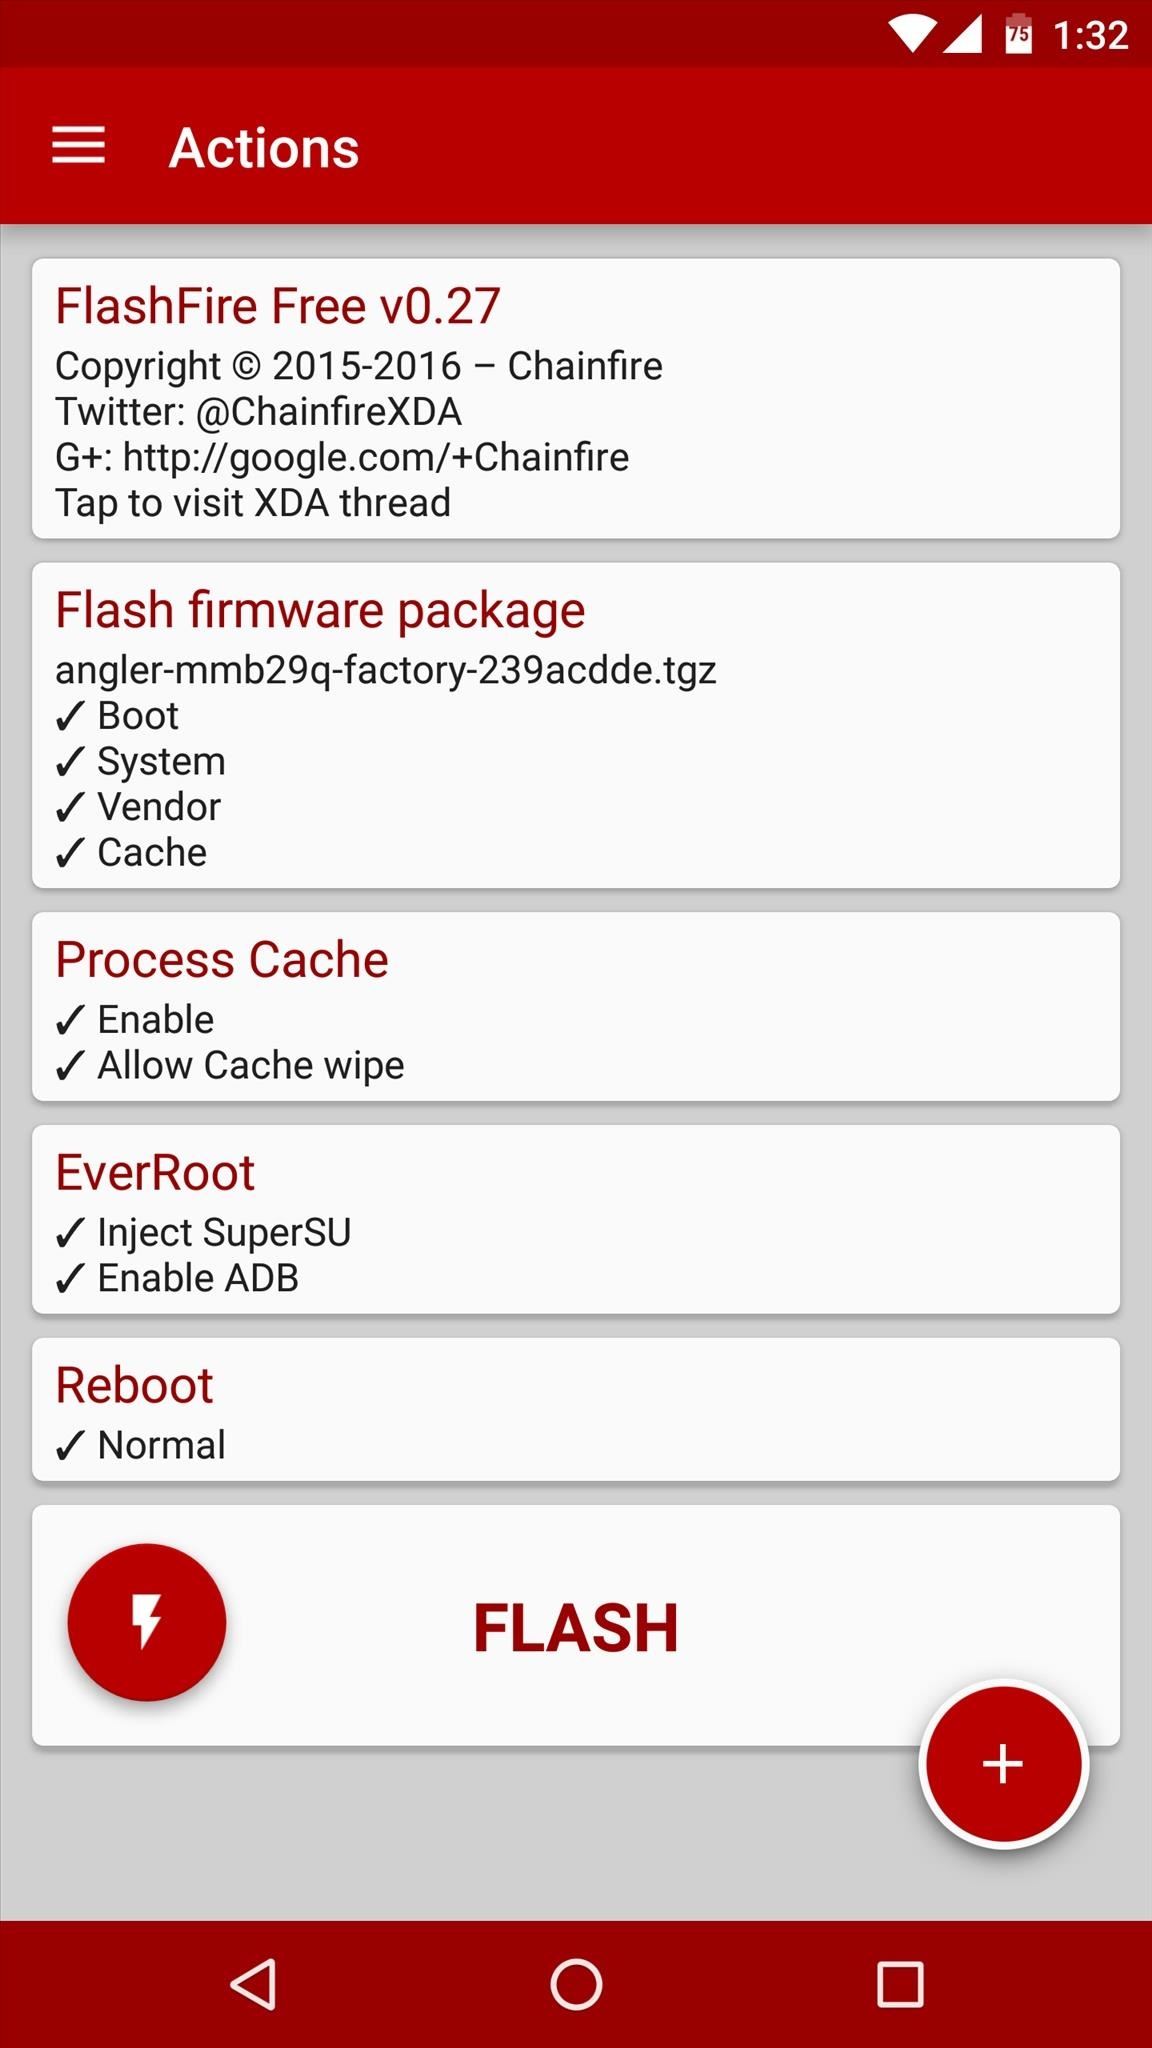
Step 3: Run FlashFire
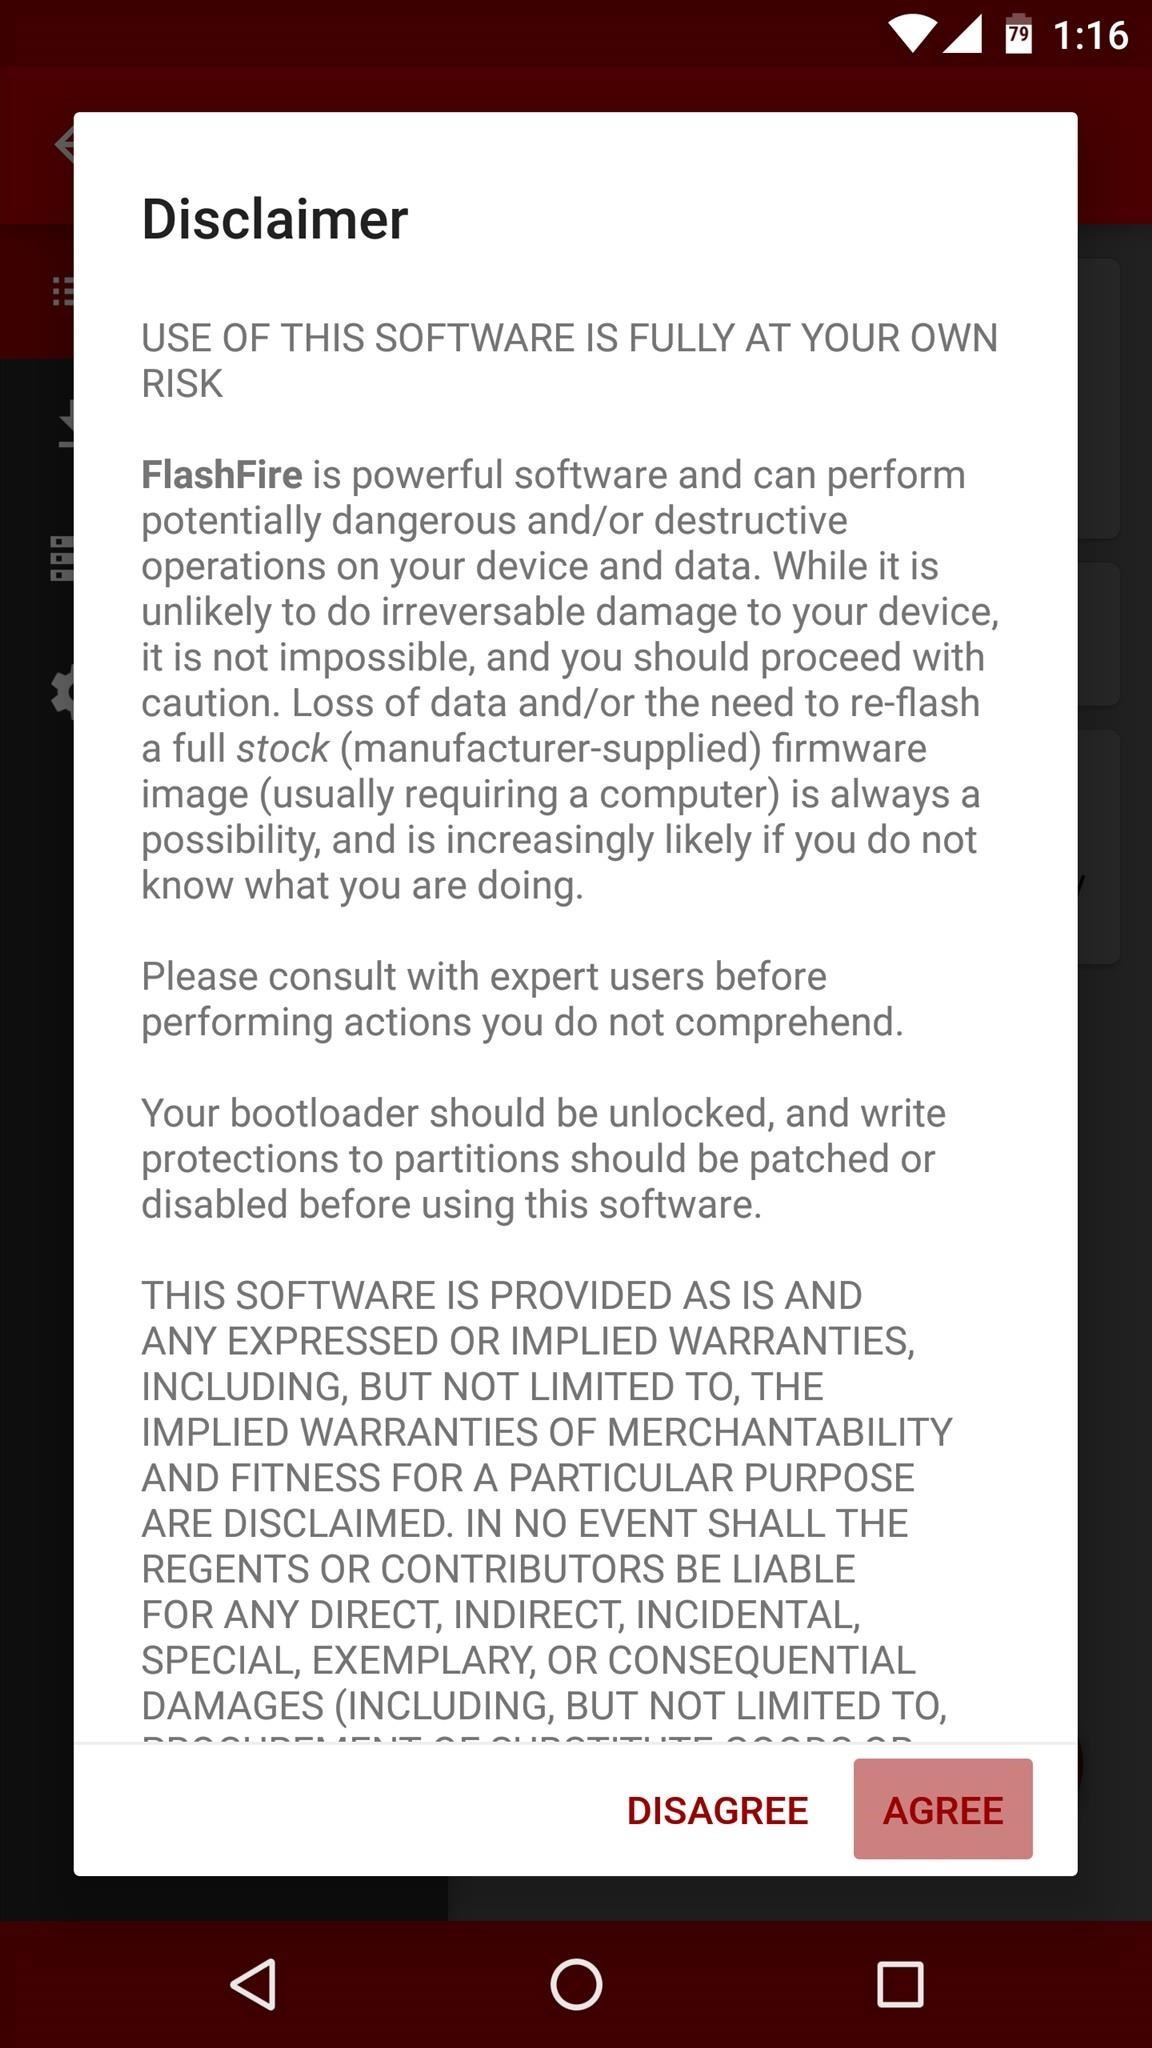
Once the factory images package is done downloading, go ahead and open the FlashFire app. From here, you'll be prompted to give the app Superuser access, so tap "Grant" on the popup. Next, you'll see a disclaimer message, so tap "Agree" here.

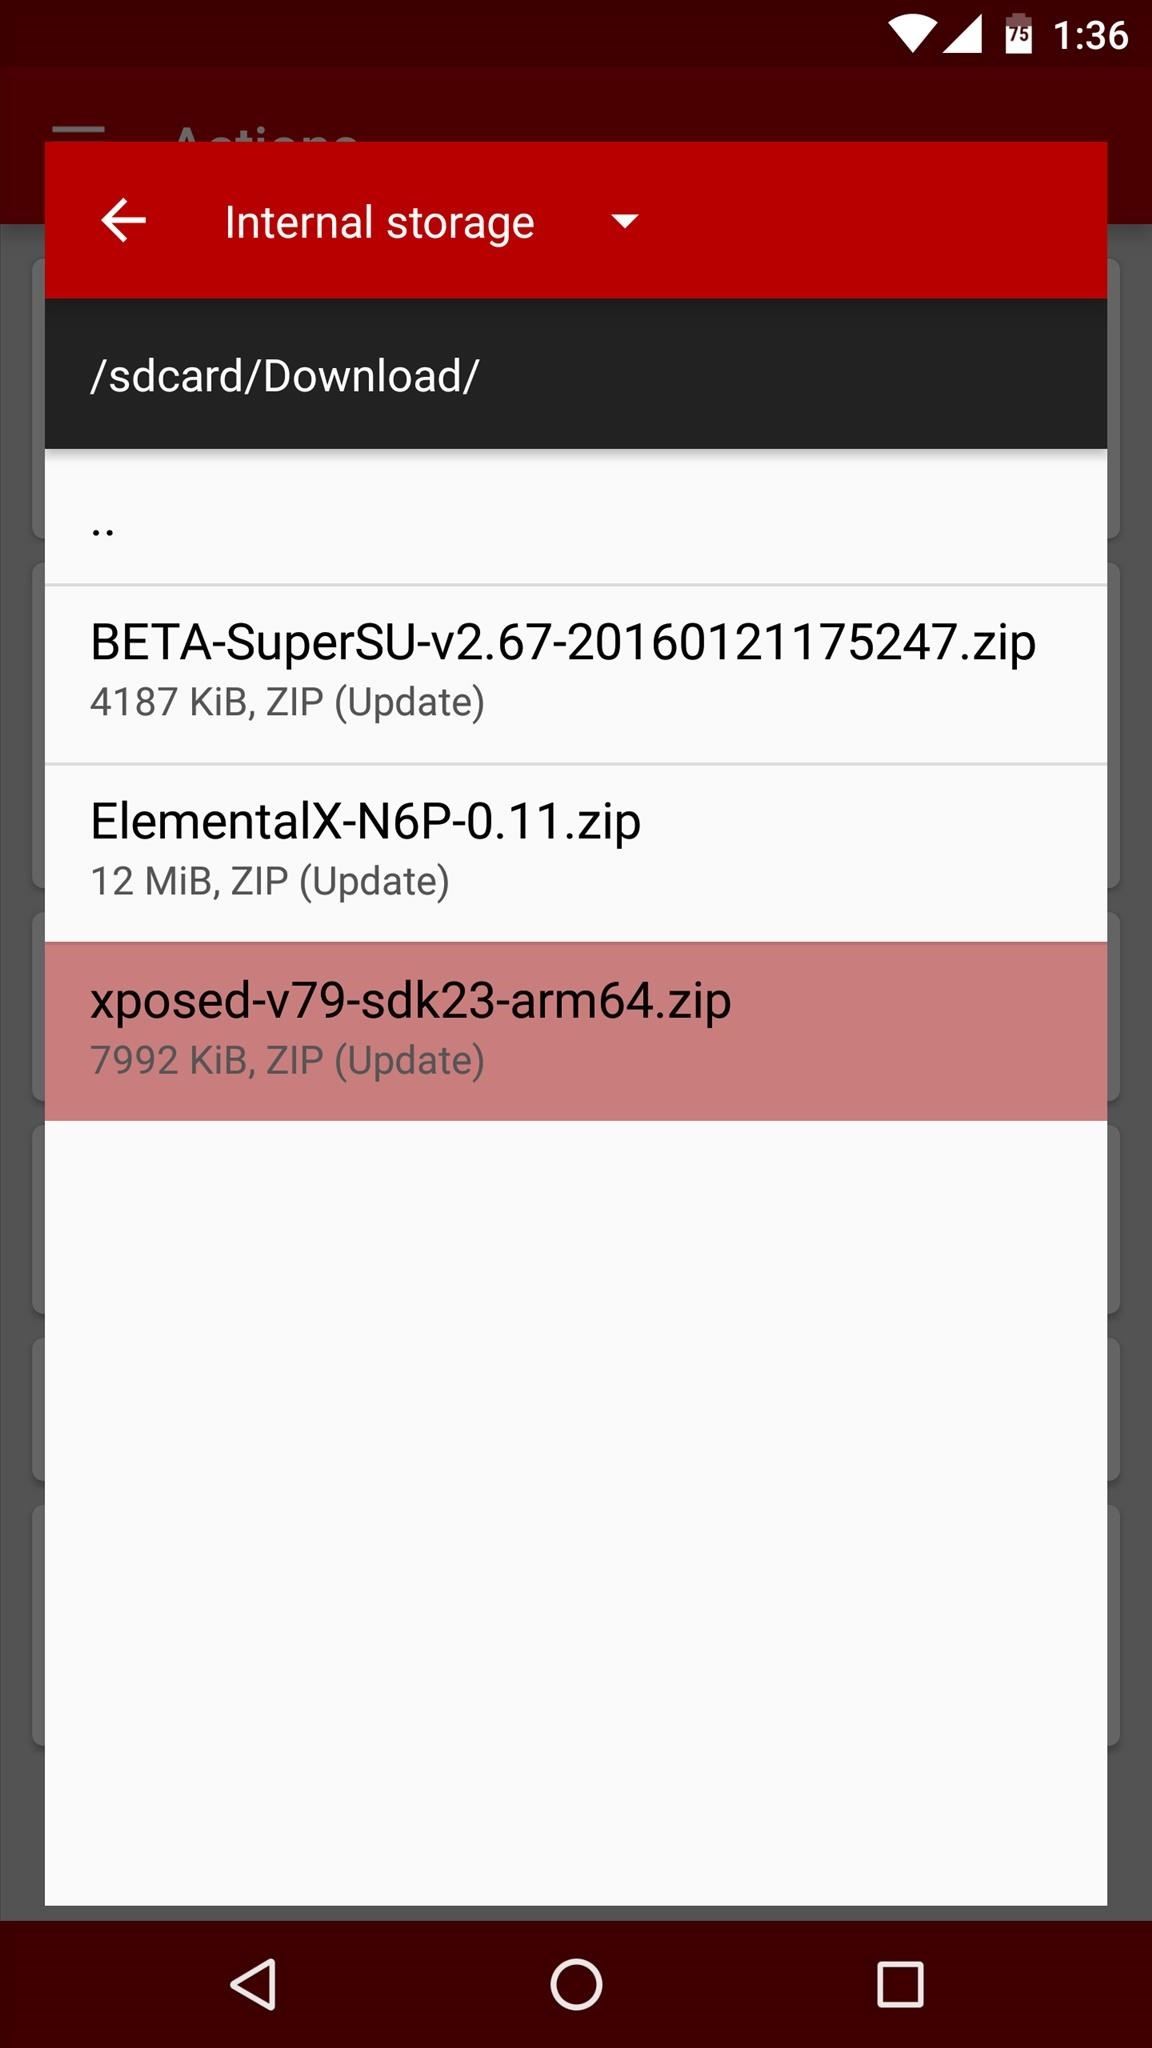
Step 4: Import the Factory Images Package
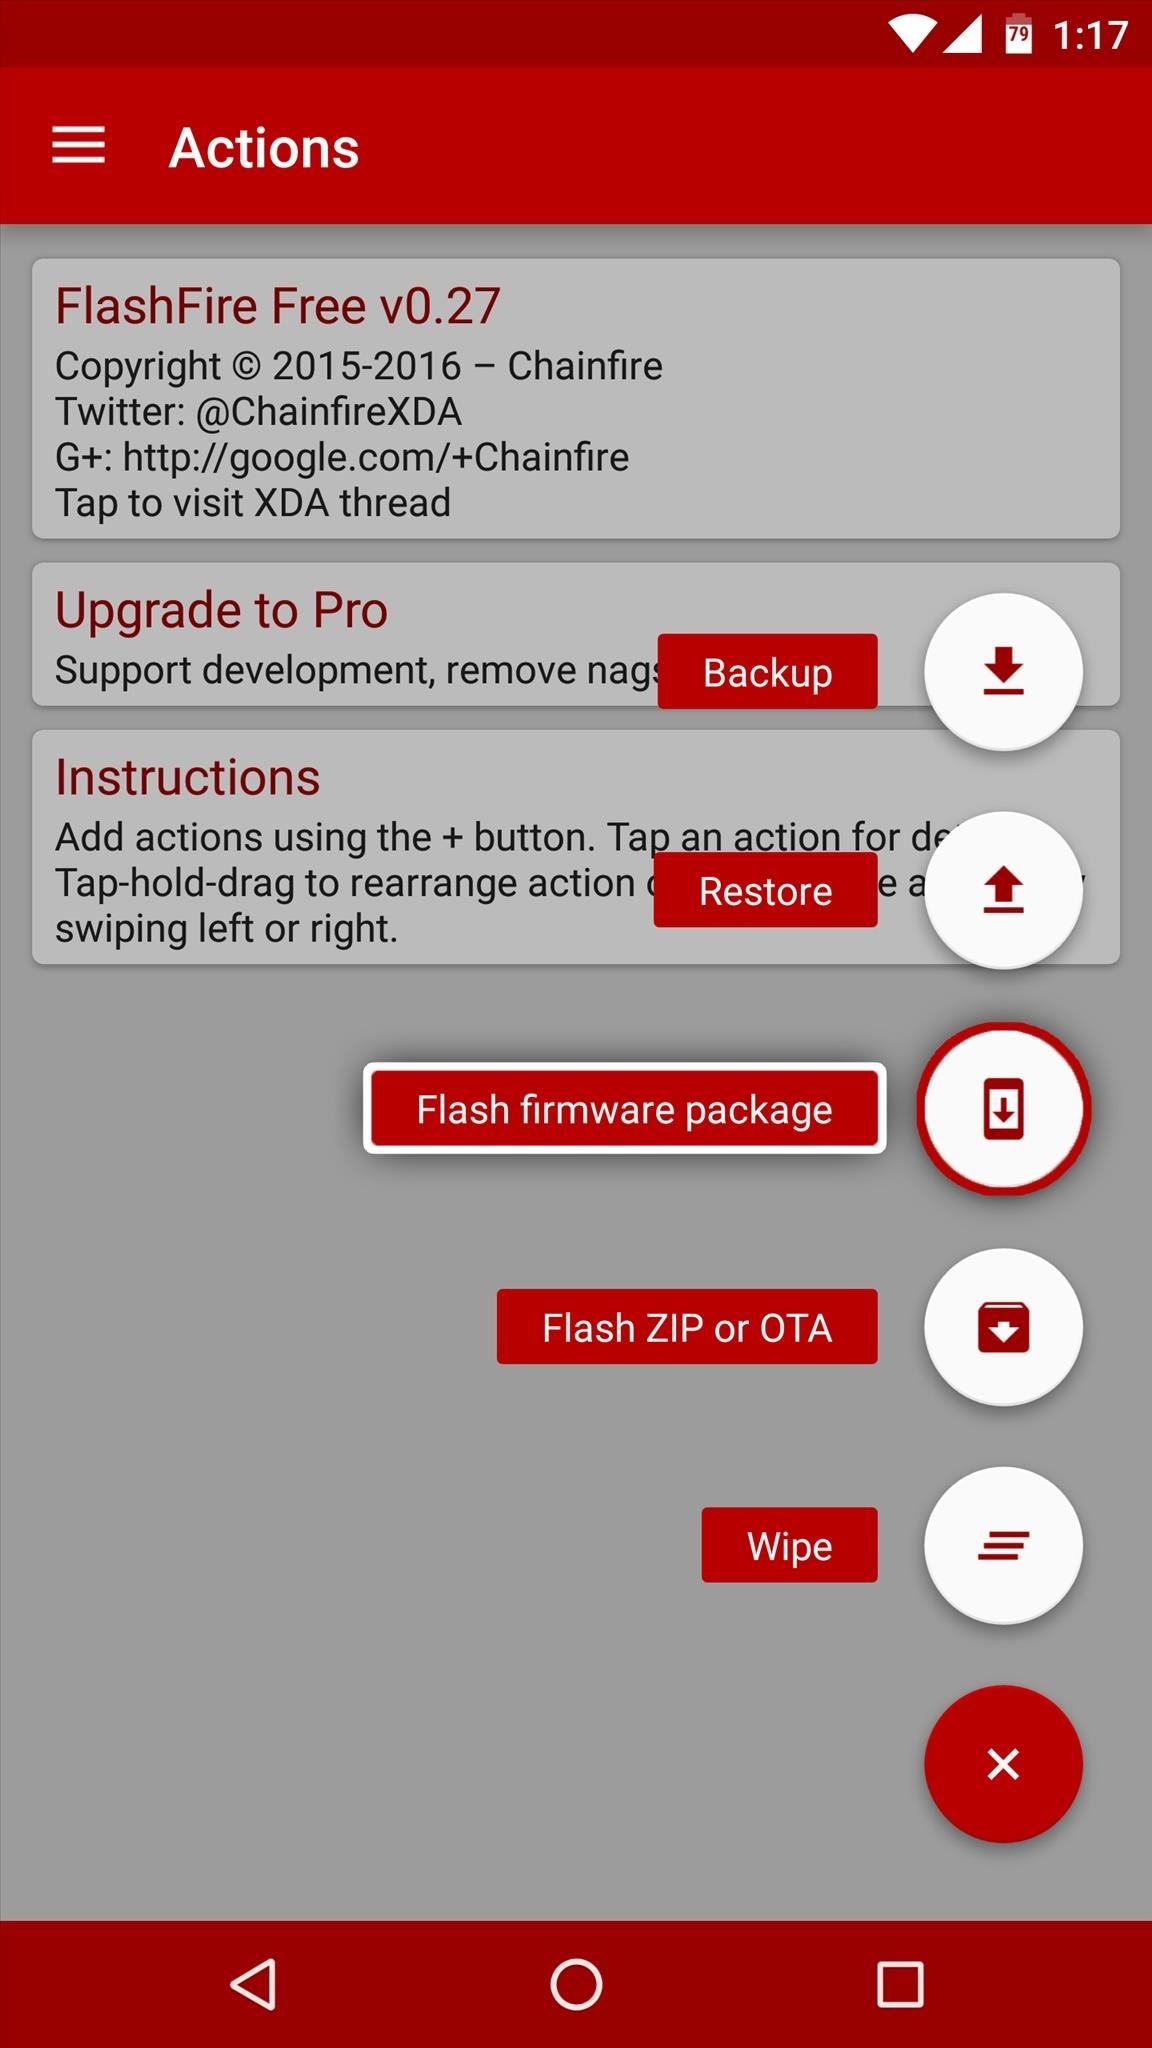
Once you've made it to FlashFire's main menu, tap the floating action button in the bottom-right corner. Next, choose the "Flash firmware package" option.

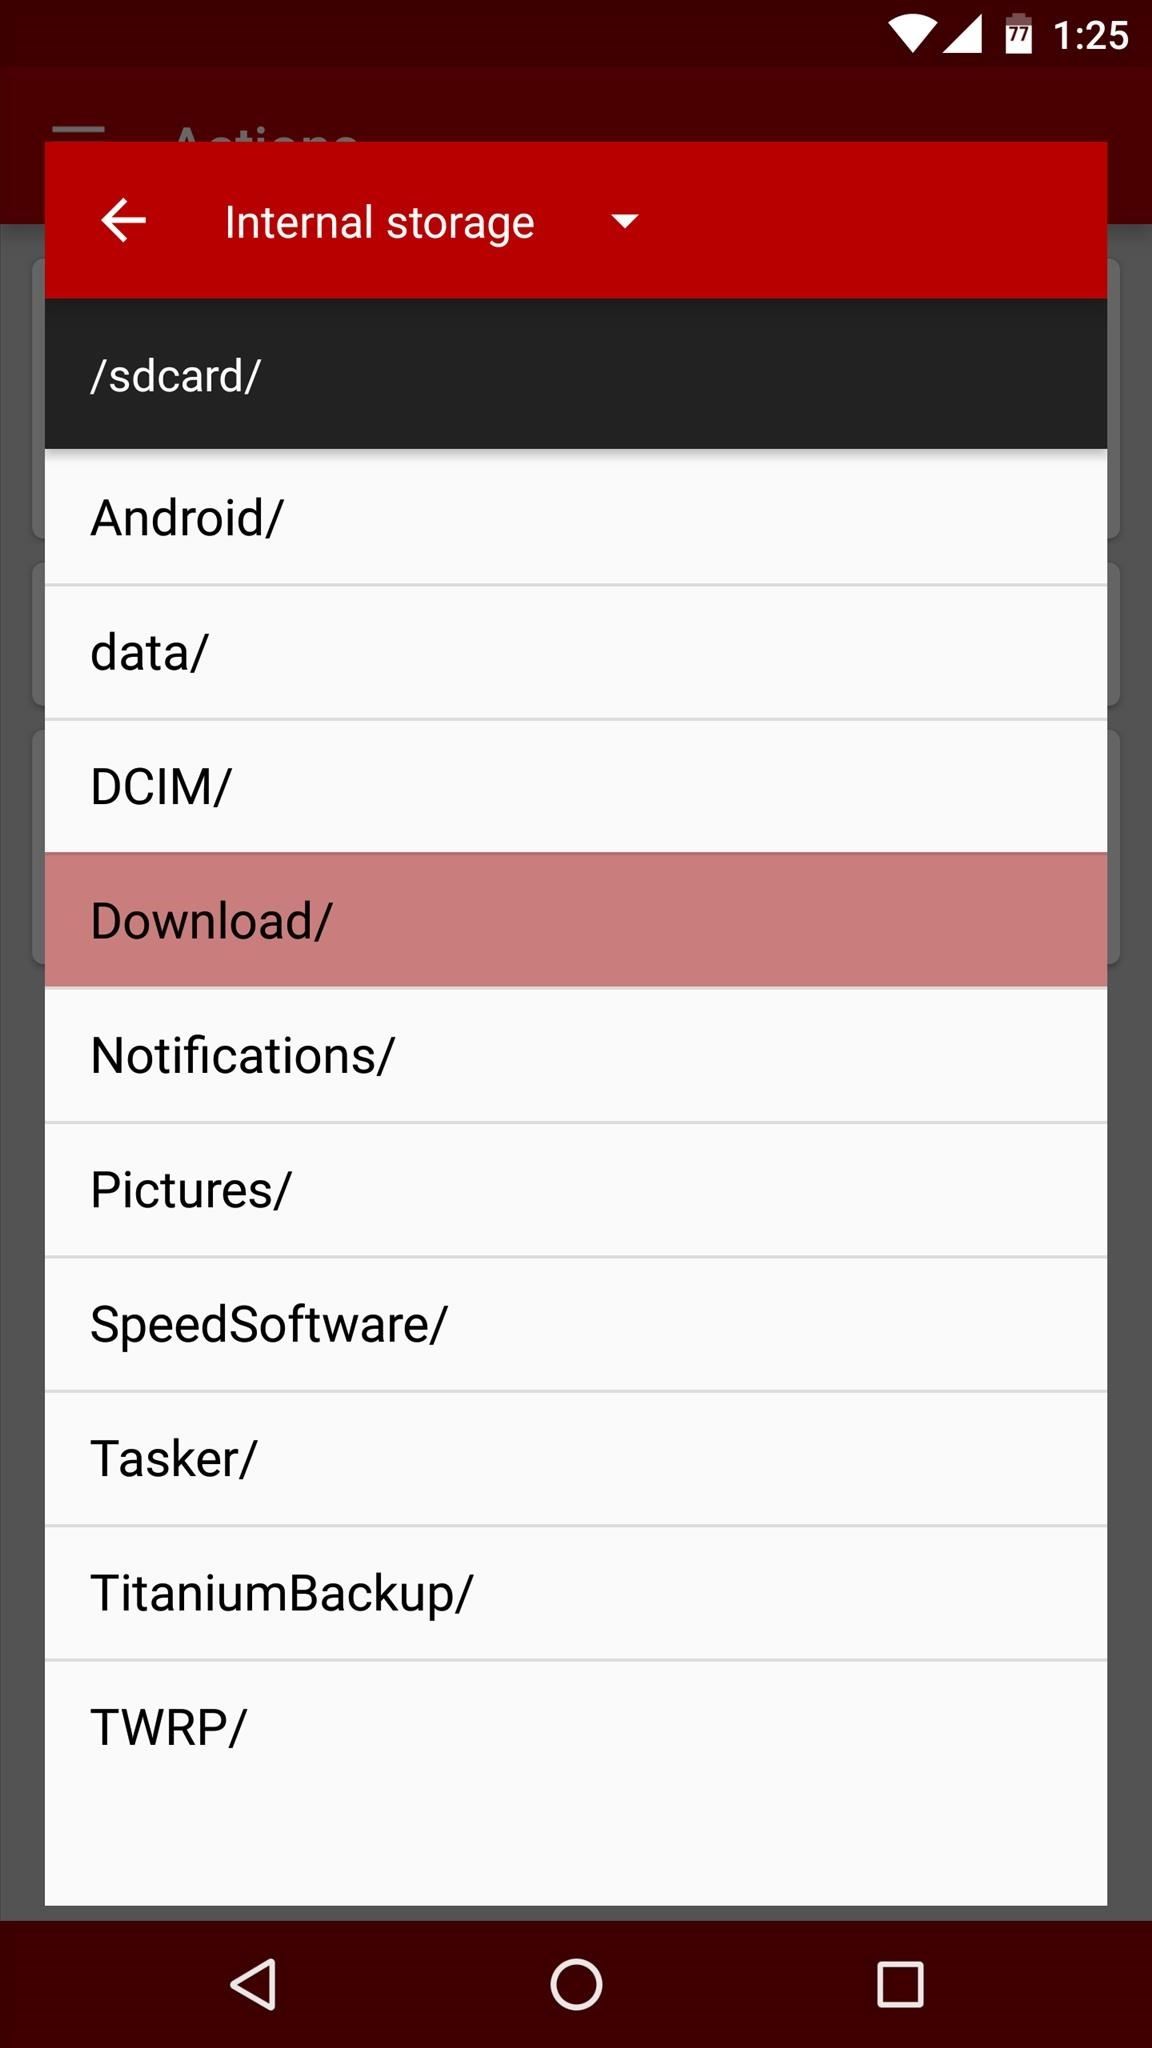
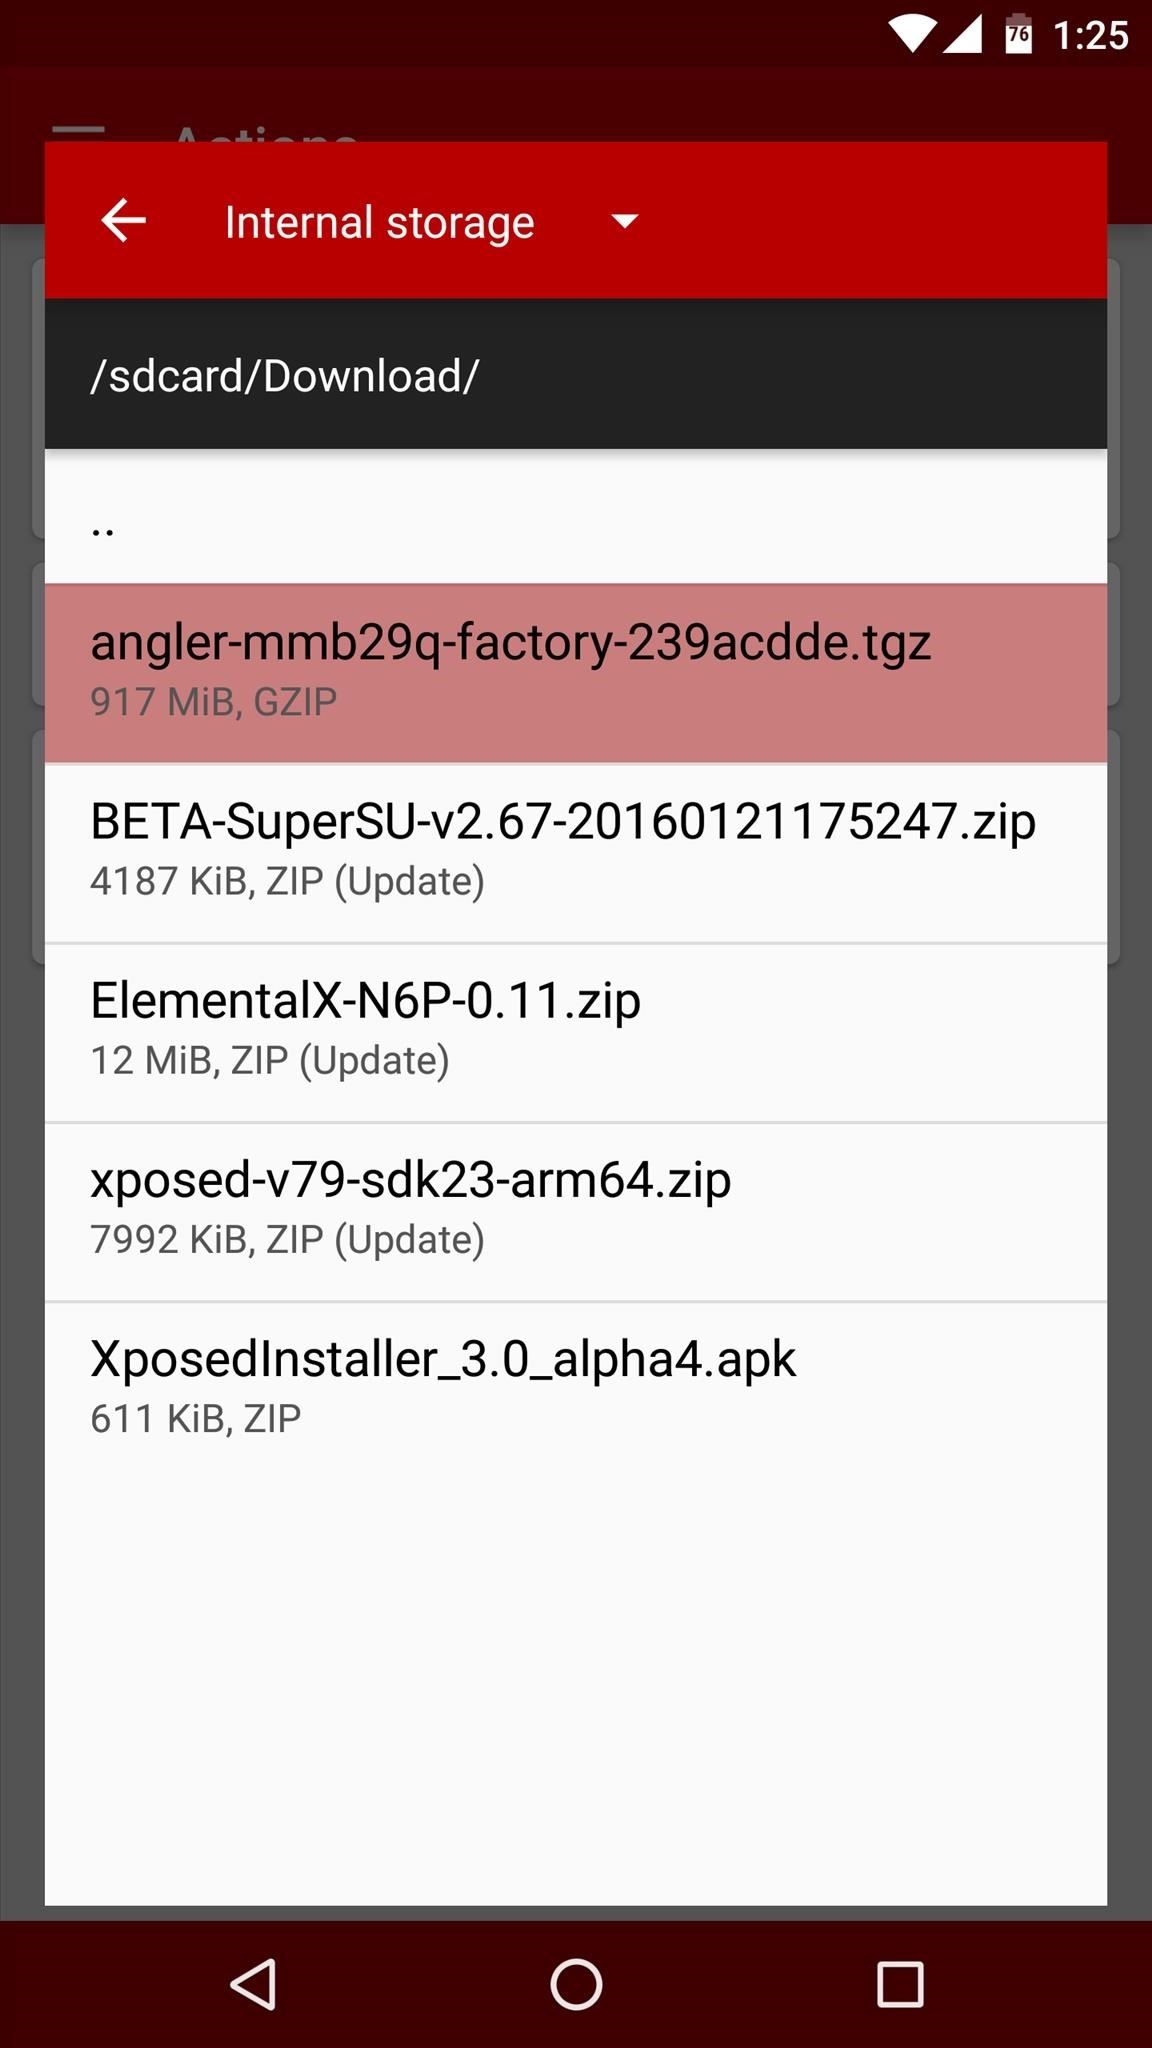
From here, use the file browser menu to navigate to your device's Download folder, then select the factory images package that you just downloaded. If you're not sure which file is the factory images package, look for the one with the .tgz extension at the end of the file name.
At this point, FlashFire will analyze the factory images package, which can take as long as 2 minutes.
Step 5: Choose the Images You Wish to Flash
Once FlashFire is done scanning the factory images package, you'll see a pop-up menu with several different selectable options—these are the individual images that make up the Android update.
If you'd like, you can deselect the Recovery image to preserve an existing installation of TWRP recovery, but I'd recommend leaving all of the options selected exactly as they are. At the very least, make sure that Boot, System, and Vendor are selected, as these are the core elements of the Android update. But either way, when you're done with this menu, tap the check mark at the top of the screen.
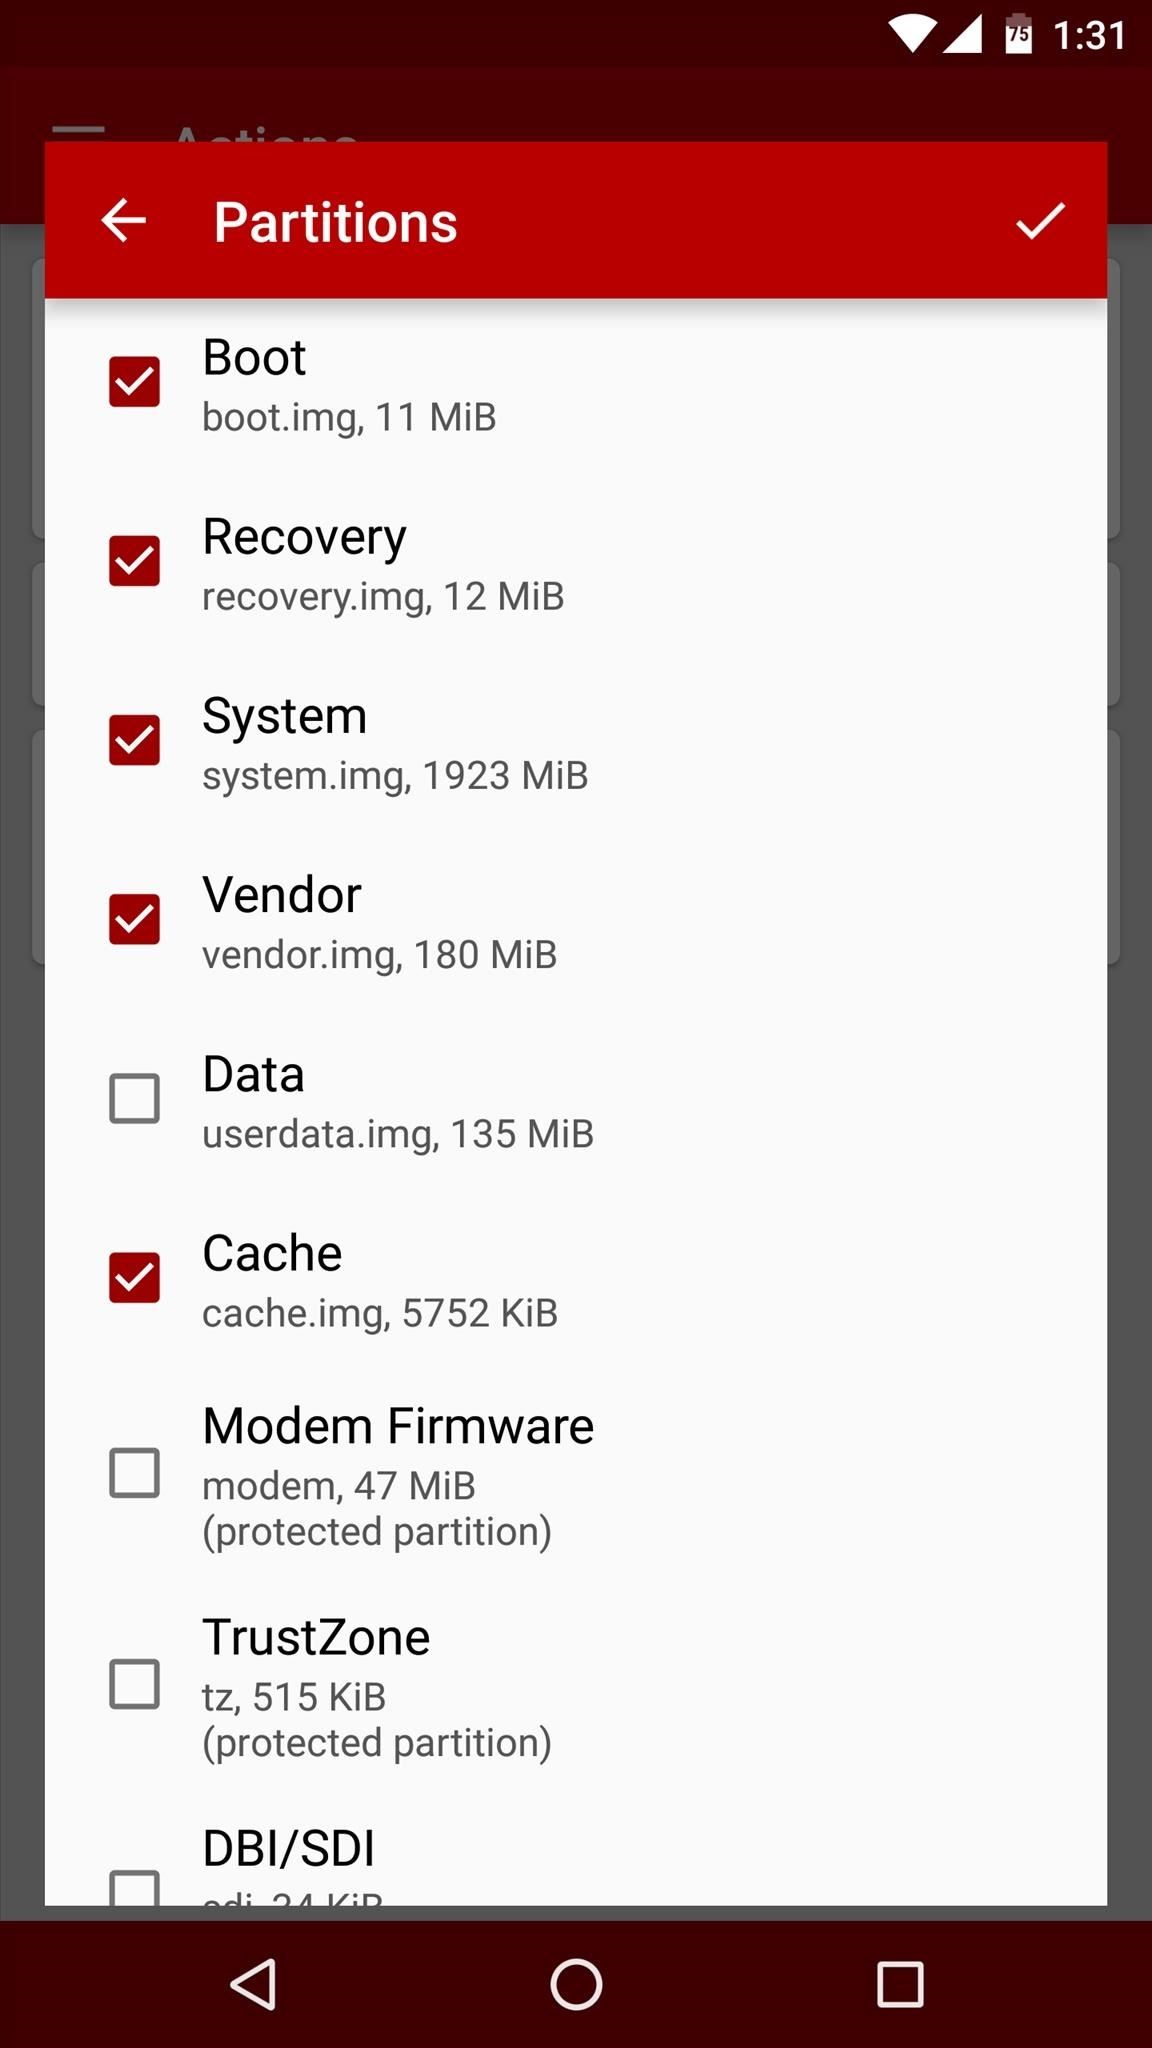
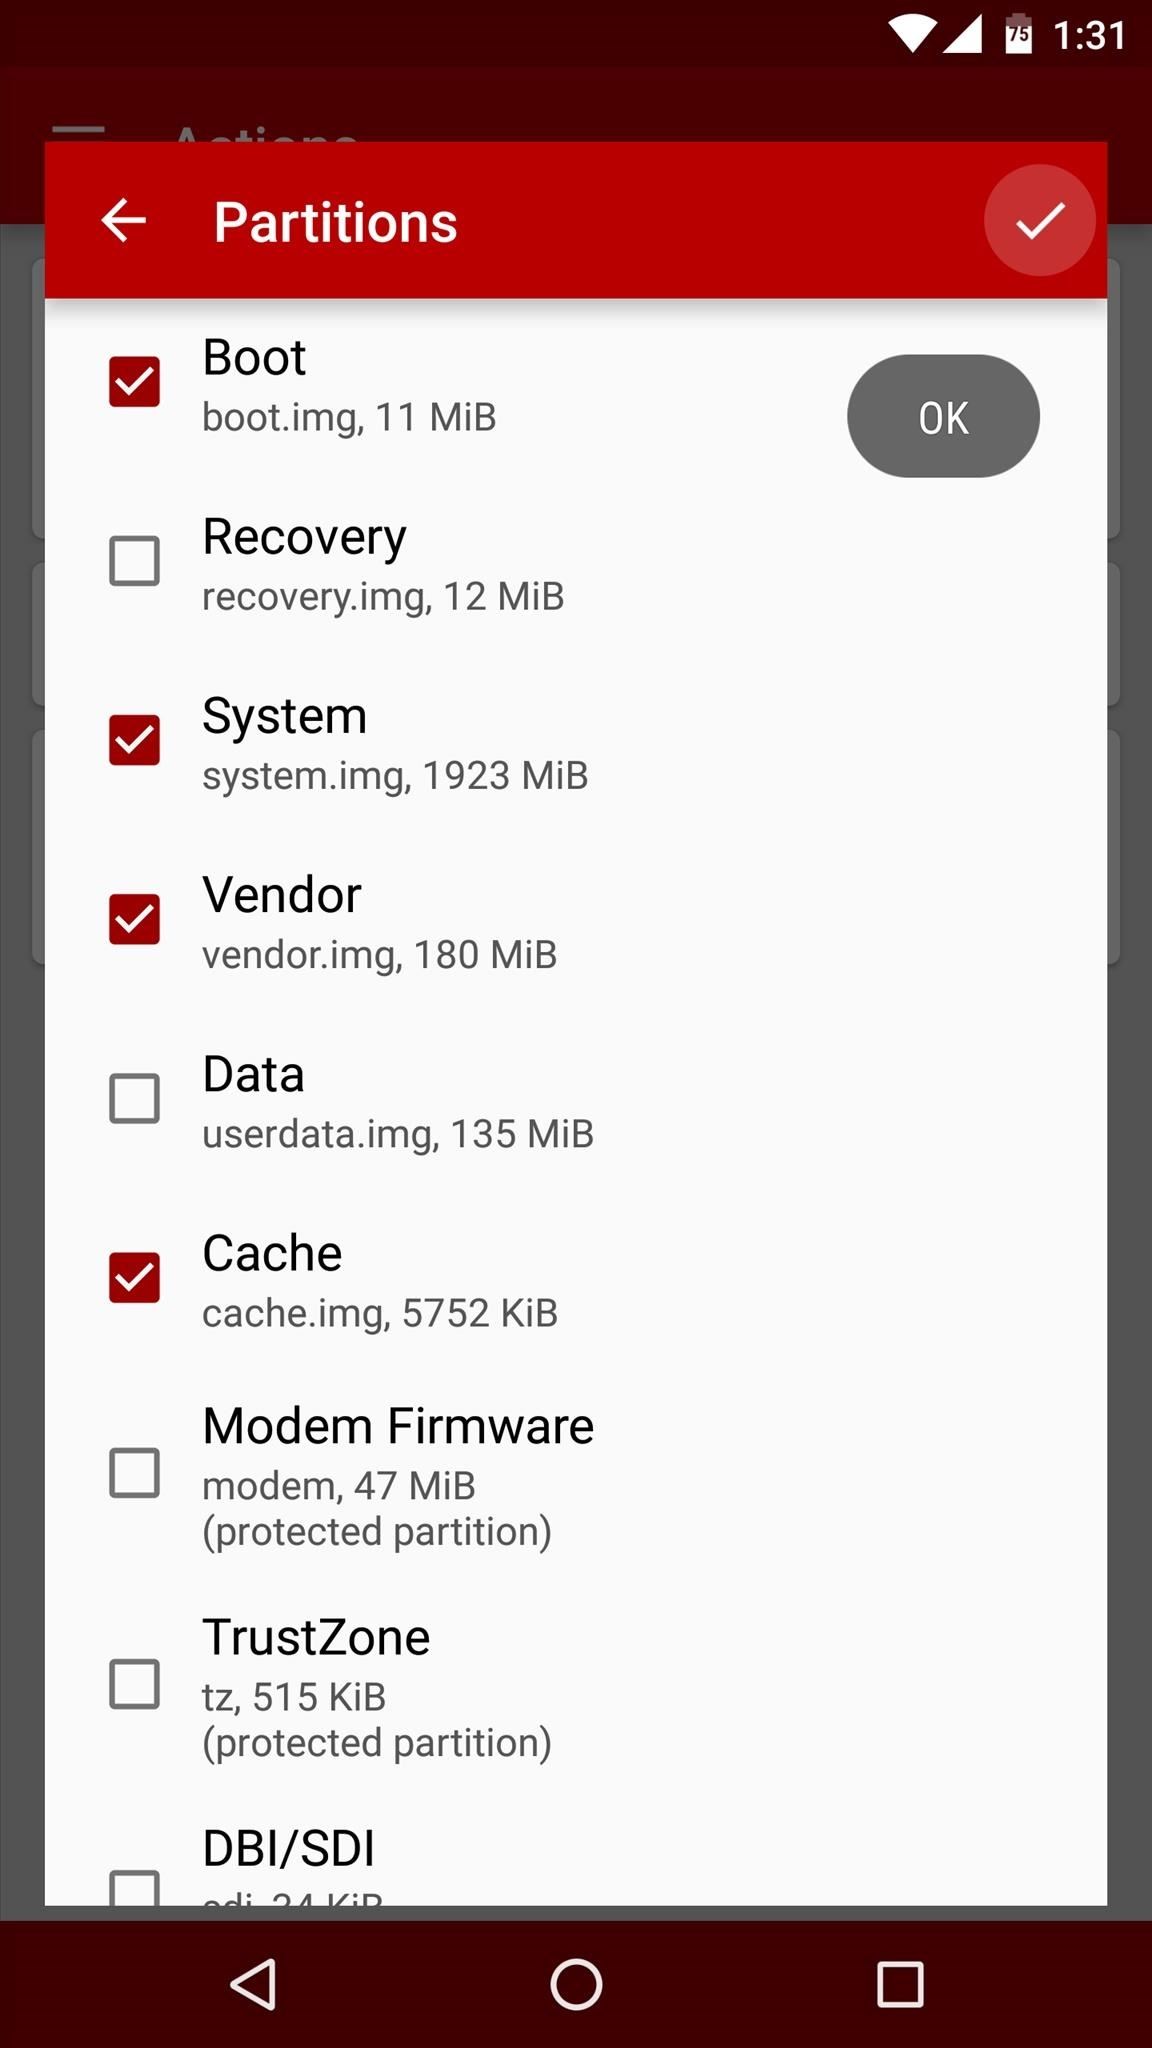
Important: If you want to simply update your Nexus and preserve your data, make sure that Data is left unchecked. This is how OTA updates work—they simply bring in new stuff while leaving everything else as-is.
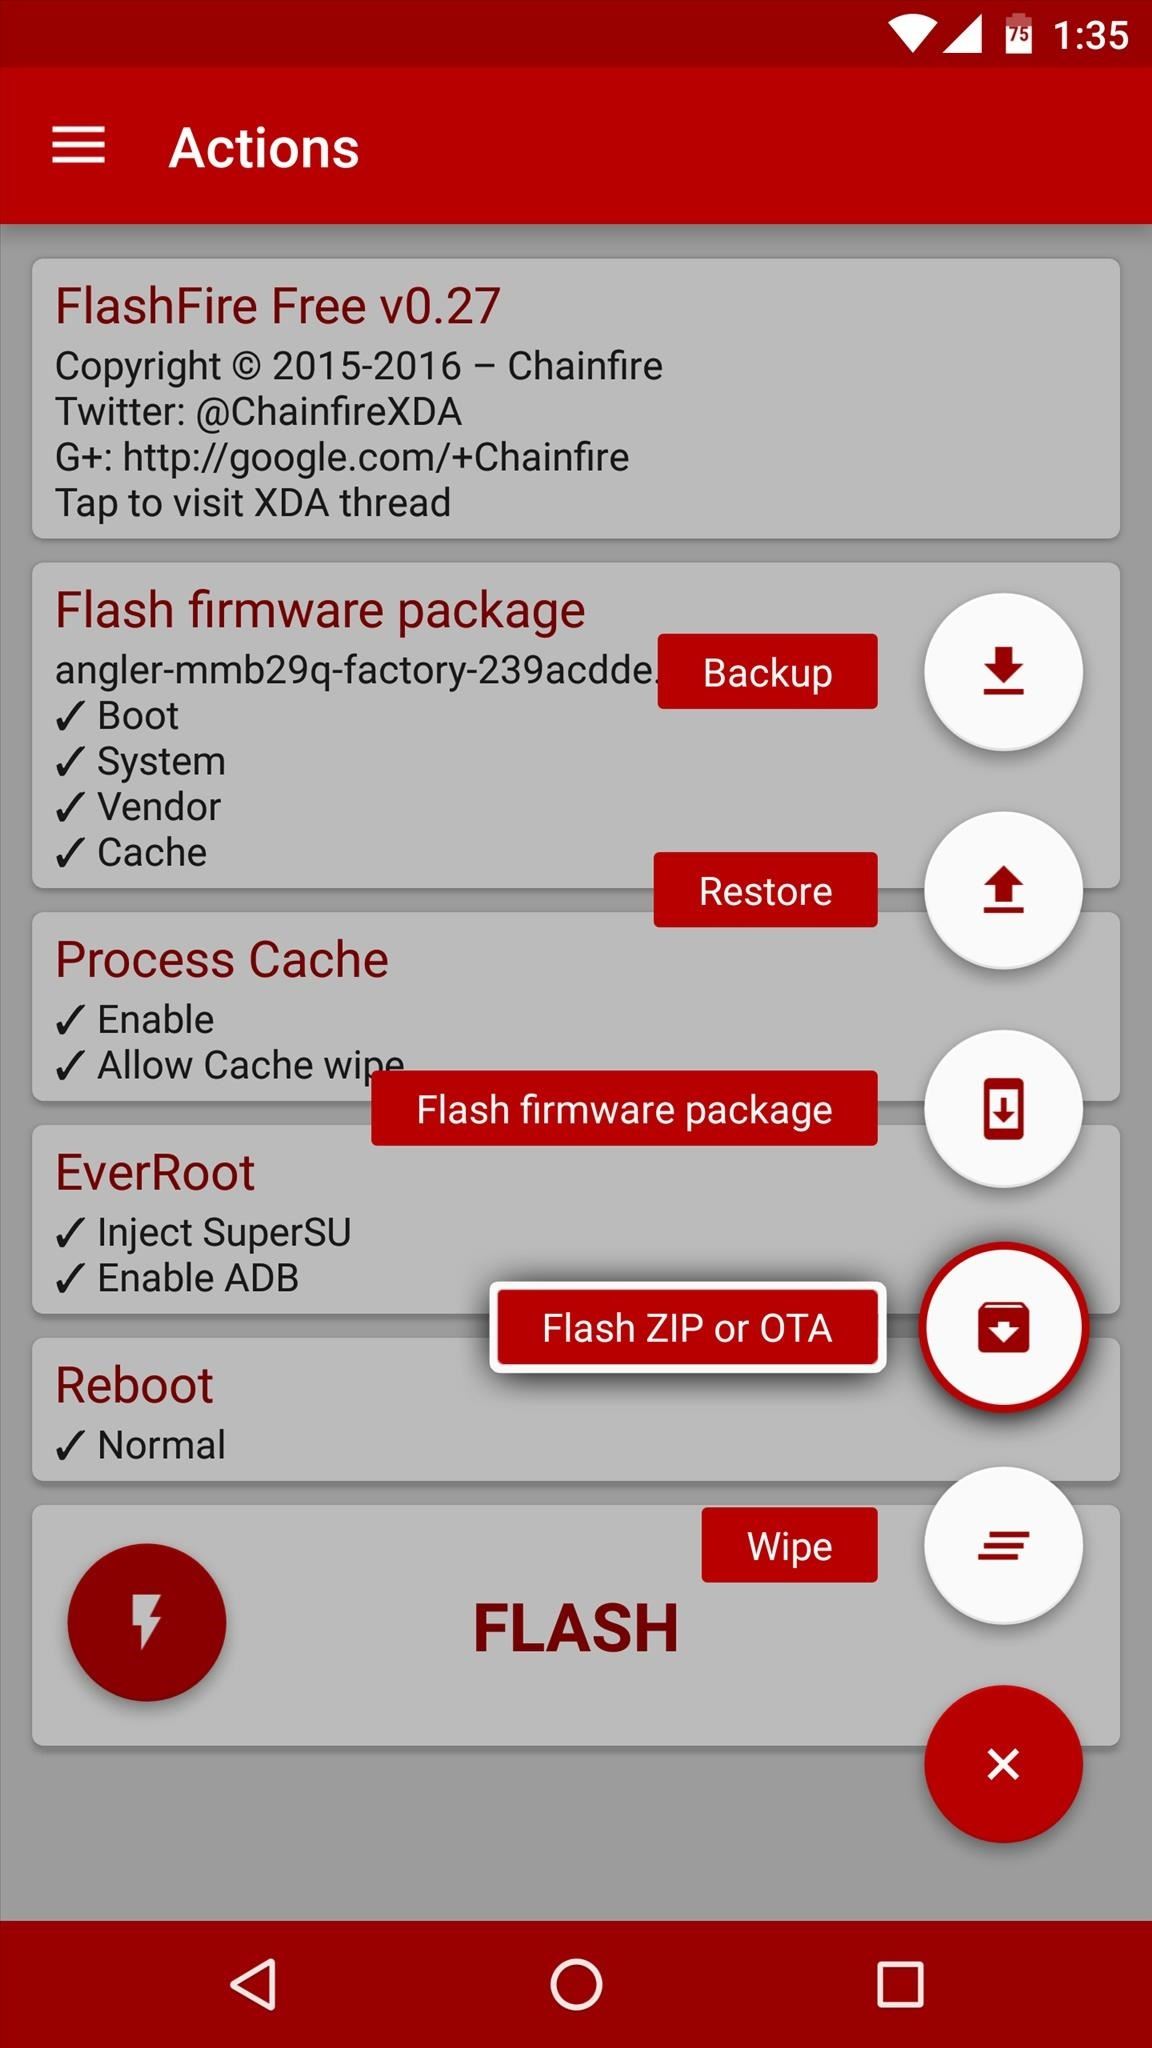
Step 6: Add Additional ZIPs Like the Xposed Installer (Optional)
At this point, you're ready to install the Android update—but since FlashFire is capable of adding multiple jobs to its flashing queue, you may want to take this time to have it reinstall the Xposed Framework once it's done installing the Android update.
If that's the case, simply tap the floating action button in the bottom-right corner again, then choose "Flash ZIP or OTA." From here, use the file browser menu to select the Xposed Installer ZIP, then press the check mark to add it to your flashing queue.
Step 7: Install the Android Update
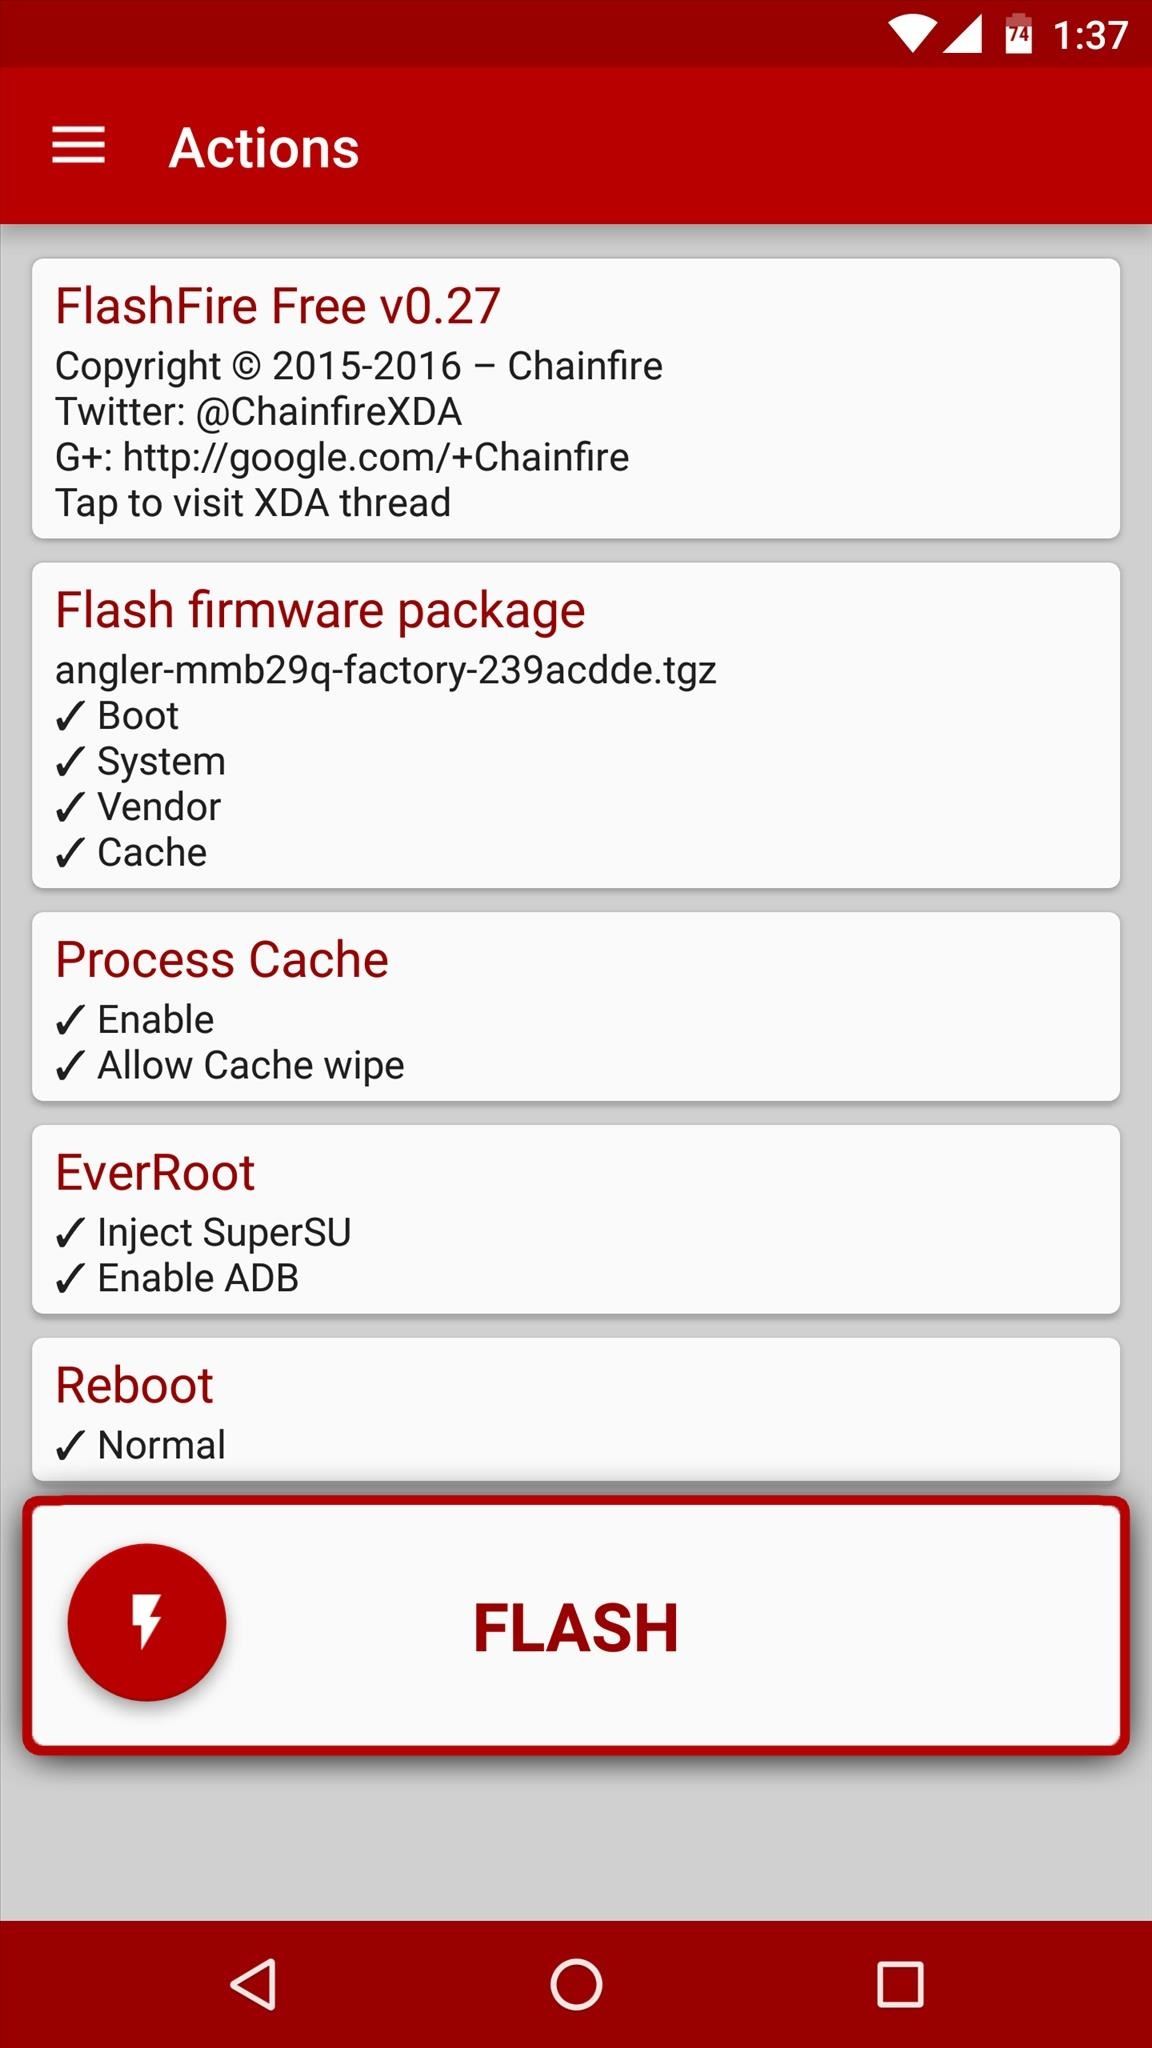
From here, regardless of if you opted to install Xposed or not, the only thing left to do now is to install the Android update. So scroll down to the very bottom of FlashFire's main menu, then tap the "Flash" button, and press "OK" to confirm your choice.
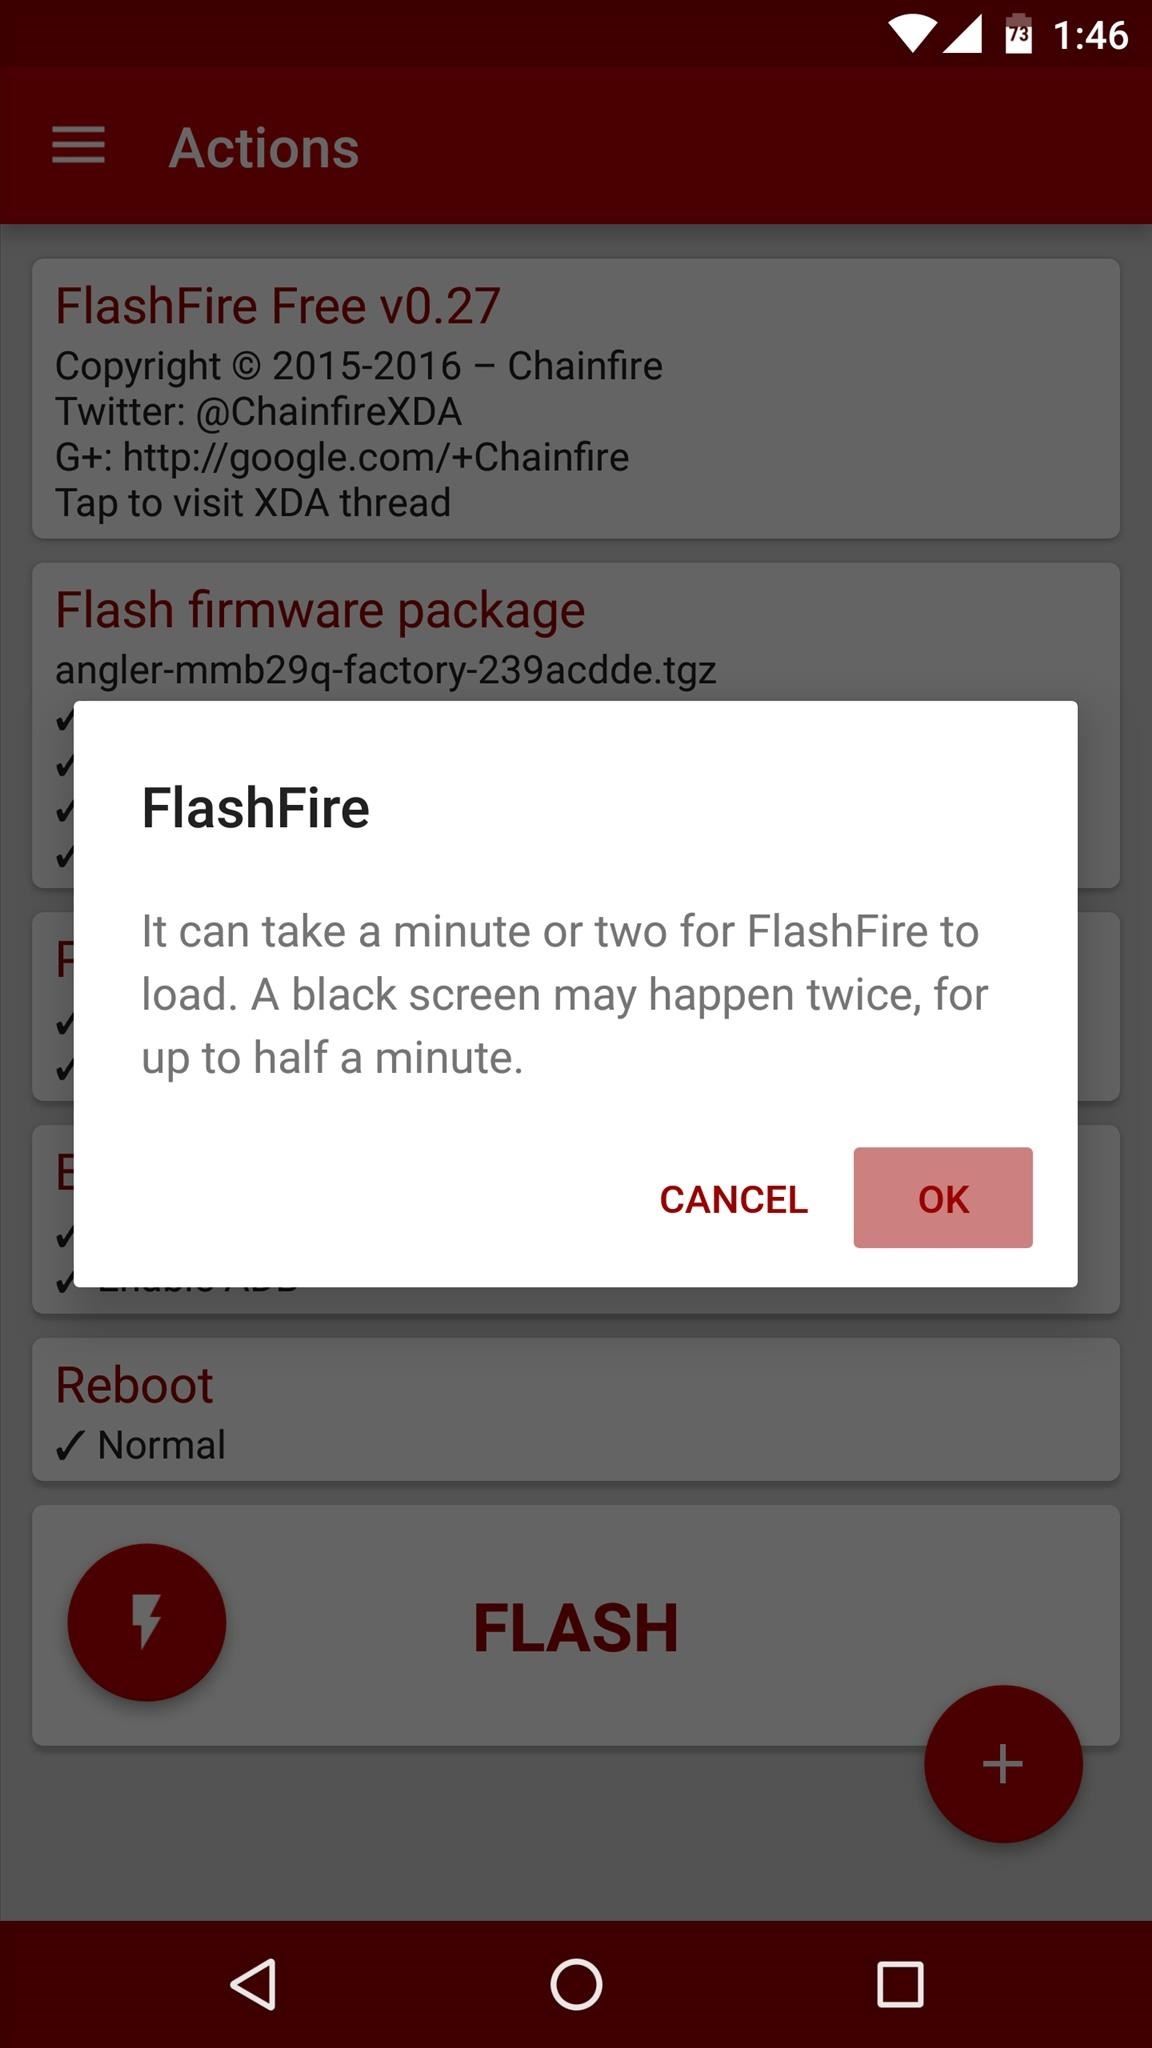
At this point, your screen will go black for as long as a minute, then you'll see a wall of text scrolling by. Once that's done, you'll see a red progress bar across the bottom of your screen as FlashFire installs the new Android update. When this progress bar reaches 100%, your device will automatically reboot.
The first time your device reboots after applying an update will take longer than usual—perhaps even as long as 15 minutes. But when you get back up, your Nexus will be running the latest version of Android, and even better, FlashFire will have automatically re-rooted your device using Chainfire's new Systemless Root method. But if you opted to install Xposed or a custom kernel, you will have effectively shifted from a systemless root to a system root.
Considering how easy that was, is this how you'll be updating your rooted Nexus from now on? Let us know in the comment section below, or drop us a line on one of the following:
Just updated your iPhone? You'll find new emoji, enhanced security, podcast transcripts, Apple Cash virtual numbers, and other useful features. There are even new additions hidden within Safari. Find out what's new and changed on your iPhone with the iOS 17.4 update.


33 Comments
Can you download an ota that Google sends to your phone and use flash fire to flash it or do I have to download from factory image's?
There's an OTA-flashing function in FlashFire, but it won't work if you've used root to modify anything at all. Basically, it's not a realistic option unless you know absolutely everything that any root app has modified and have some way of going back and undoing every little change that has been made. But that's the beauty of the factory images option, since none of that matters and it will update regardless of what's been modified.
Is it possible to use this on a Google Play Edition rom or is this strictly for Nexus devices? In any rate, this is another great development from Chainfire and I will continue to support him. Thanks for sharing this tutorial!
The only devices that are officially supported by FlashFire are Samsung's Galaxy series and Nexuses. That said, it might be possible with a GPE device, but I personally wouldn't try it.
I've been using the Nexus Root Toolkit from WugFresh to do this for a long time now. Hook up your phone and start the tool kit. Just hit "Flash stock and unroot". This flashes the most up to date version of your ROM and unroots the phone. After that I just reroot my phone and all my data is preserved. Obviously all the customisations will have to be reimplemented after having rerooted.
I followed the video and it worked great! I just downloaded the files on to my computer first and transferred them to my Nexus 6p.
The first time I tried it though, I selected to keep my custom recovery and the screen went black but nothing happened. I let it sit for 8 minutes and nothing. I just rebooted my phone and found everything the same. I tried it again, this time leaving the check mark to have the recovery installed and the process went on. It did not take long at all once it worked, like 5 minutes...tops. Now I am upgraded and rooted still. Nice.
Interesting quirk you found there, I'm not sure what exactly was going on. But either way, I'm glad to hear it worked out in the end!
Confirmed. Had the exact same thing happen with my Nexus 6. Your instructions worked. Thanks for the tip.
FlashFire doesn't find the vendor image on my nexus 7 2013 WiFi. Is that normal? Can I do it forward ignoring that?
Yes, that's normal. The vendor image was something they added to Android in 2014, so devices manufactured before then don't have that partition.
Thank you! Than I can update without any worries, right?
Yep! Watching that video clip you posted, everything looks to be in order, so I'd go ahead and flash it now if I were you.
Damn it worked like a charm,i havent upgraded my nexus ever since i rooted it.Its not that i did not want to update it.Its just that the tutorials i found required a computer with ADB tool and some other software and wasnt that easy to do.
Thank you a lot,im gonna keep updating my rooted nexus this way.
Glad to hear it worked so well! One thing, though, is that this can't update your radio or bootloader. They're minor images that don't usually have much of an impact on functionality, and they won't cause any issues with Android if you don't update them. But in the future (like with a major Android version bump or something), you might still want to do an update the old fashioned way here and there so that you can get the newer radio and bootloader.
Here is an updated link to the newest version of Flashfire....
http://download.chainfire.eu/956/FlashFire/FlashFire-v0.31-20160405175326.apk
So you update the link at the top of the page. Also, here is where I got the link from so everyone can keep up-to-date with the app...
https://plus.google.com/+Chainfire/posts/8WB78xvY2oM
Your v0.31 works well thanks !!!
Installing the v0.27 just blinking in my N5 .. nothing happened ..
I'm glad it worked for you.
New ver of Flashfire...
https://download.chainfire.eu/957/FlashFire/FlashFire-v0.32-20160420152035.apk
If radios were updated in the OTA, do I have to select anything special for them to update with FlashFire?
Or will the example selection above suffice?
You are going to have to check the box that says Modem Firmware. It will give you a warning. Just accept it and flash it second not with the rest of the Firmware Flash. It will update your phone, reroot and then update the Modem. Just make sure that you have a backup before you flash anything.
Great info here. At this point, I've used Flashfire to update my Nexus 6P. I do know how to use ADB and fastboot.
Can I simply flash the new radio, or must I do both the bootloader AND the radio at the same time?
Also, will flashing the stock bootloader unroot or lock my phone? I'm a bit unclear on the effects of flashing the updated bootloader after using Flashfire. Thanks.
Worked like a charm on my Nexus 6! Only question I have is why wasn't this method for updating developed sooner. Thank you for sharing.
Worked like a charm! Kept TWRP, root and xposed The only thing I needed to re-do was my custom density in build.prop. I am so glad to get rid of that damn update notification :) Thank you so much!
Does this nuke everything on the phone and require me to set up everything again?
thanks for the tutorial!
quick question, are you able to skip between ota updates? I'm currently on the december 2015 patch (MMB29K) and was hoping to skip all the other updates and flash the current version for july (MOB30O). would that work or would i have to flash the previous ota patches before i can flash the current july patch?
Yep, using this method you can do that. OTA ZIPs only contain the different files from one Android version to the next, so when you use one of those, you have to update to the next subsequent version. But this method uses the factory images, which contain all of the files from the Android version they represent. The images basically overwrite your existing system partitions (the ones dedicated to the Android OS) with all of the new data, so it's like a fresh install, but you get to keep your personal data and apps, because those are on separate partitions that remain untouched.
I have tried several times to download the factory images for my nexus 5 with 4.4.4 to the most recent update. My phone starts the download but stops before it gets to 10%. There is no file in my downloads folder or anywhere that i can find. I have also tried with older update links and the same thing happens. I have 6gb available on my phone. Any advice? Thanks!
I think it's just a big file, so the phone times out. The fix I've found is to keep Chrome open in the foreground while the factory images are downloading. Might have to change your settings to make your screen stay on longer, but if you leave Chrome in the foreground the whole time, it seems to work.
I have a rooted Nexus 6P with TWRP 3.0.2-3 and SU 2.78, with Android N NRD90U.
In the past, with MM, I have repeatedly made the update to the monthly security patches with Flashfire without losing root and data.
It 'just the latest available security patches NBD90X.
It 'also possible with Android N follow the same procedure, or perhaps there are tips on any differences?
Thank you.
The update process is functionally identical on Android N, so Flashfire shouldn't have any problems. I'd be hesitant to update from Android M to Android N using Flashfire (because there are a lot of major changes), but if you're already on N, you shouldn't have any problems installing a security update or minor version bump.
Have you flashed from Factory image Boot , System, Vendor and Cache?
Any problem with TWRP (I have TWRP 3.0.2-3)?
Thank.
I'm just a regular guy who likes to play with my phone; I'm not a developer, programmer or engineer, so some aspects are over my head. I appreciating rooting my Nexus 6P and I'm running TWRP, ElementalX and Magisk with a Nova launcher. It's great - I love my phone! However, updating is a chore and I've screwed up in the past and had to redo my phone from scratch which is a lengthy chore. That's why I haven't bothered with any security updates - it's been 8 months. But now I'm getting the itch again and would like to update it: this method looks great. If I follow this to a T, do you think I'll need to reload TWRP, ElementalX and or Magisk? Thanks.
By the way I'm on Android 8.1
Share Your Thoughts