

Google has finally released the next version of the world's leading operating system—Android 6.0 Marshmallow. This latest iteration isn't as much of a visual overhaul as Lollipop was, but it packs in more new functionality than almost any update before it. Awesome features like Now on Tap, granular permissions control, and a deep sleep battery-saving feature called Doze round out the highlights, but there is far more to it than that.
- Don't Miss: How to Root Marshmallow on a Nexus Device
The only trouble here is the wait. Owners of most devices will have to wait on their manufacturers to tweak Marshmallow to their liking before an update will come through, but even Nexus owners will have to wait on Google's staged rollout, which can take as long as a month. Luckily though, Android 6.0 is already available for download, so if you're up to the task, you can manually install Marshmallow on your Nexus device right now.
Note: Back Up Your Device to Save Important Files
Since manually updating a Nexus device requires you to unlock the bootloader, and the process of unlocking your bootloader will wipe the device, make sure to have any important data backed up before you begin. Apps and contacts should automatically restore themselves when you log into Marshmallow with your Google account, but anything that isn't saved to the cloud should be transferred to a separate storage device at this time.
Method 1: Use Nexus Root Toolkit (Windows Only)
If you're using a Windows PC, the easiest way to manually install updates on a Nexus device is to use a program called Nexus Root Toolkit. The utility was developed by Wugfresh to provide a nice, mouse-friendly interface for this whole process, and I've covered it with an in-depth guide in the past. While the guide outlines updating to Lollipop, the steps will be exactly the same if you're updating to Marshmallow.
Method 2: Use ADB & Fastboot Commands (Mac, Windows, or Linux)
If you don't own a Windows PC, or if you'd simply prefer not to use the Nexus Root Toolkit, manually updating your Nexus device is still fairly simple. You'll have to download the update yourself, install ADB and Fastboot on your computer, and type in a few commands—but I'll go over the entire process in detail below.
Step 1: Install ADB & Fastboot on Your Computer
First, you'll need to install a pair of Android tools on your computer, which are called ADB and Fastboot. This process will vary depending on your operating system, but we've got an easy-to-follow guide for Mac, Linux, and Windows that will cover all of the bases.
Step 2: Download the Android 6.0 Factory Images
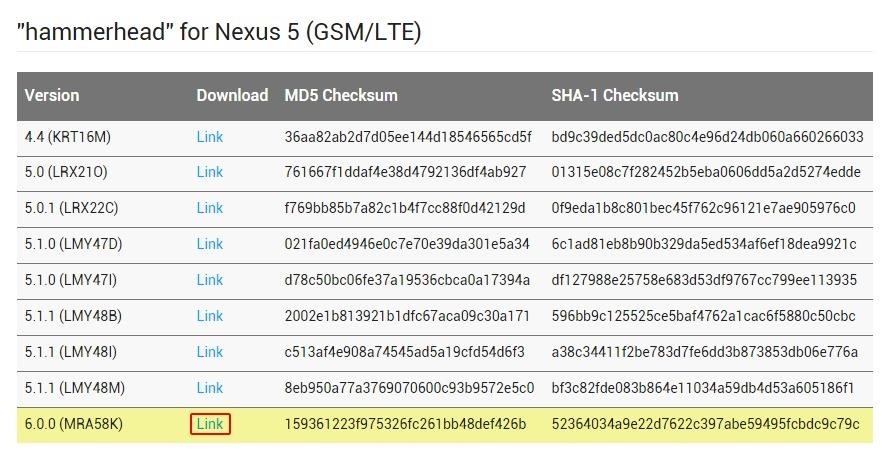
Next up, you'll have to download the Android 6.0 Marshmallow factory images. These are essentially the official stock firmware for your device, and they've already been published, so there's no need to wait.
Using your computer, click this link to head to Google's factory image download page. From here, find your device, then download the Android 6.0 firmware by clicking the adjacent link.
Step 3: Move Files to Platform Tools Folder
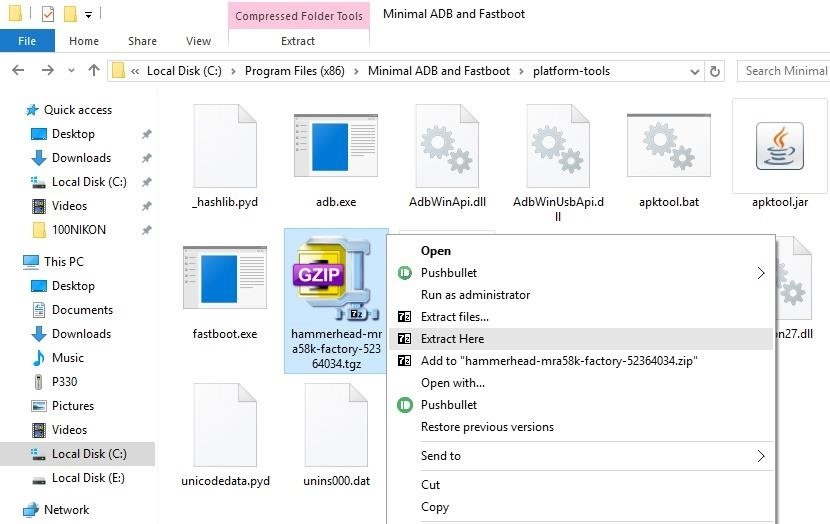
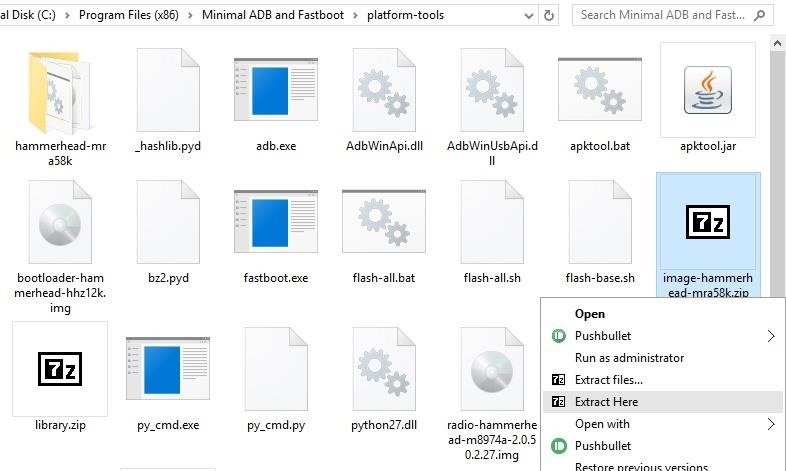
Once the factory image file is finished downloading, copy the TGZ file over to the "platform-tools" folder inside of the ADB installation directory. From here, use a program like 7zip or WinRAR to extract the contents of the TGZ file into the platform-tools ADB folder.
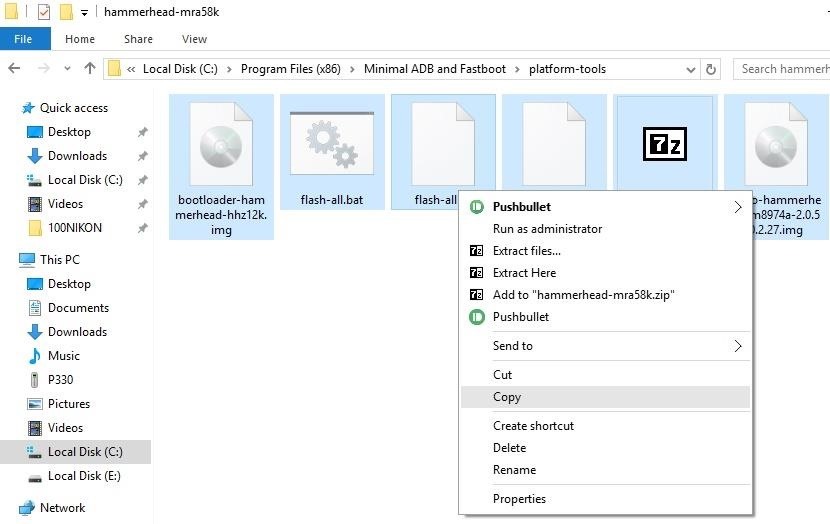
Once you've done that, you'll find another archive—this time a TAR file. Extract the contents of this archive as well, then open the folder it creates. From here, copy all of the files inside of this folder, then paste them into the parent platform-tools folder.
Step 4: Enable USB Debugging & OEM Unlock on Your Nexus
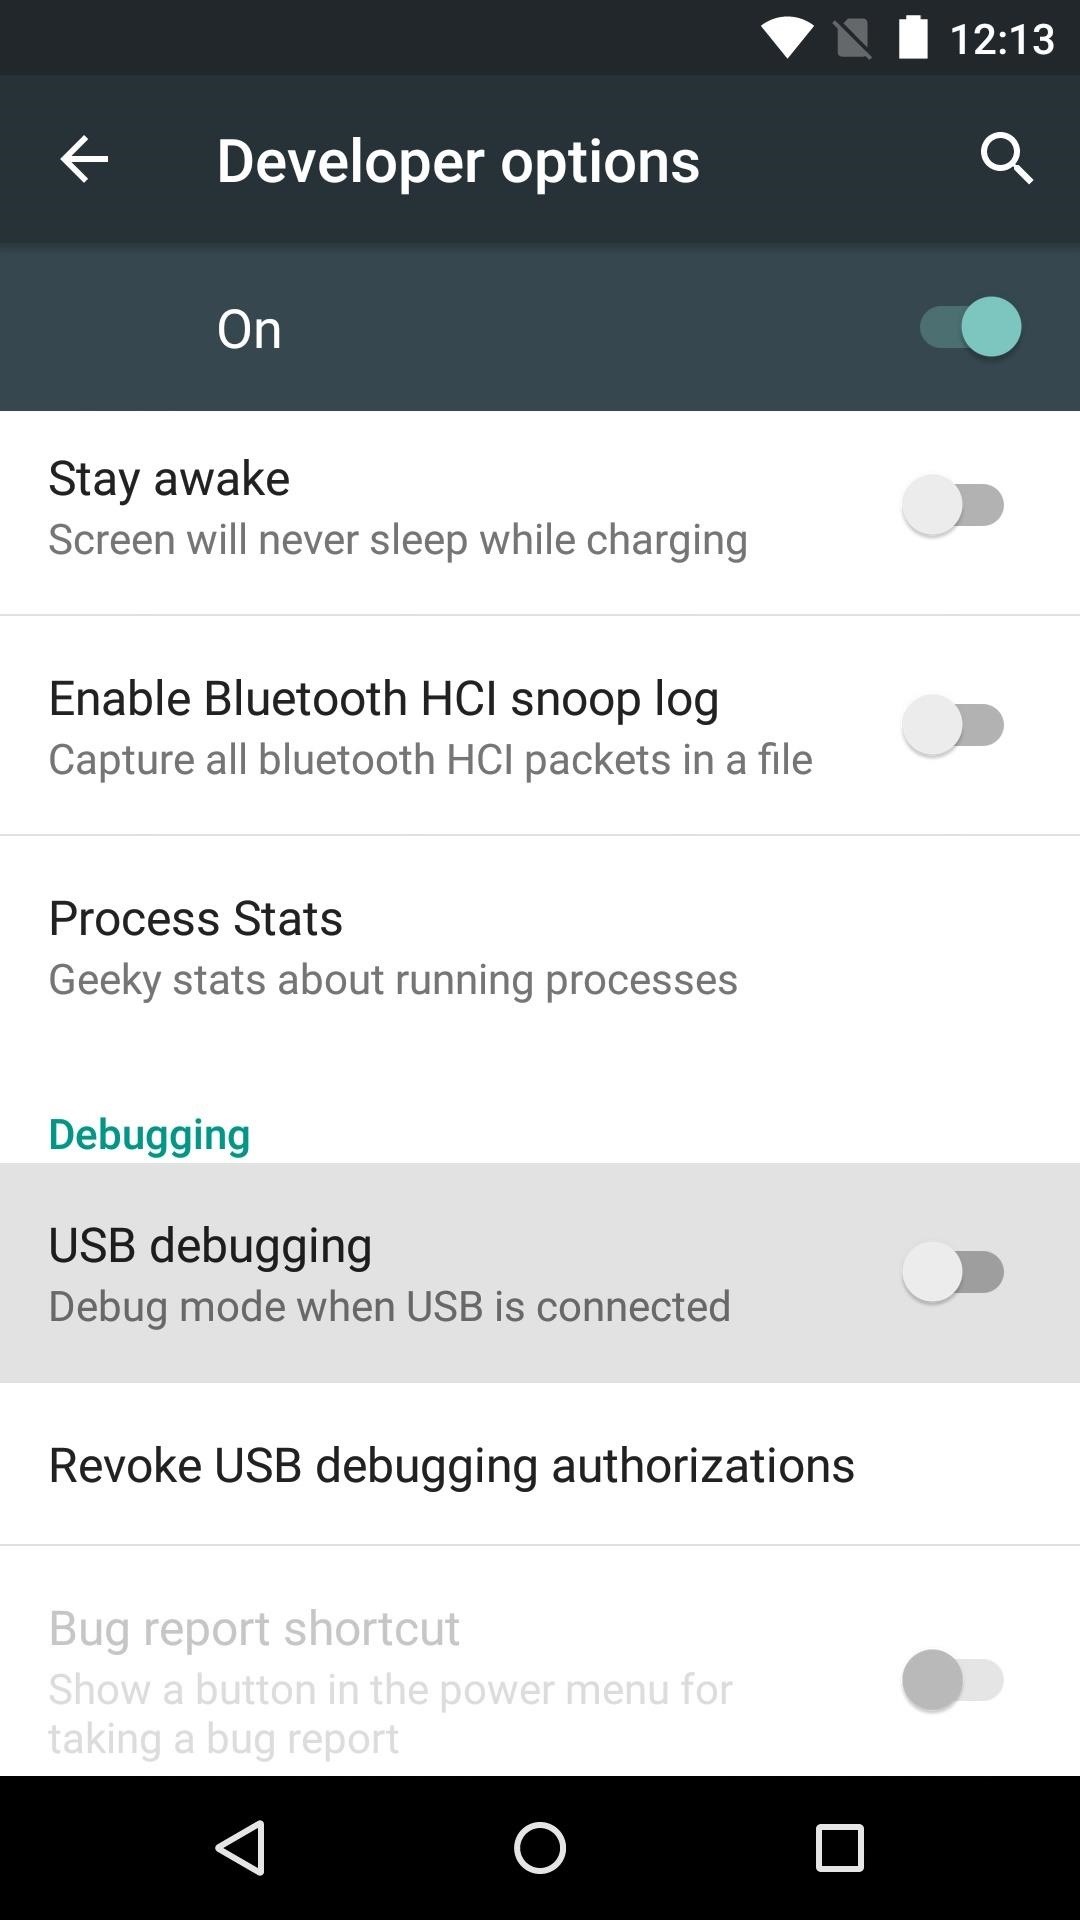
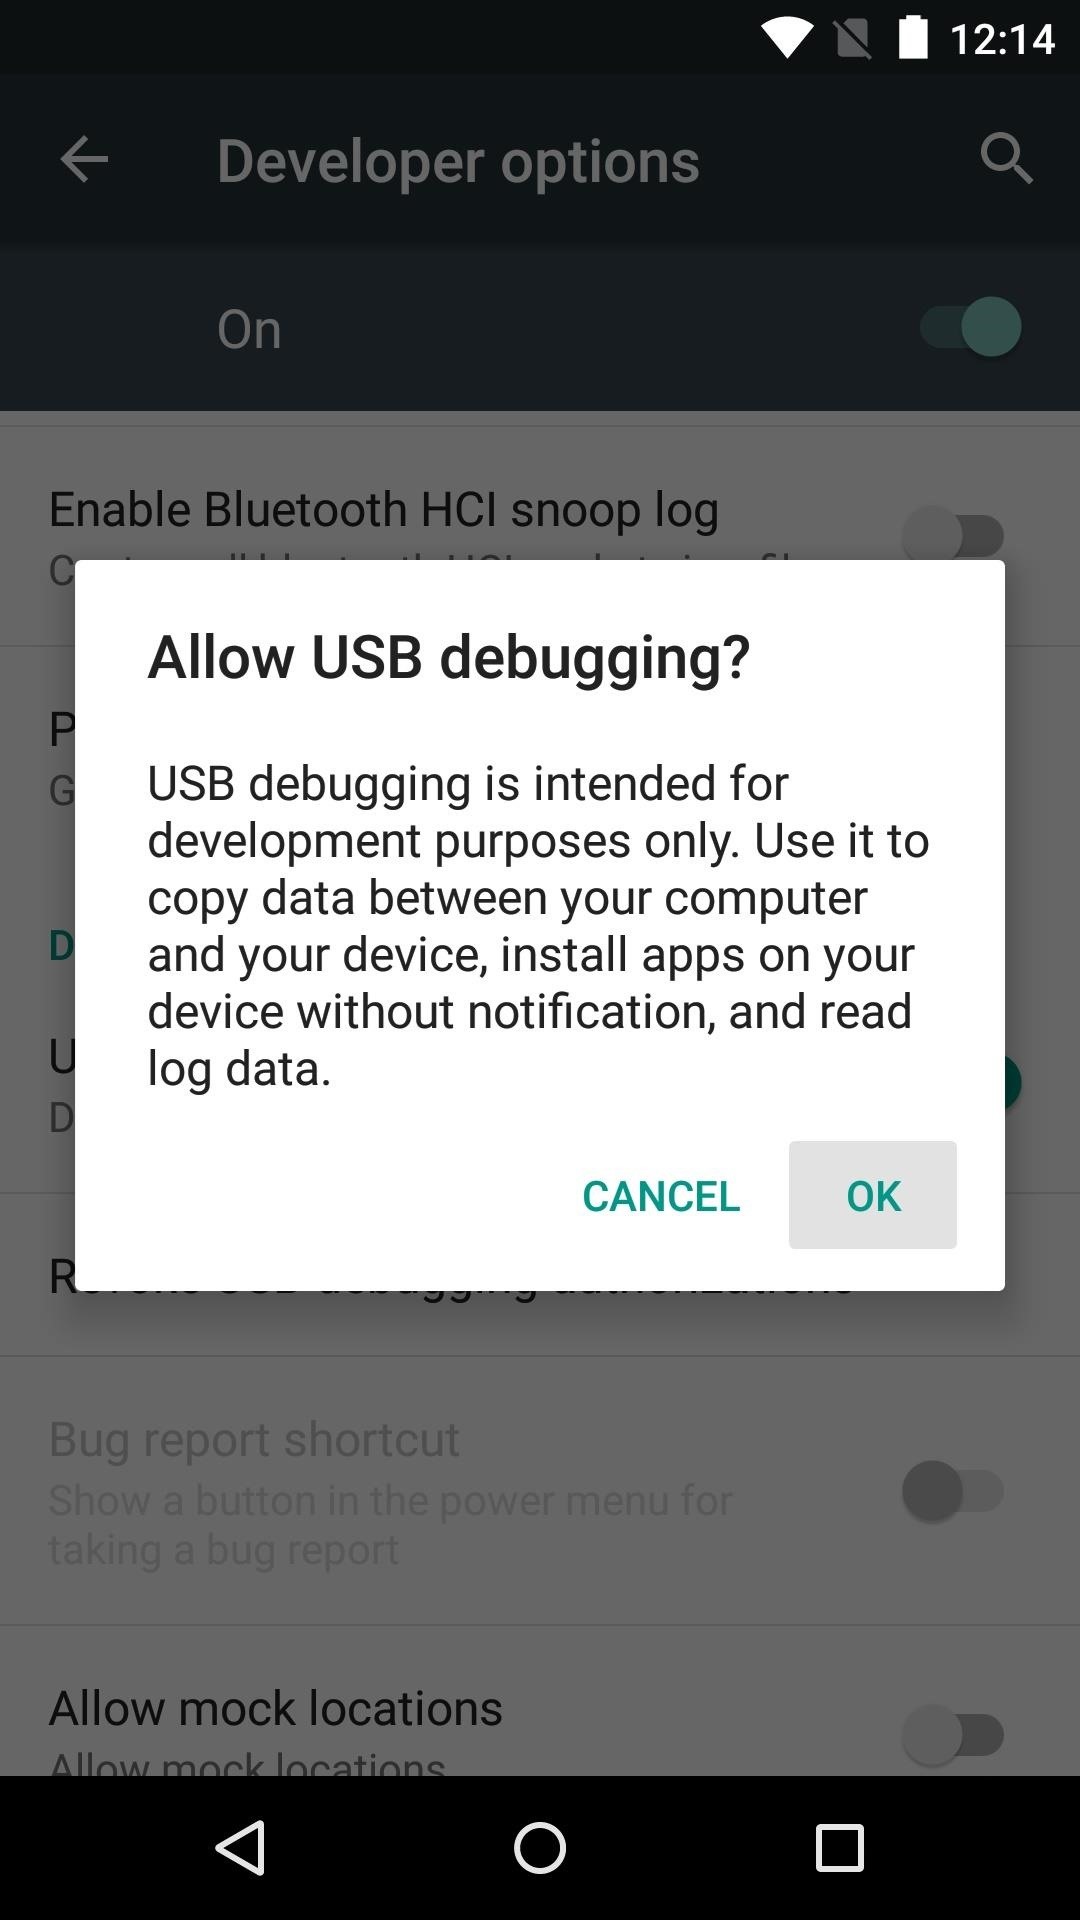
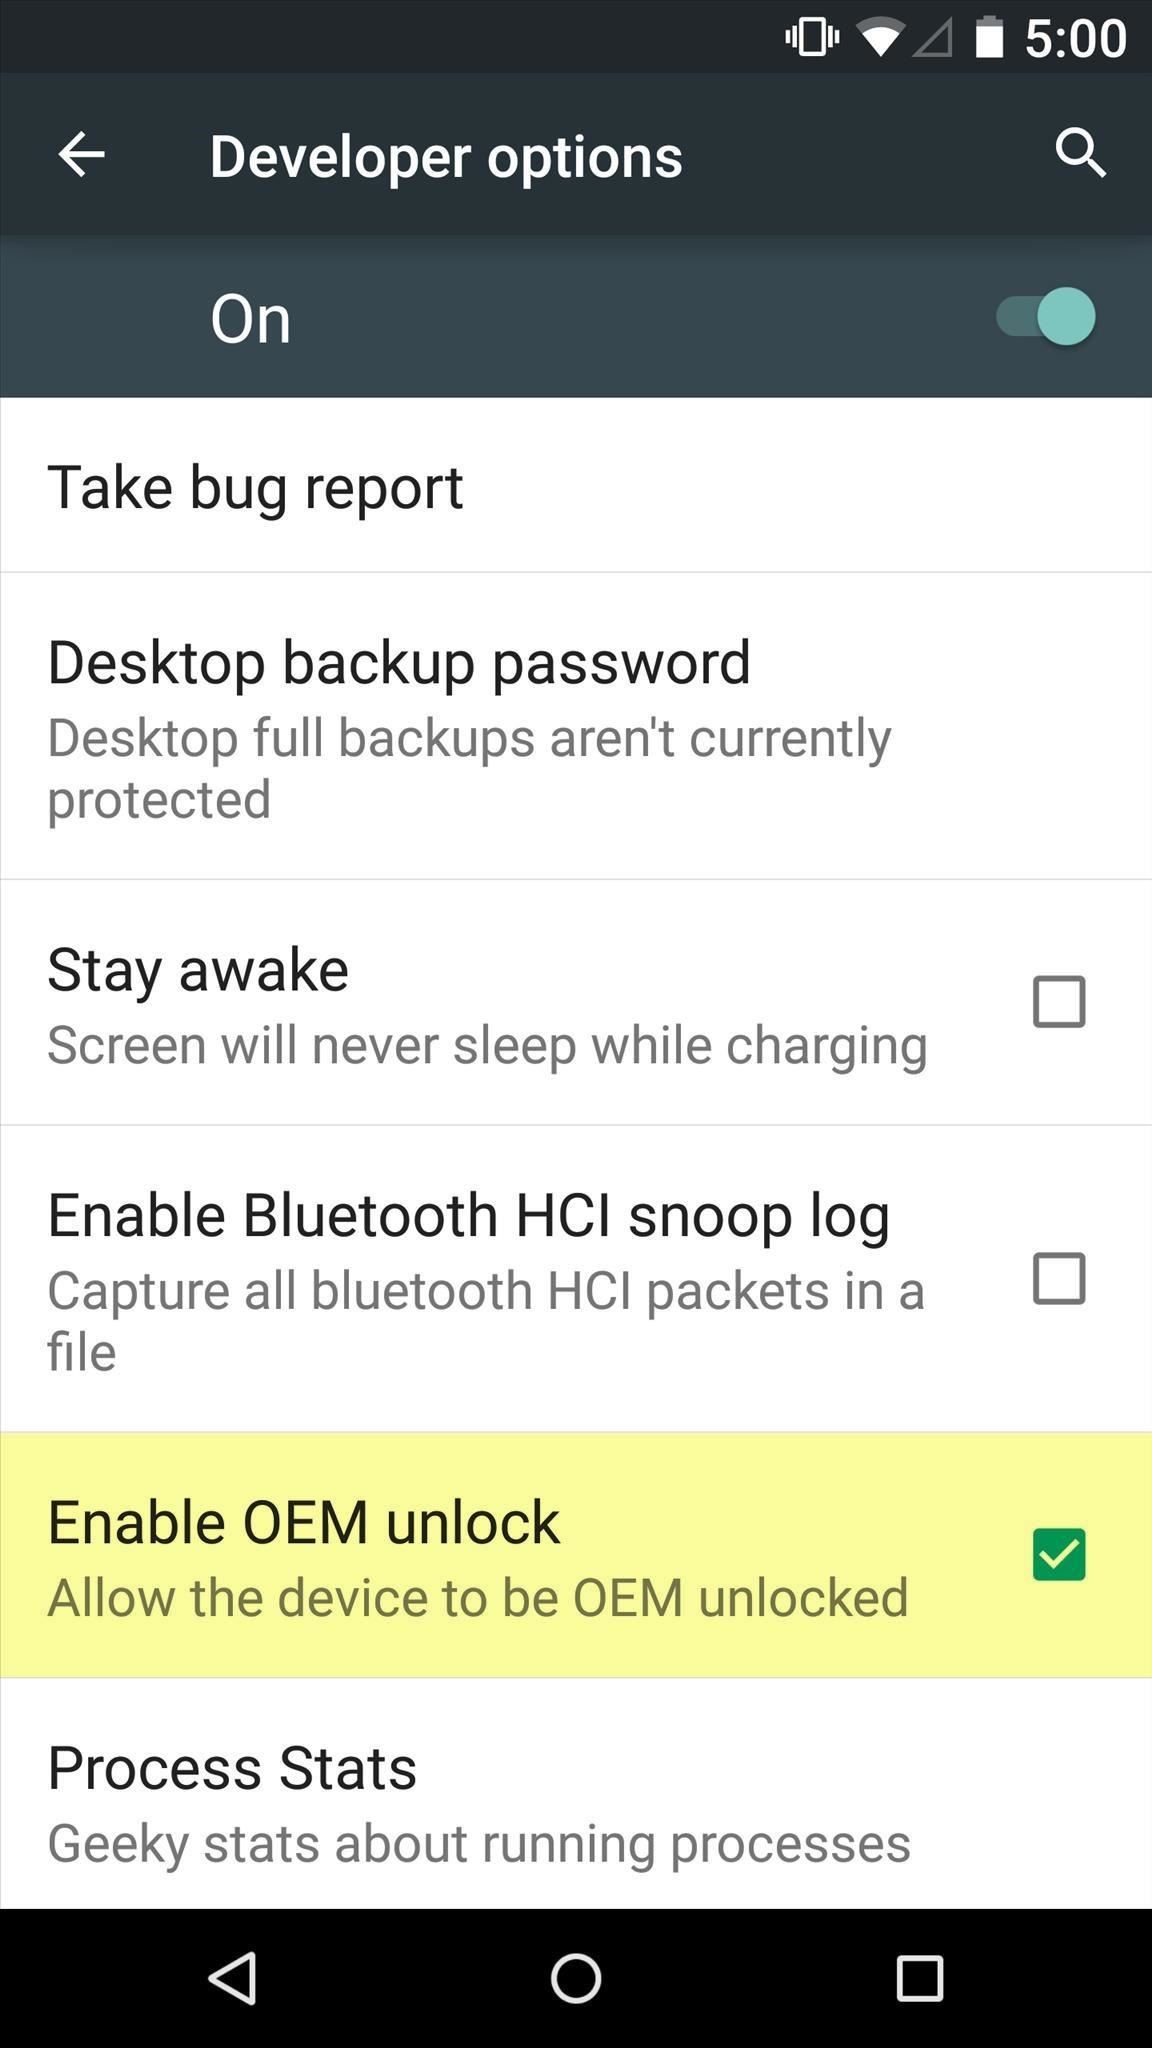
Before you can flash the factory images that you just downloaded, you'll have to enable an option or two on your Nexus device. Both of these settings can be found in the Developer options menu, which is hidden by default. To activate this hidden menu on your device, refer to our guide on enabling Developer options.
From here, all Nexus devices will need to have the "USB debugging" setting enabled for any of this to work, so make sure to take care of that. If you own a newer device like the Nexus 6, you'll also have to turn on the "Enable OEM unlock" setting, which allows you to unlock your bootloader.
Step 5: Unlock Your Bootloader
Next, you'll need to unlock the bootloader on your Nexus to enable manual updating if you haven't already done so. Plug your device into your computer with a USB data cable, then open a command window and enter the following command if you're using a Windows or Linux machine:
- adb reboot-bootloader
If you're using a Mac, it's essentially the same command, but with a period and slash at the beginning:
- ./adb reboot-bootloader
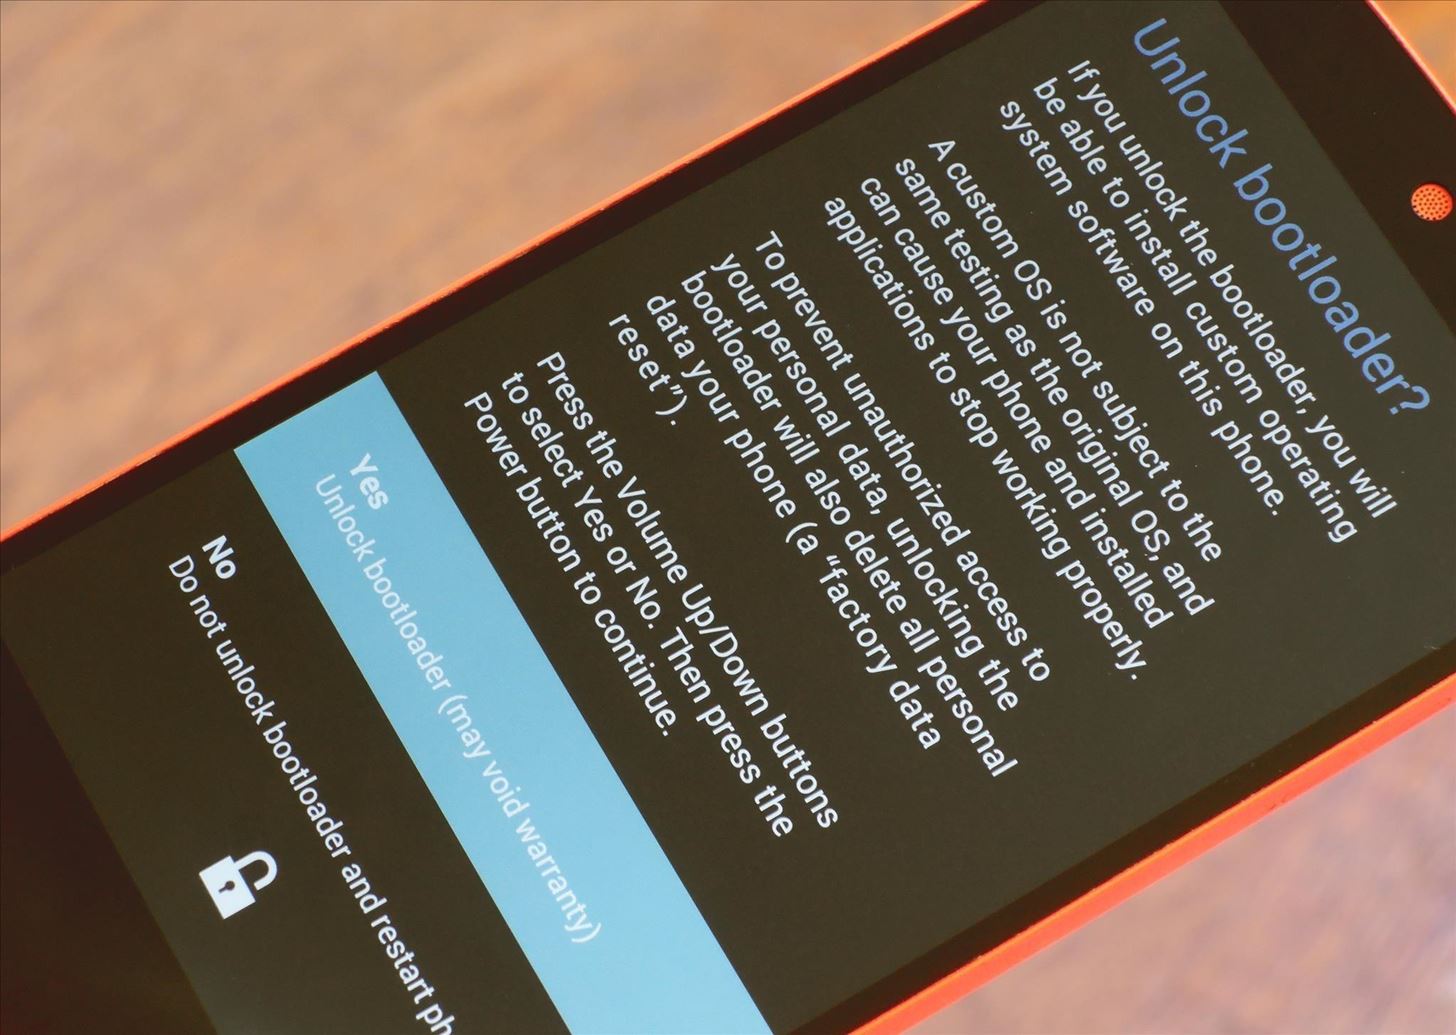
Once you've done that, your Nexus will boot into bootloader mode, which is a black screen with green and white text. To unlock your bootloader, enter the following command, and remember to add "./" to the beginning if you're using a Mac:
- fastboot oem unlock

At this point, you'll see a menu on your device asking if you'd like to unlock the bootloader. Press the volume up button once to highlight "Yes," then press the power button to confirm your choice. The process will take up to a few minutes, so wait until it's finished before proceeding to the next step.
Step 6: Install Android 6.0 Marshmallow
At this point, you're ready to install Android 6.0 Marshmallow. With the terminal window still open, enter the following command to install the factory images, remembering to add "./" to the beginning if you're using a Mac:
- flash-all
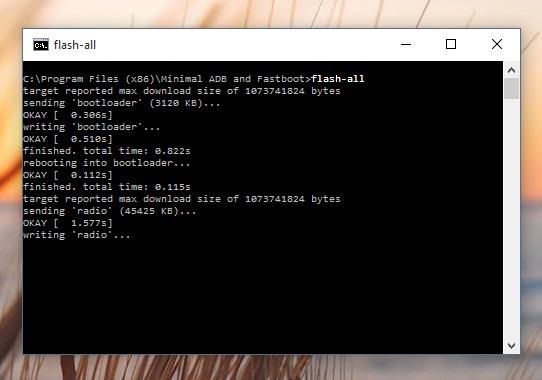
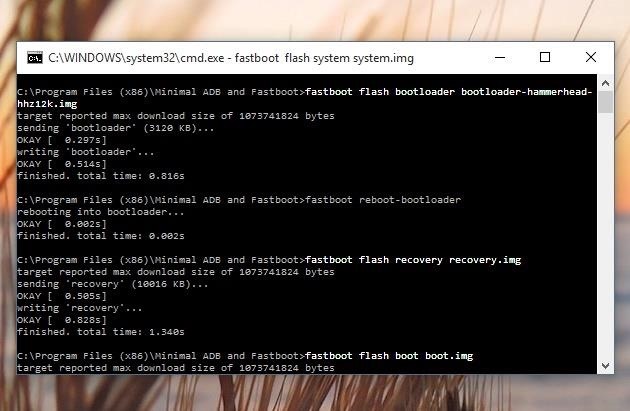
This should automatically flash all of the factory images onto your Nexus device, and the process should take 5 to 10 minutes. If you experience any issues with the flash-all script or a "missing boot.img" error, you may have to flash the individual factory images manually. To do that, extract the last remaining ZIP archive from the initial factory image file and make sure its contents are all stored in the platform-tools folder.
When you're done there, enter the following commands, remembering to add "./" to the beginning if you're using a Mac, and substituting the text inside of the brackets with the name of the actual file:
- fastboot flash bootloader [bootloader file name].img
- fastboot reboot-bootloader
- fastboot flash recovery [recovery file name].img
- fastboot flash boot [boot file name].img
- fastboot flash radio [radio file name].img
- fastboot flash cache [cache file name].img
- fastboot flash userdata [userdata file name].img
- fastboot flash system [system file name].img
- fastboot reboot
At this point, your Nexus device should automatically reboot into Android 6.0 Marshmallow. The first boot will take longer than normal, but if it hangs up on the boot animation for more than 5 minutes, simply unplug the phone or tablet from your computer, then press and hold the device's power button to force a reboot.
What are your favorite new features of Android 6.0 Marshmallow? Are you ready to root it?Let us know in the comment section below, or drop us a line on Android Hacks' Facebook or Twitter, or Gadget Hacks' Facebook, Google+, or Twitter.
Just updated your iPhone? You'll find new emoji, enhanced security, podcast transcripts, Apple Cash virtual numbers, and other useful features. There are even new additions hidden within Safari. Find out what's new and changed on your iPhone with the iOS 17.4 update.


6 Comments
MagicJack is not working after upgradation of my Nexus5 phone to Android 6. Please look into the matter
I'd say to try clearing data on the Magic Jack app by dragging the icon out of your app drawer and dropping it on App Info. It could have something to do with Marshmallow's new permissions system, in which case Magic Jack might not have known to properly request access to the permissions it needs. But if that doesn't work, it may just be that the Magic Jack developers need to update their app for Marshmallow compatibility, which happens a lot right after big OS updates.
I am on lolllipop currently. rooted with xposed and twrp and few tweaks such as volume increased.. should i go ahead with aforementioned steps or should i first unroot, factory reset, or anything like that?
Since you're rooted with a modified system partition, the over-the-air update will refuse to install on your device, so you'll have to update manually unless you want to stay on Lollipop. Your tweaks will be overwritten by manually updating, and root access will be removed, but there's really nothing you can do to avoid this. Depending on how you do it, though, TWRP can be preserved.
So let's say you want to keep TWRP and re-root after you update. I'd say to do it this way:
Run through all of these steps, but you can skip Step 5 since you've already unlocked your bootloader. When you get to Step 6, skip the "flash-all" command and just do the individual images manually. But since you already have TWRP recovery, don't send the "fastboot flash recovery recovery.img" command, which would overwrite TWRP with the stock recovery image from Marshmallow. I'd also skip flashing the cache and userdata images, since those would only overwrite your existing data with blank partitions. Basically, just flash bootloader, boot, radio, and system, then you'll have all of the essential elements of Marshmallow without losing TWRP or all of your data. I wrote a more detailed article about how to do pretty much exactly what I'm talking about here, and while it was made for the Nexus 6, the steps would be almost identical for any Nexus (save for the download links and the bit about keeping encryption disabled with a modified boot image). You can check that out here if you want to.
Once you've done that, flash a root-enabled kernel with TWRP, then flash the SuperSU ZIP to get root access back. I've outlined that whole process here.
As of right now, though, Xposed hasn't been updated for Marshmallow, and most existing flashable ZIPs won't work with Android 6.0 either. But since you'll be rooted with TWRP still installed if you do it this way, it would be easy to get those things back once they're updated for Marshmallow compatibility.
Hey, I am using 5.1.1(LMY48B) on my rooted Nexus 5 with TWRP as recovery. I didn't installed any custom ROM till now , I have only use XPOSED Module (Gravity Box etc). I am getting notification for 5.1.1 (10.1Mb) update, but unable to install as I have tweaked on system and recovery. Could U please tell me how can I proceed to install Marshmallow on my Nexus 5 (5.1.1).
Thanks
The commenter above (Rahul Kumar) was in the same boat as you, so I typed out a lengthy response detailing the whole process. It's the response directly above yours. The process I outlined there would be your best bet, I think.
Share Your Thoughts